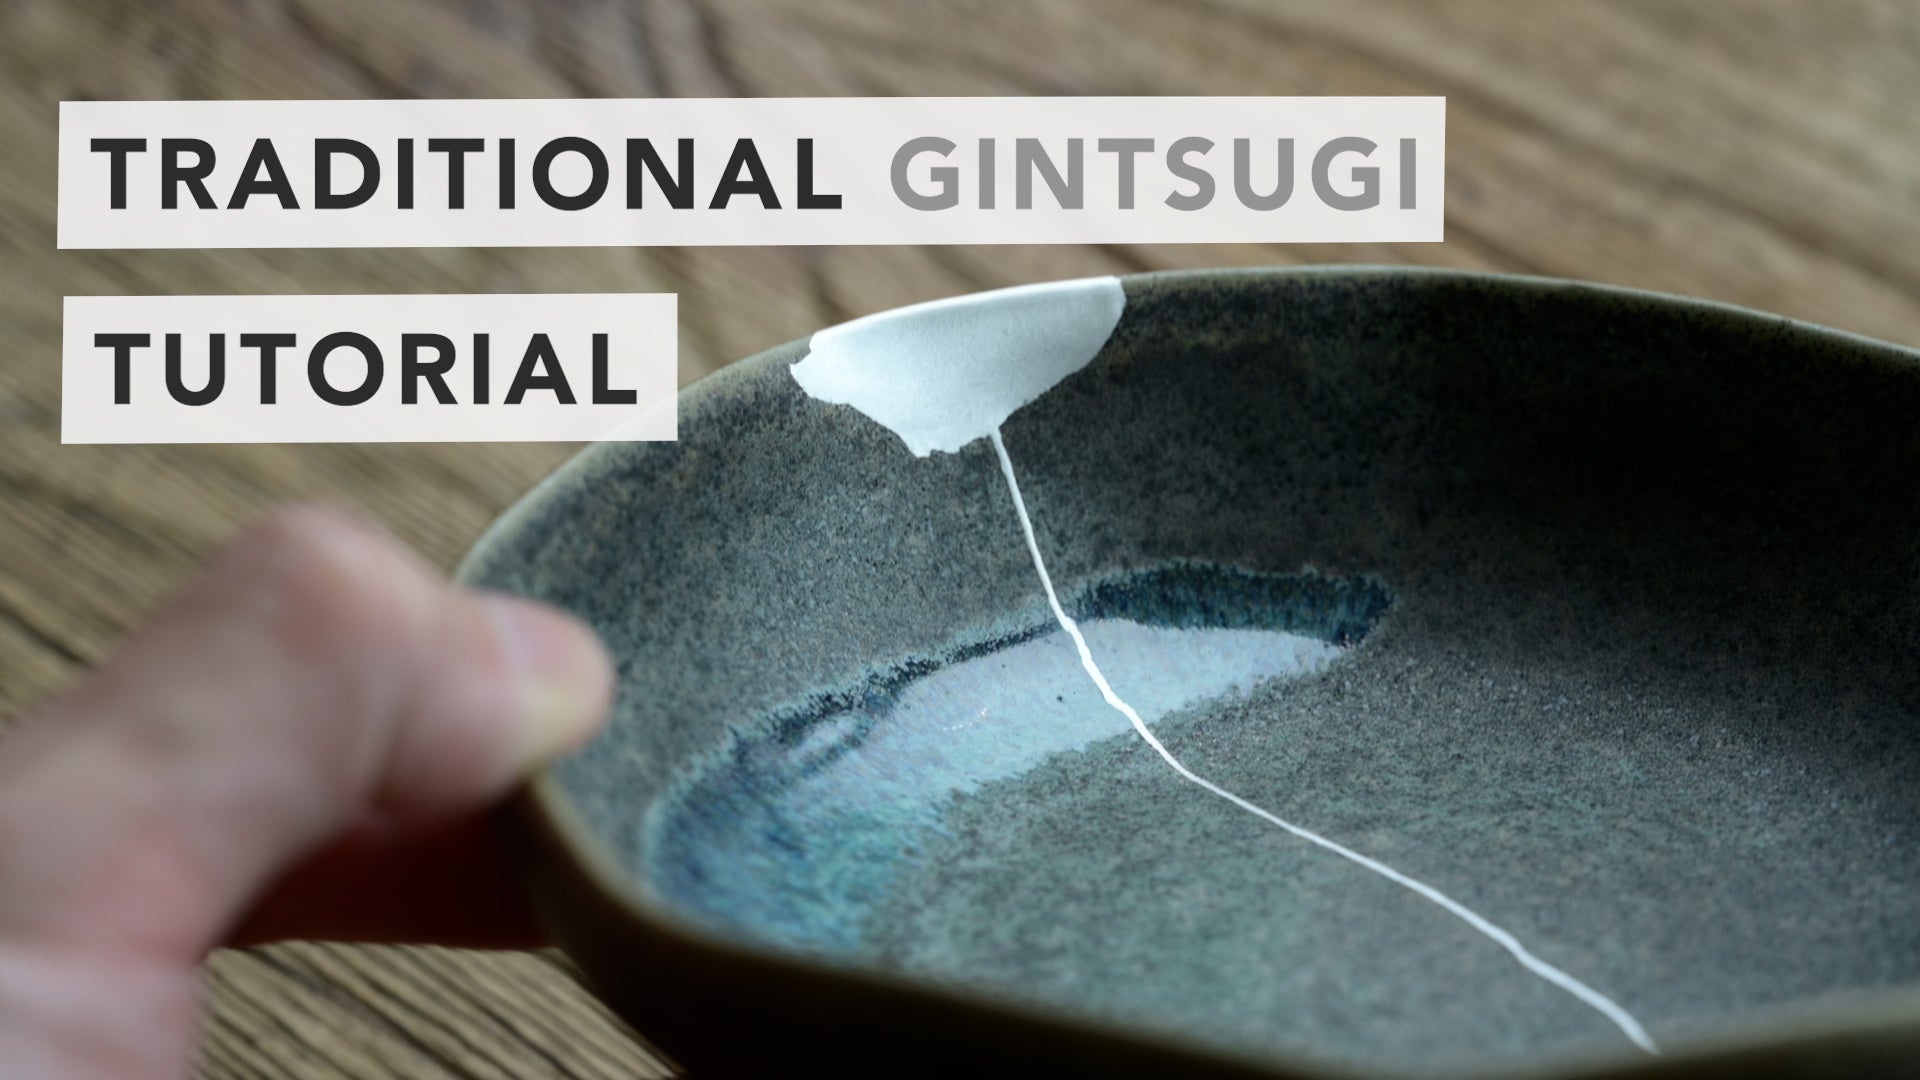
Lesson 05: Gintsugi(Silver Repair)
*Wear gloves during the entire process, as urushi can cause severe rash.
*We assume no responsibility for any health hazards.
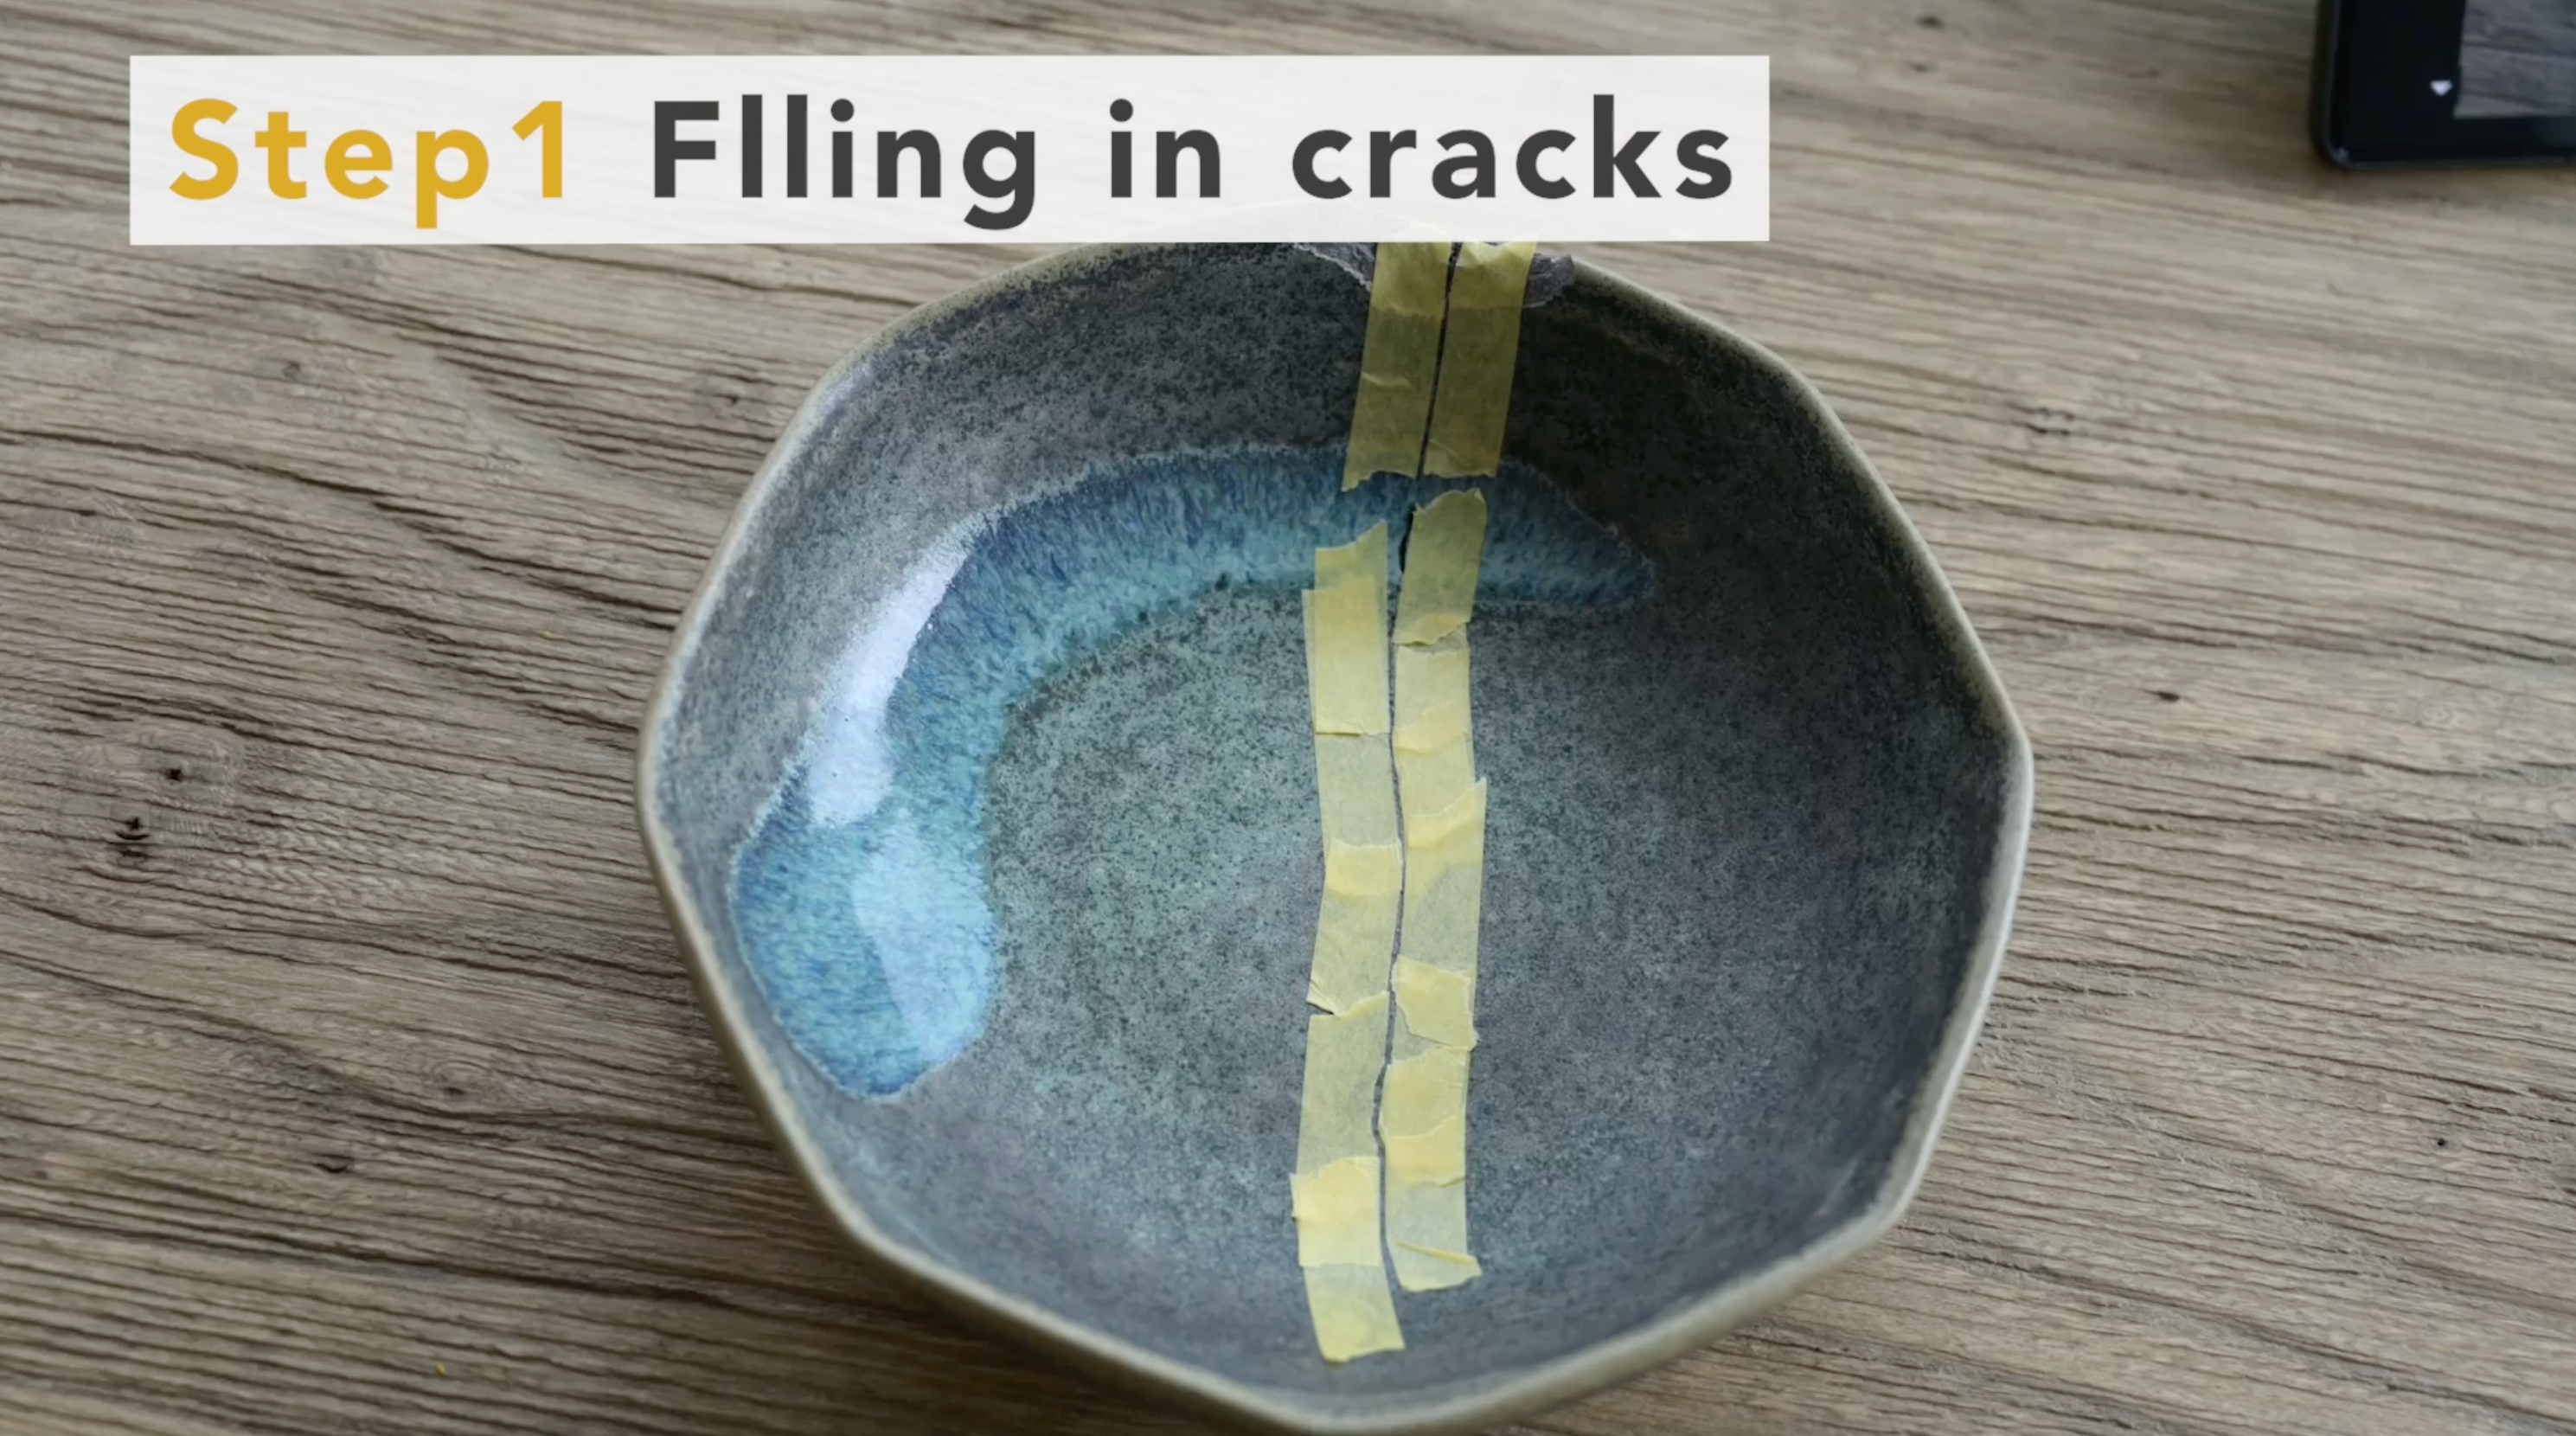
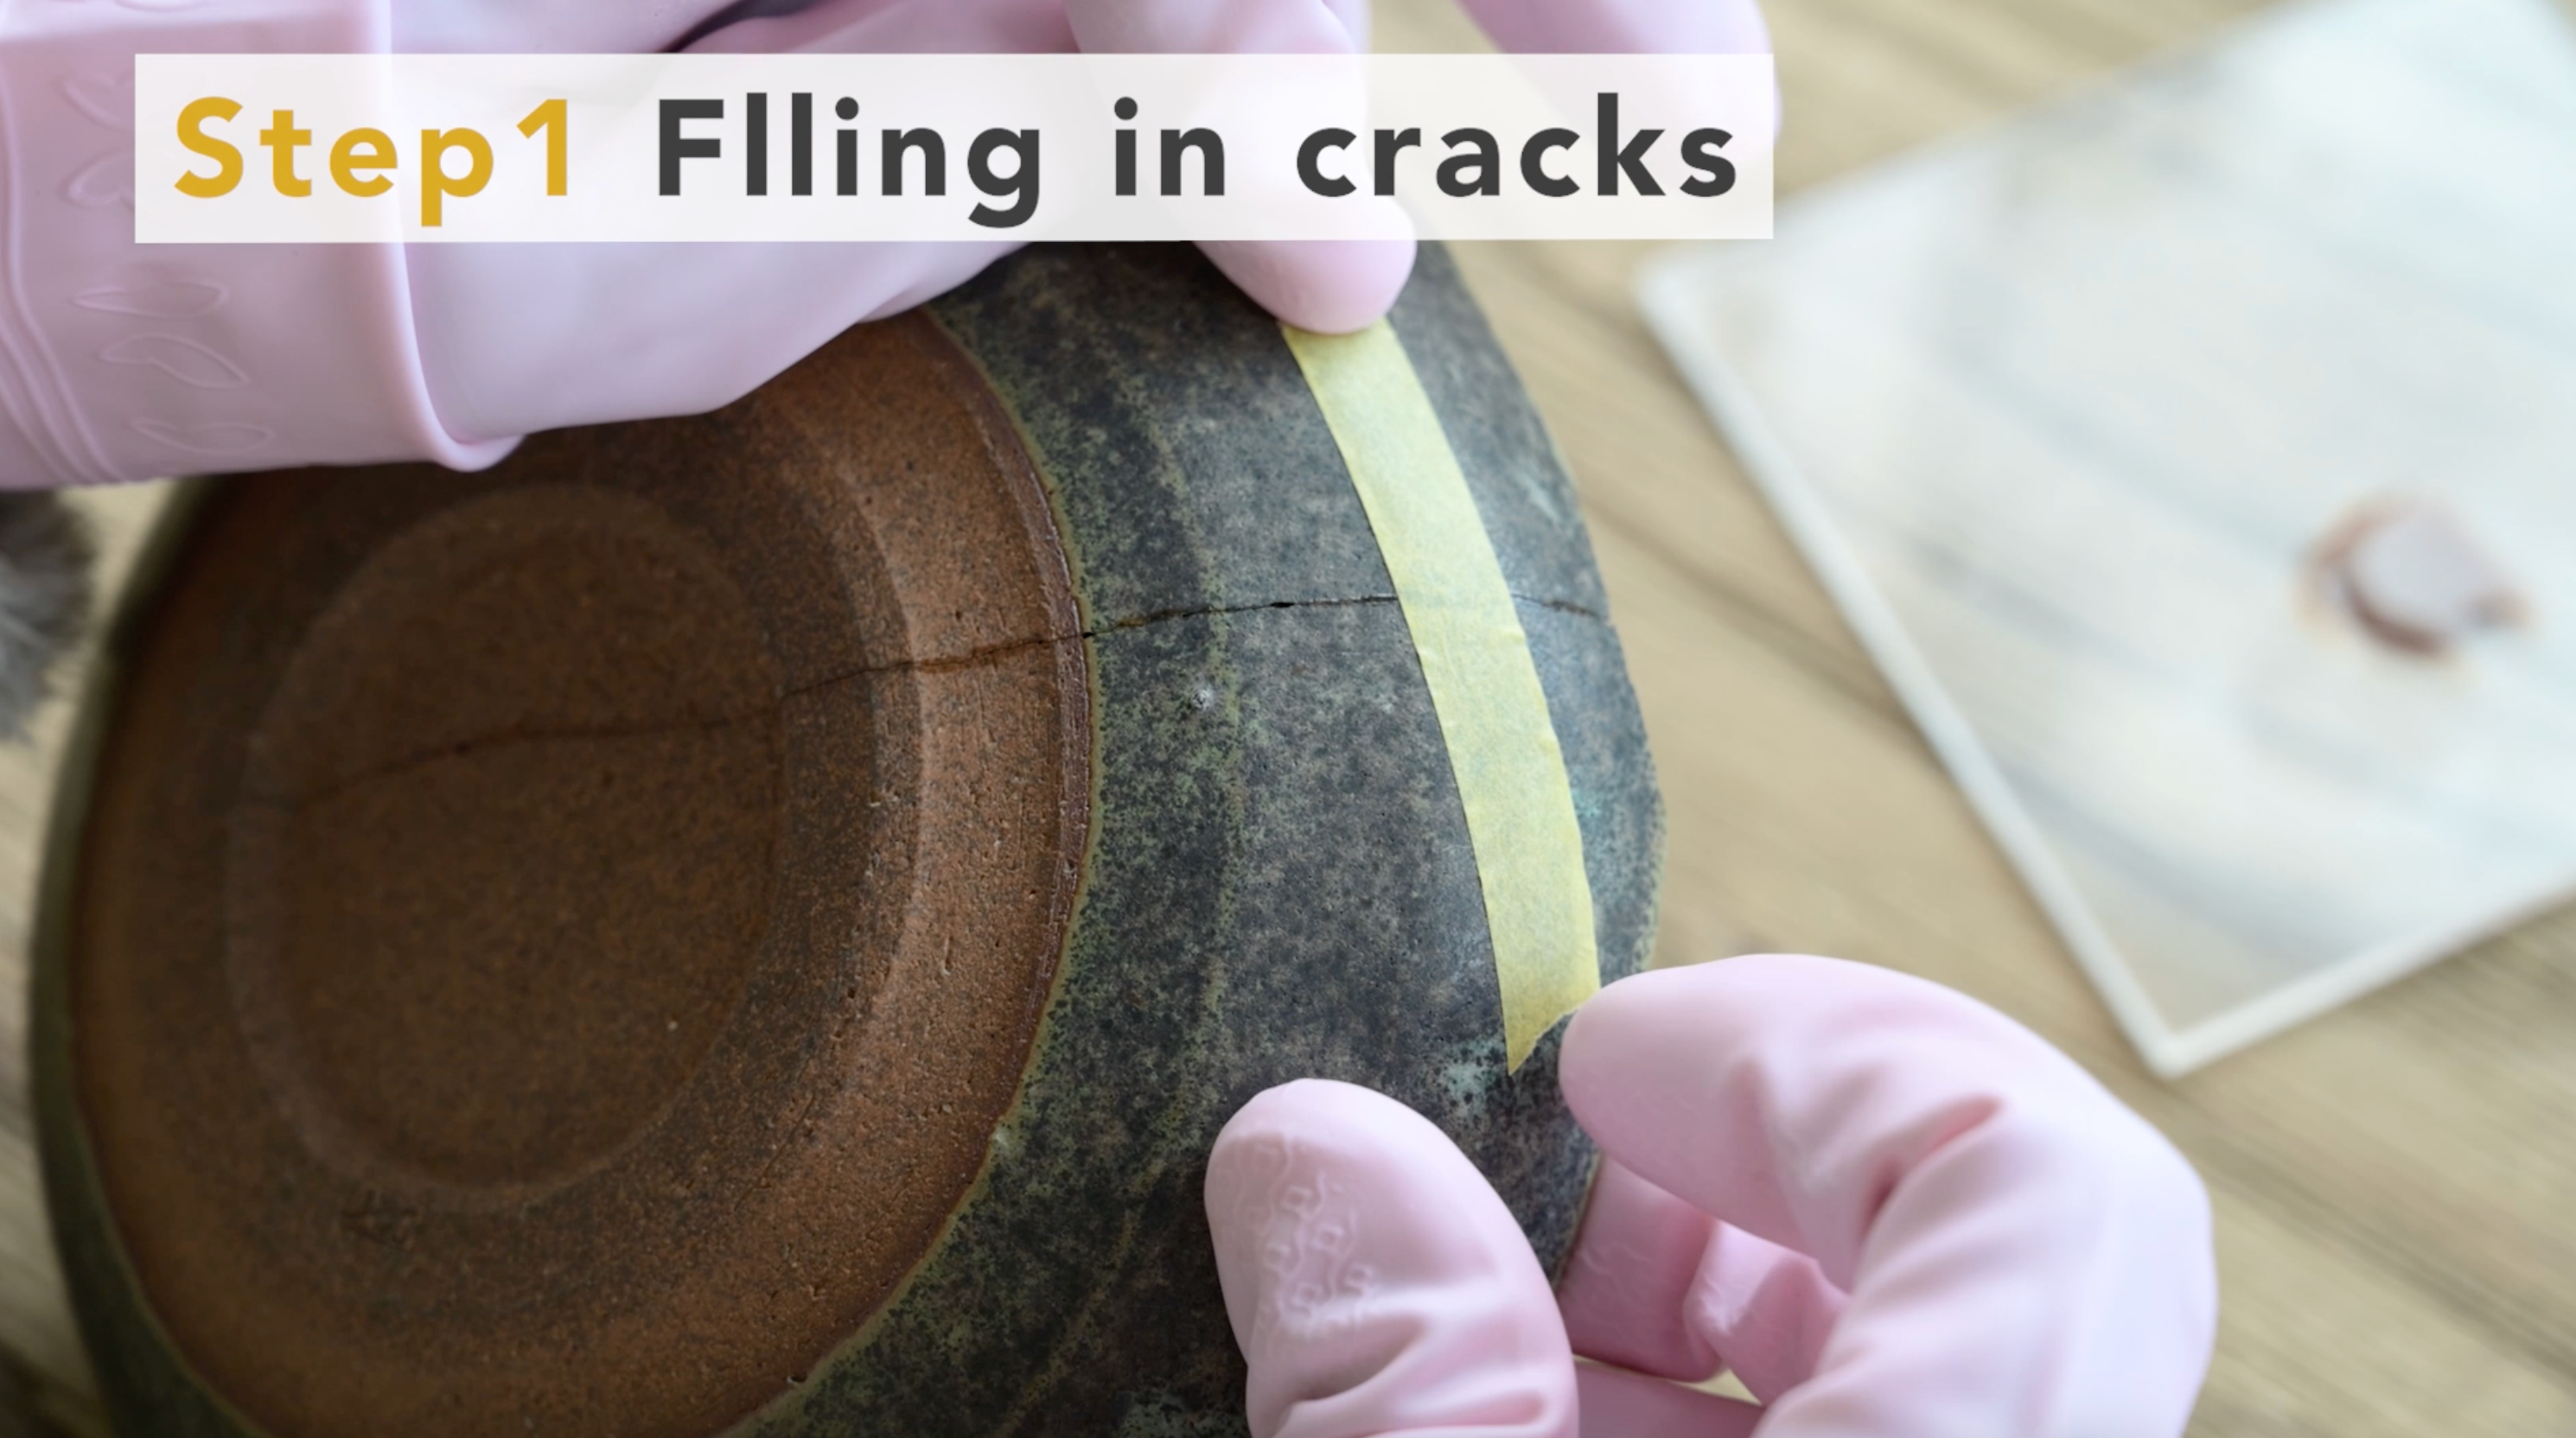
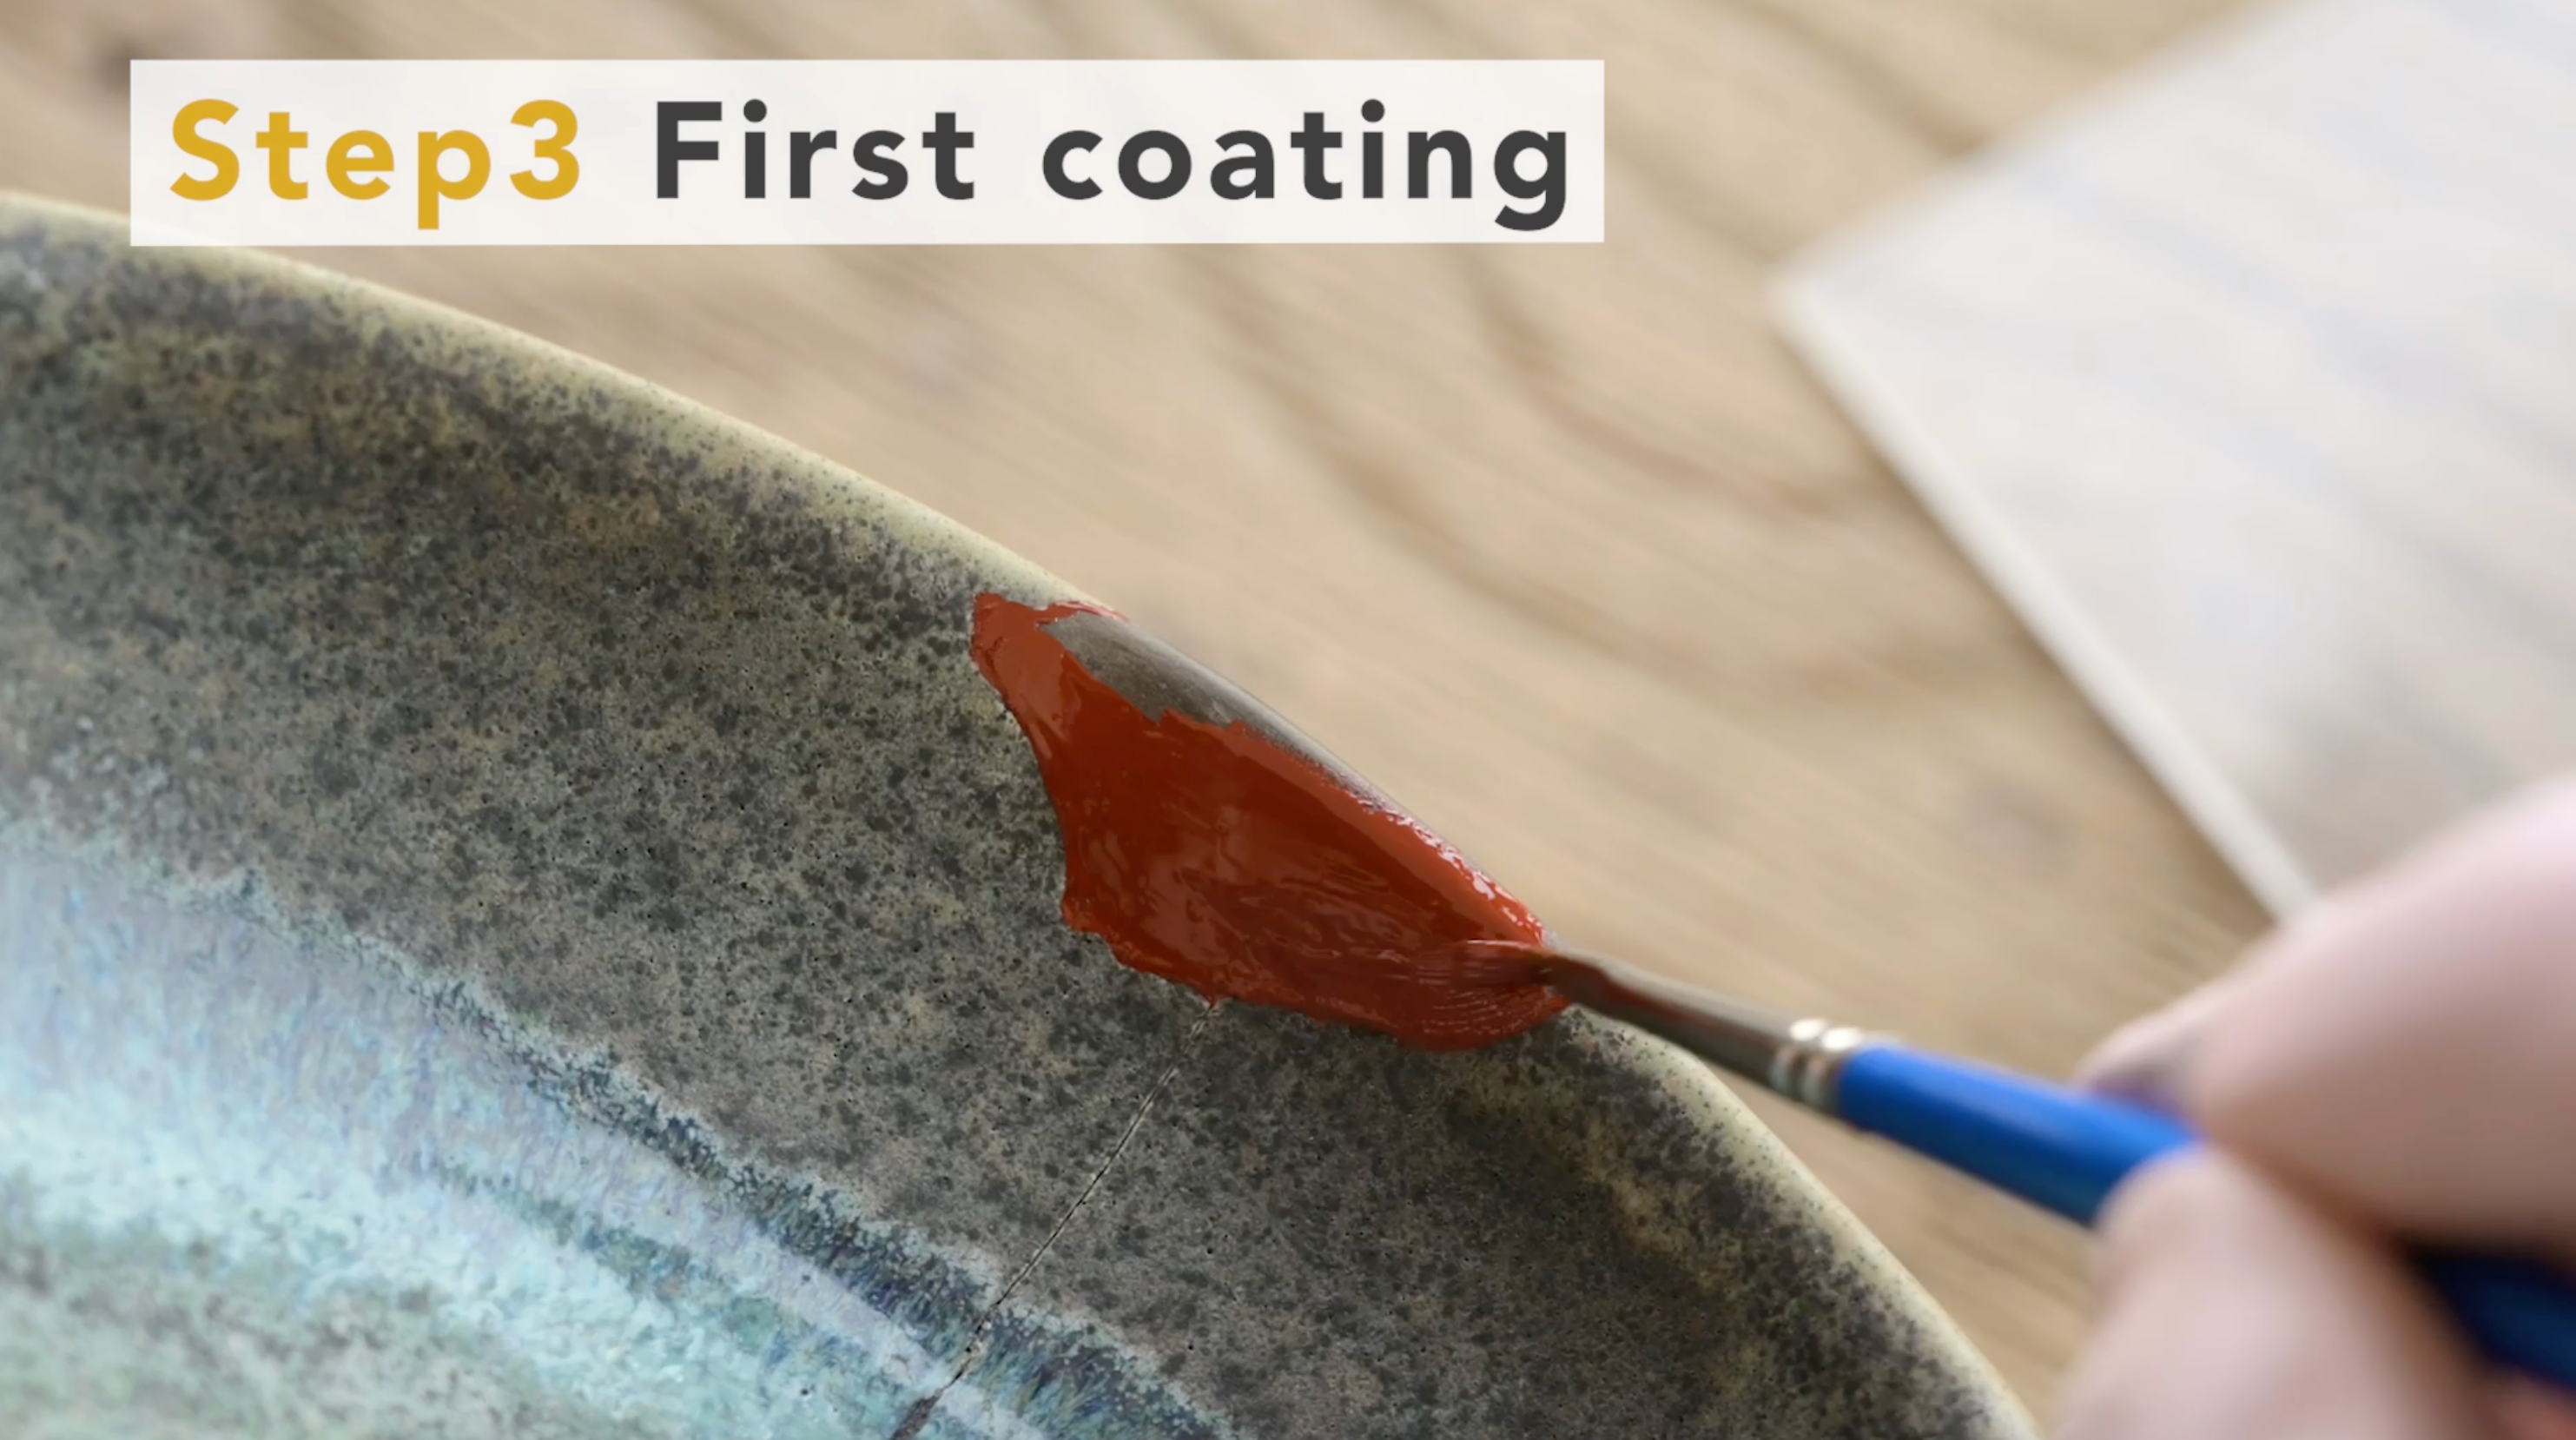
1. Pouring raw urushi into cracks
A cracked pottery is repaired by pouring raw urushi into the cracks.
However, this bowl is not well glazed and may not be able to remove urushi stains.
It is necessary to work carefully to avoid staining it throughout the entire process.
So, first apply masking tape around the crack.
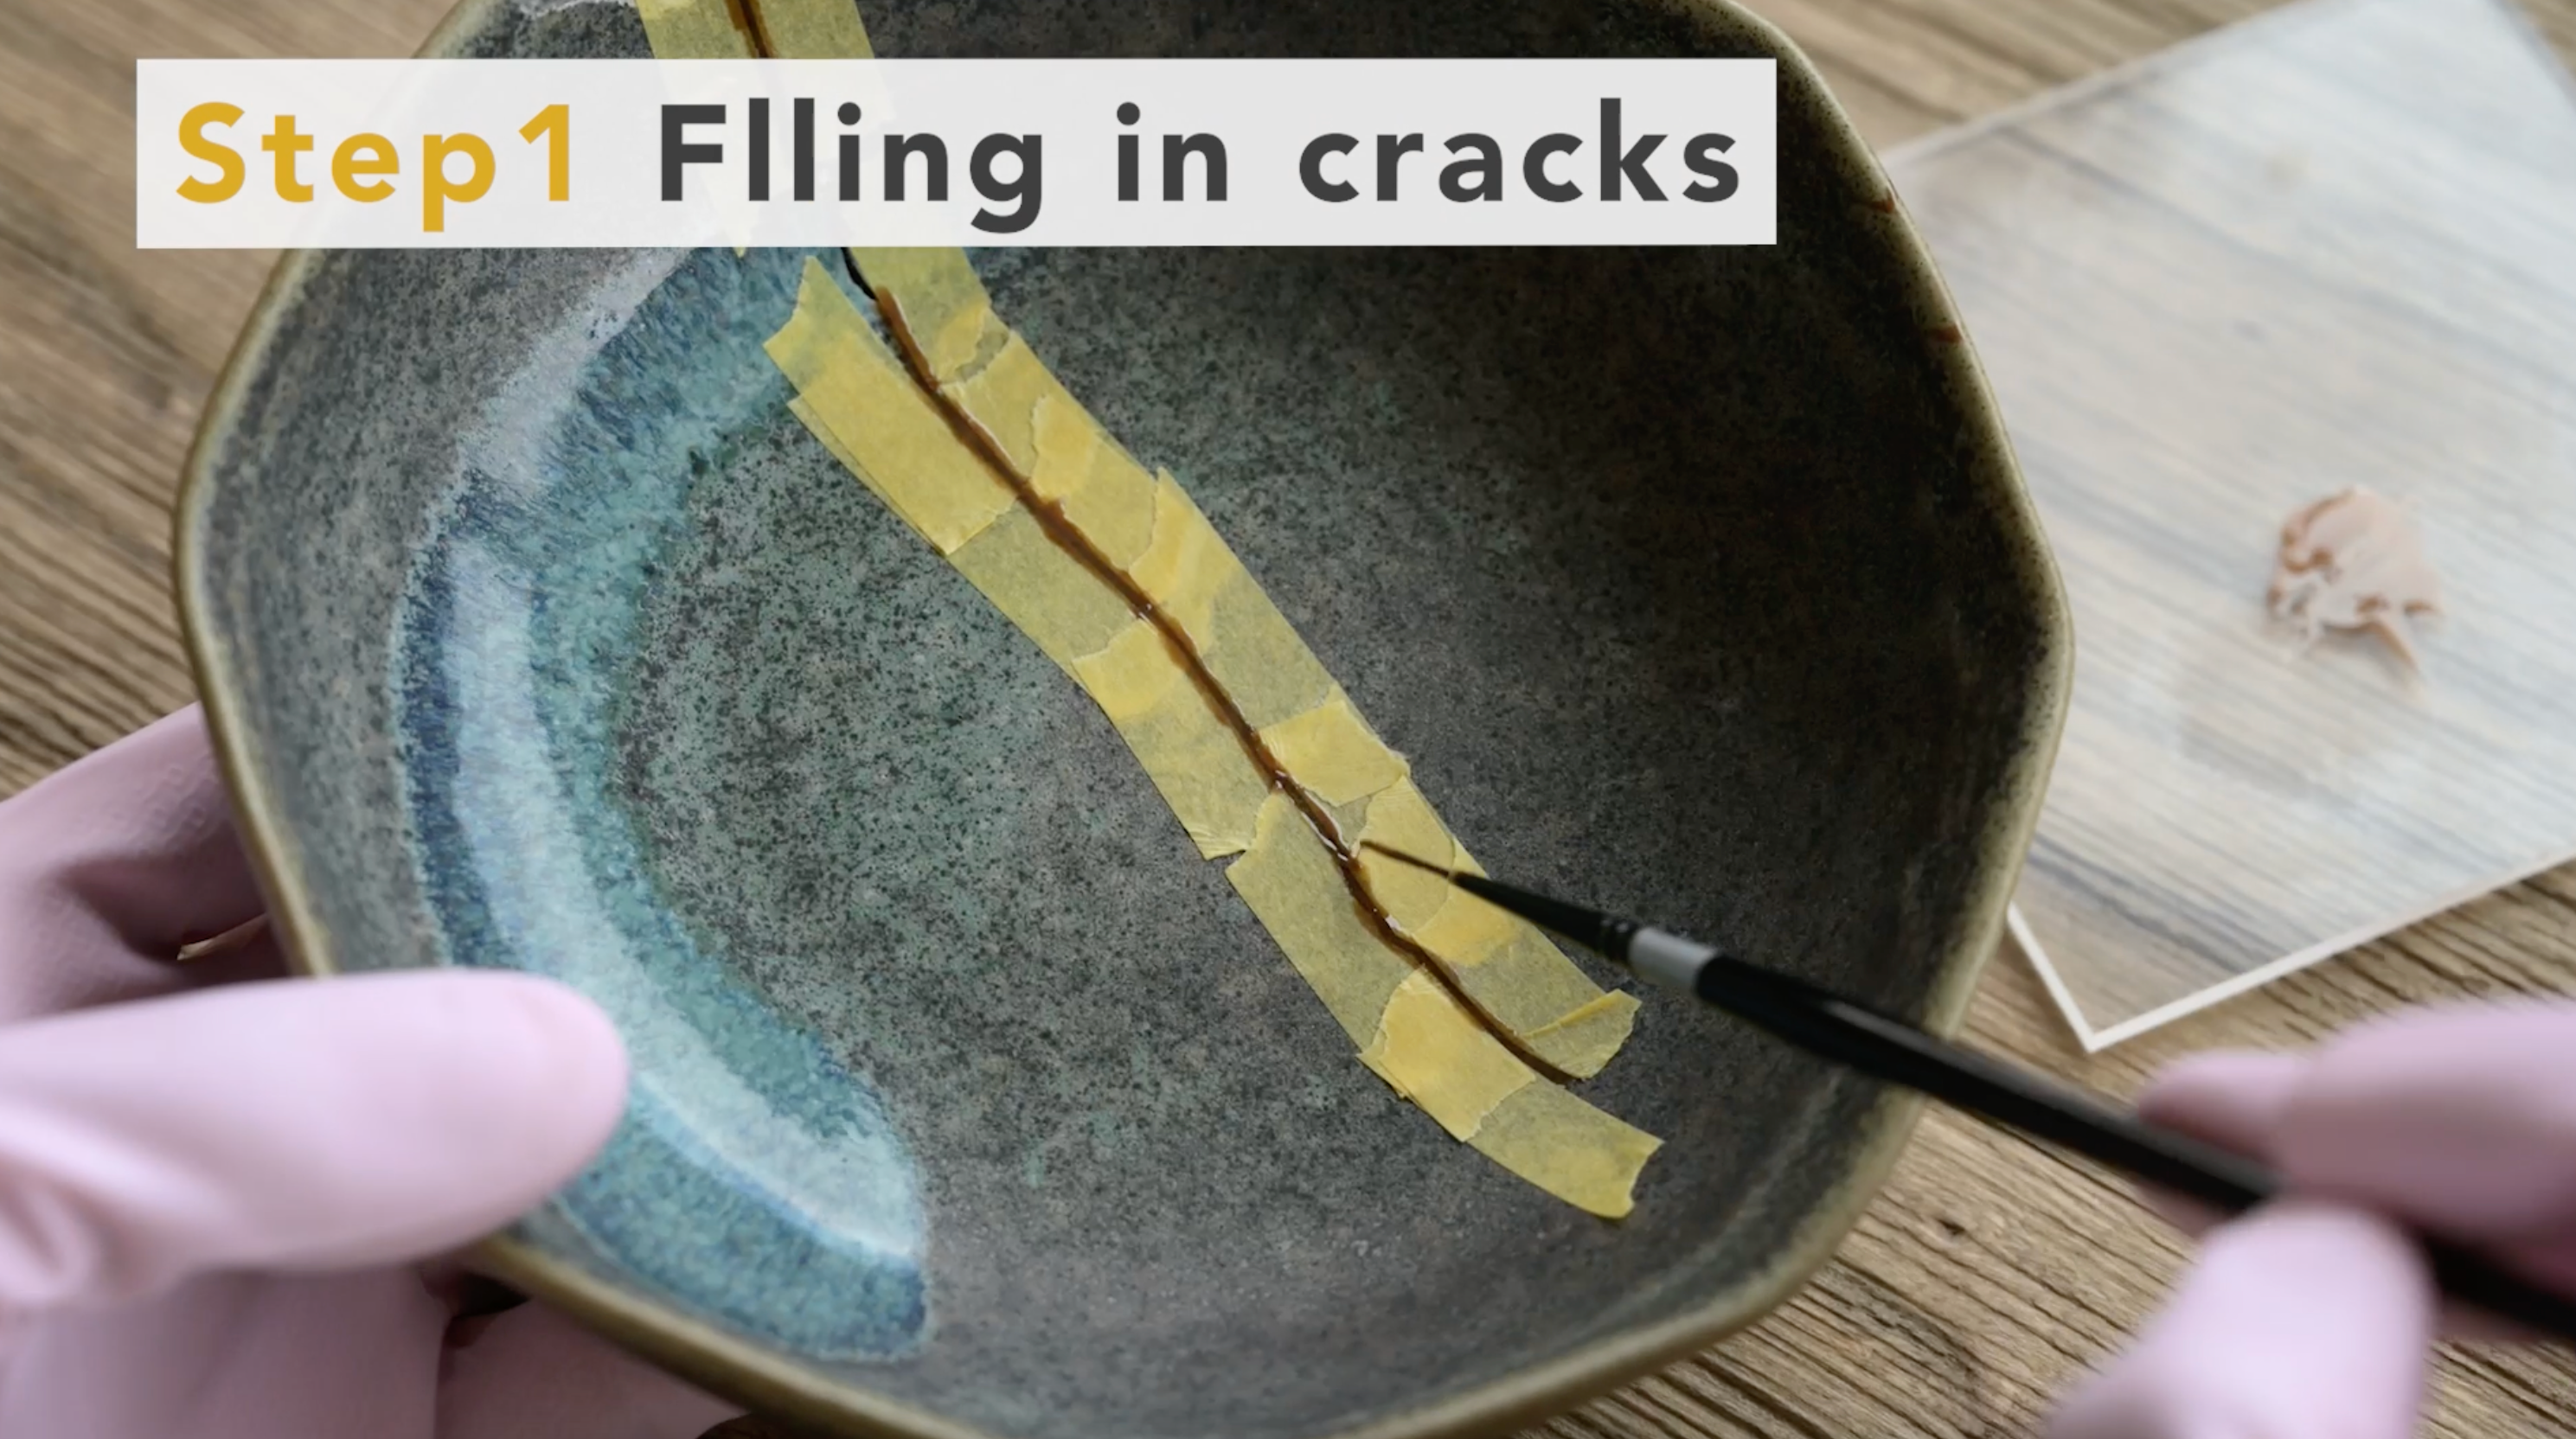
Then, apply raw urushi to the gaps in the tape.
*Wipe the brush tip thoroughly with ethanol first before use.
※Thin glazed ceramics should be protected with masking tapes or use black urushi to fill in as in the Lesson 04.
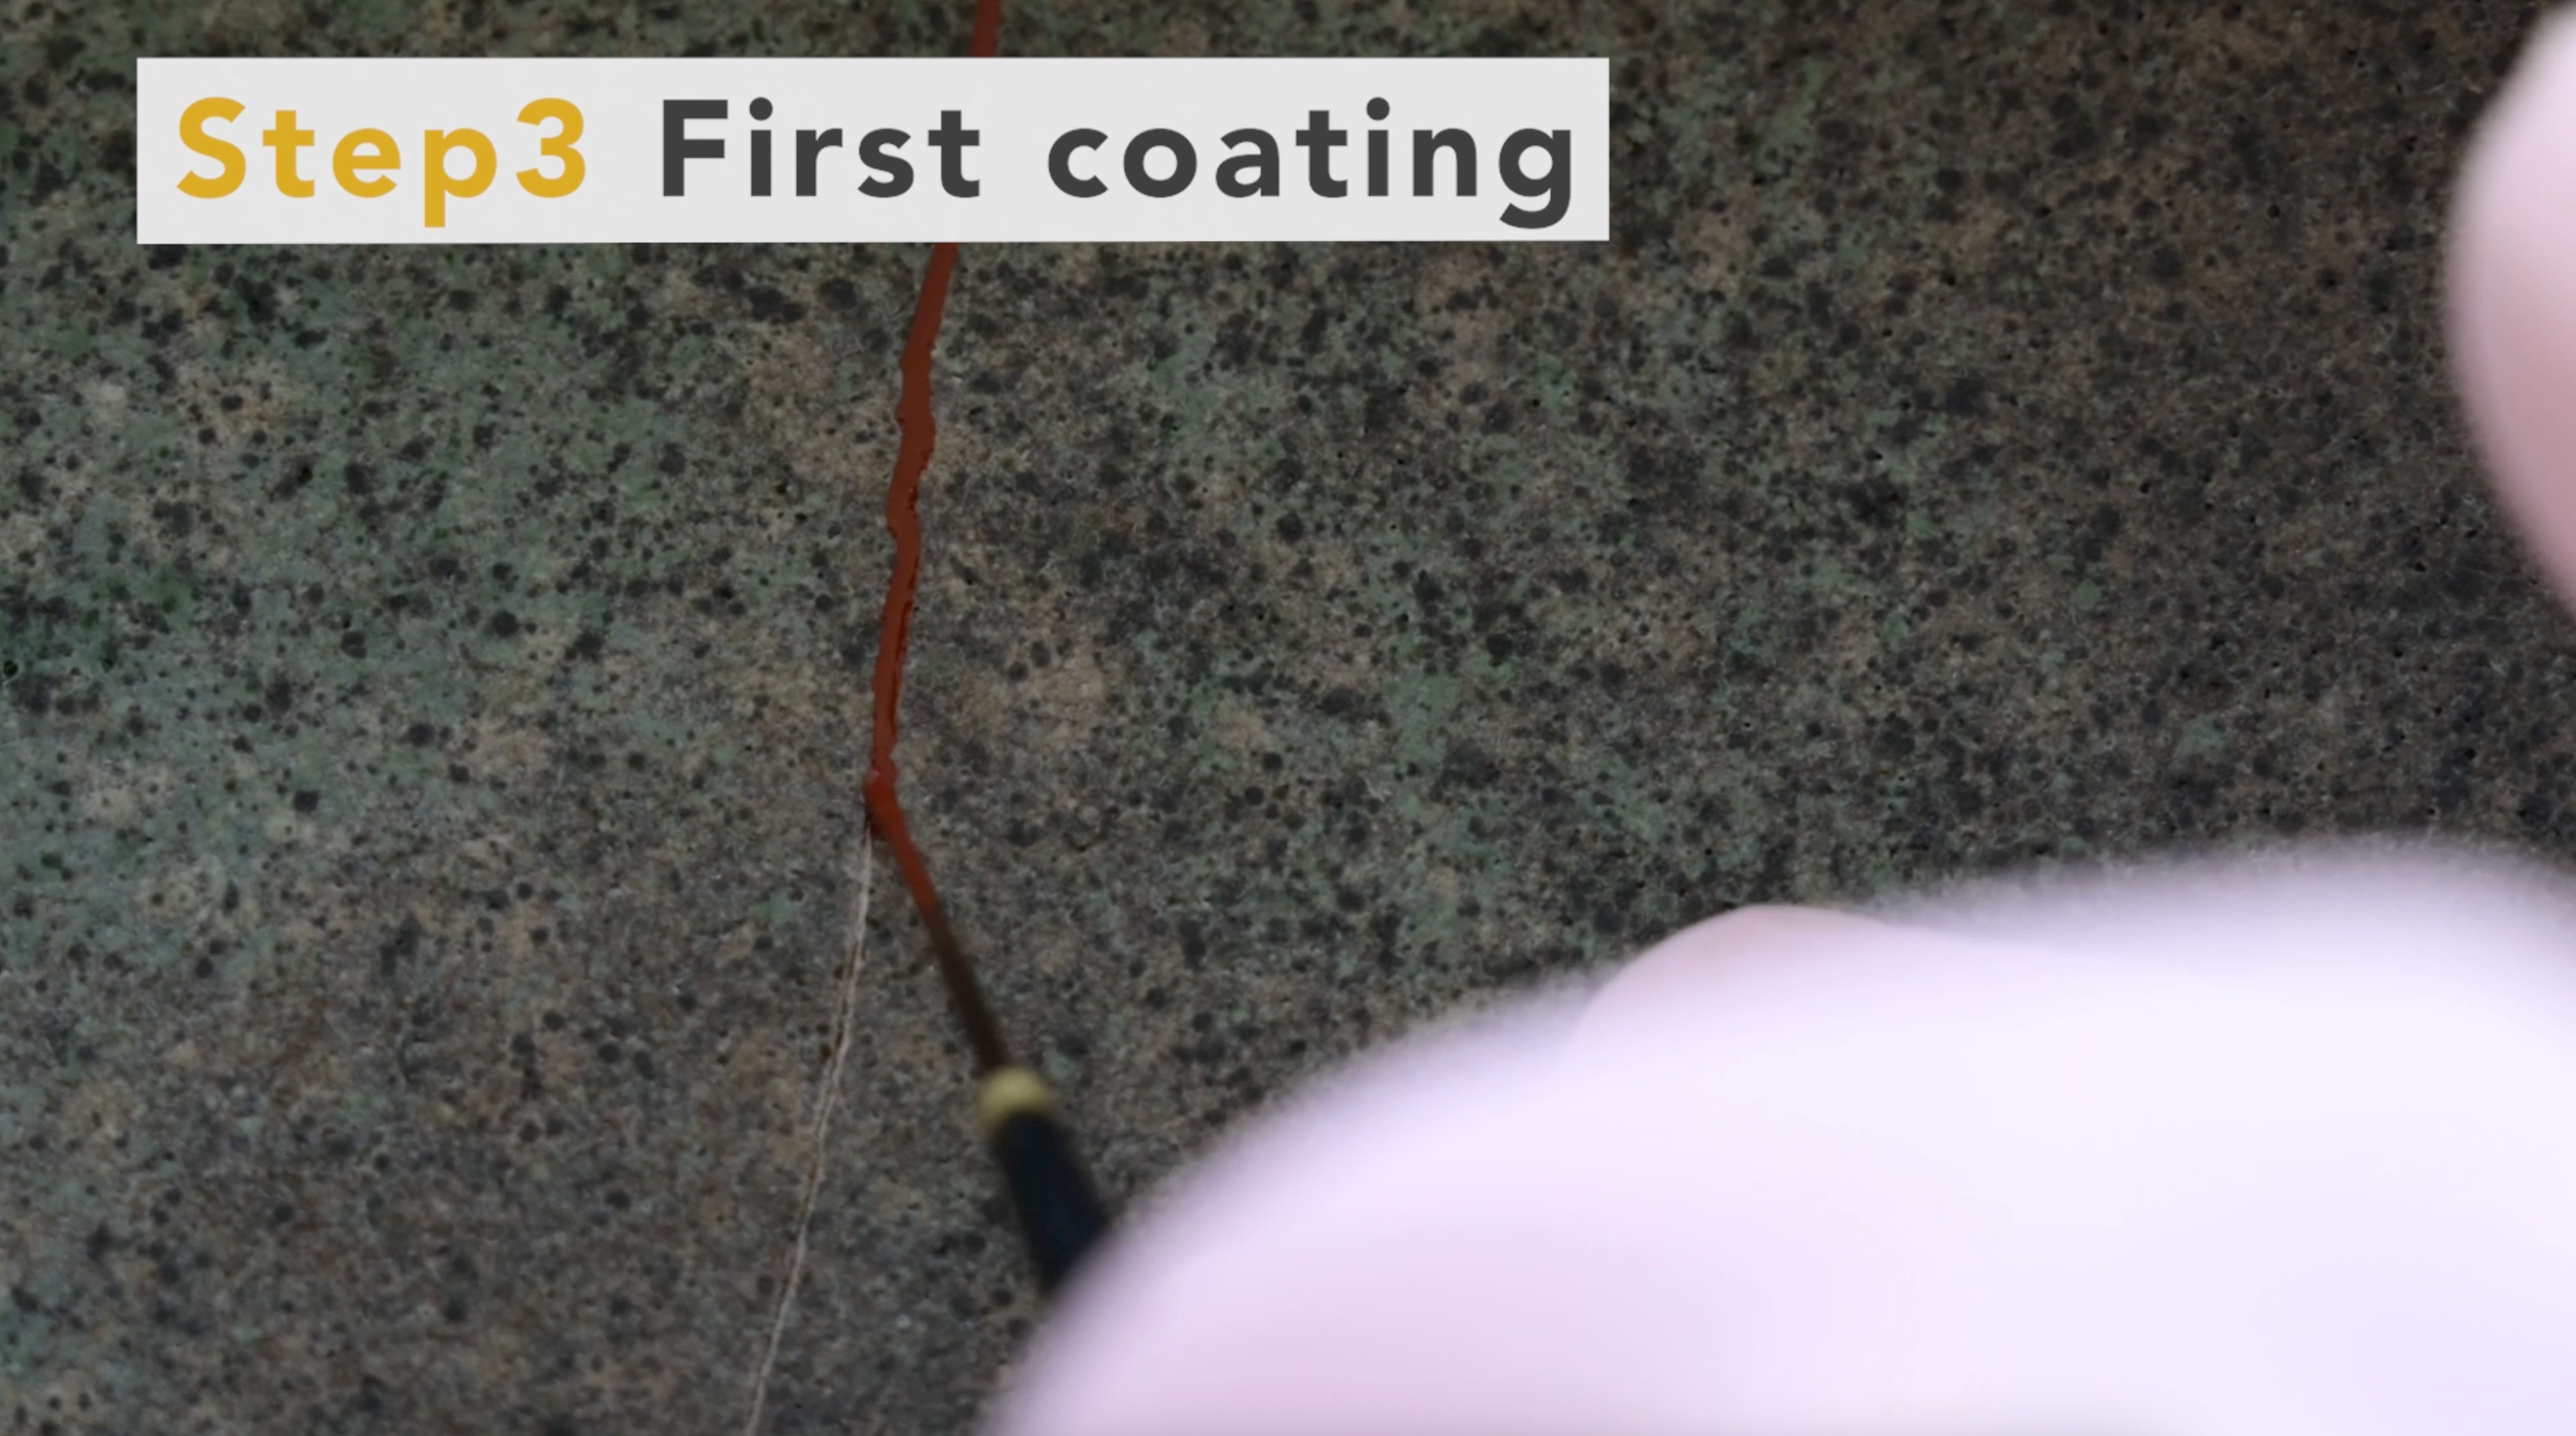
Areas with deep cracks will quickly soak up the raw urushi, so place additional raw urushi on those areas.
Place raw urushi on only one side of the pottery and see how it goes.
By doing so, you will be able to see how far the urushi has soaked into the cracks.
Wait a few minutes and the urushi will gradually seep out.
There is no glaze here, so if left as it is, urushi might spread and cause staining.
So, wipe it down with alcohol now.
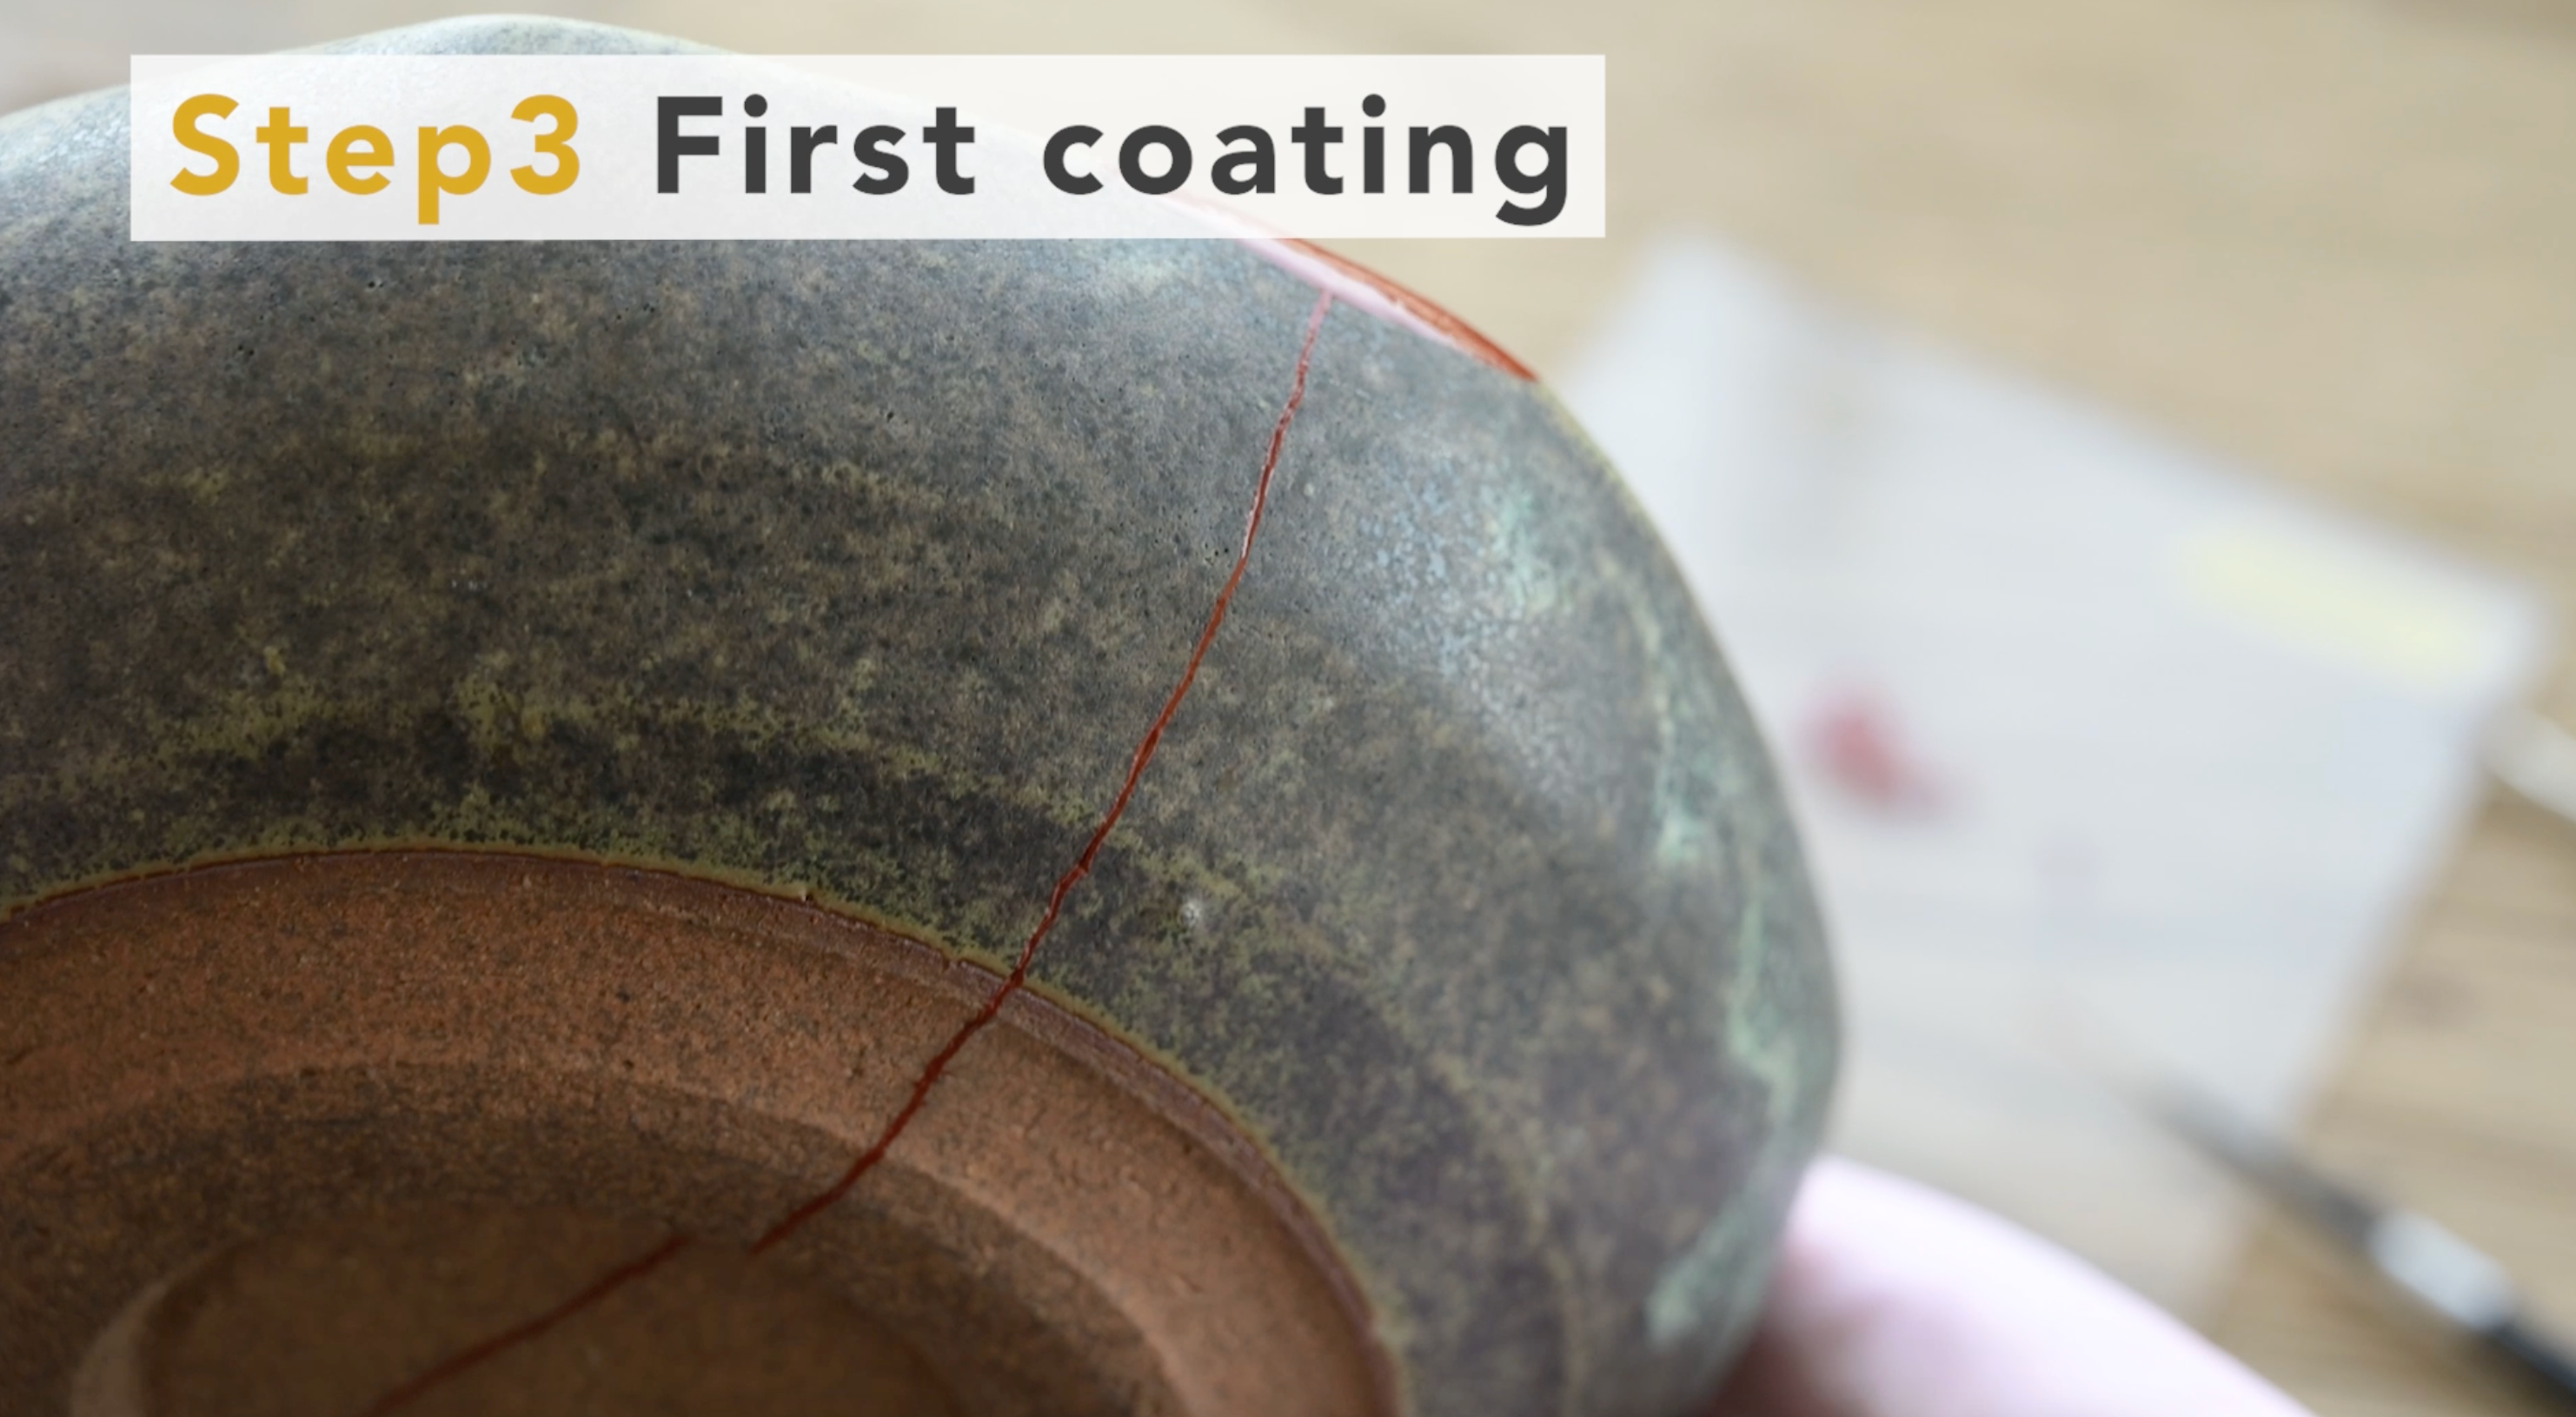
White, thin glazed ceramics may leave stains with this method, so it is better to use black urushi instead of raw urushi.
Wipe off the rushi on the front side as well.
After wiping off urushi, remove the tape.
Deep cracks should be kept close together and taped.
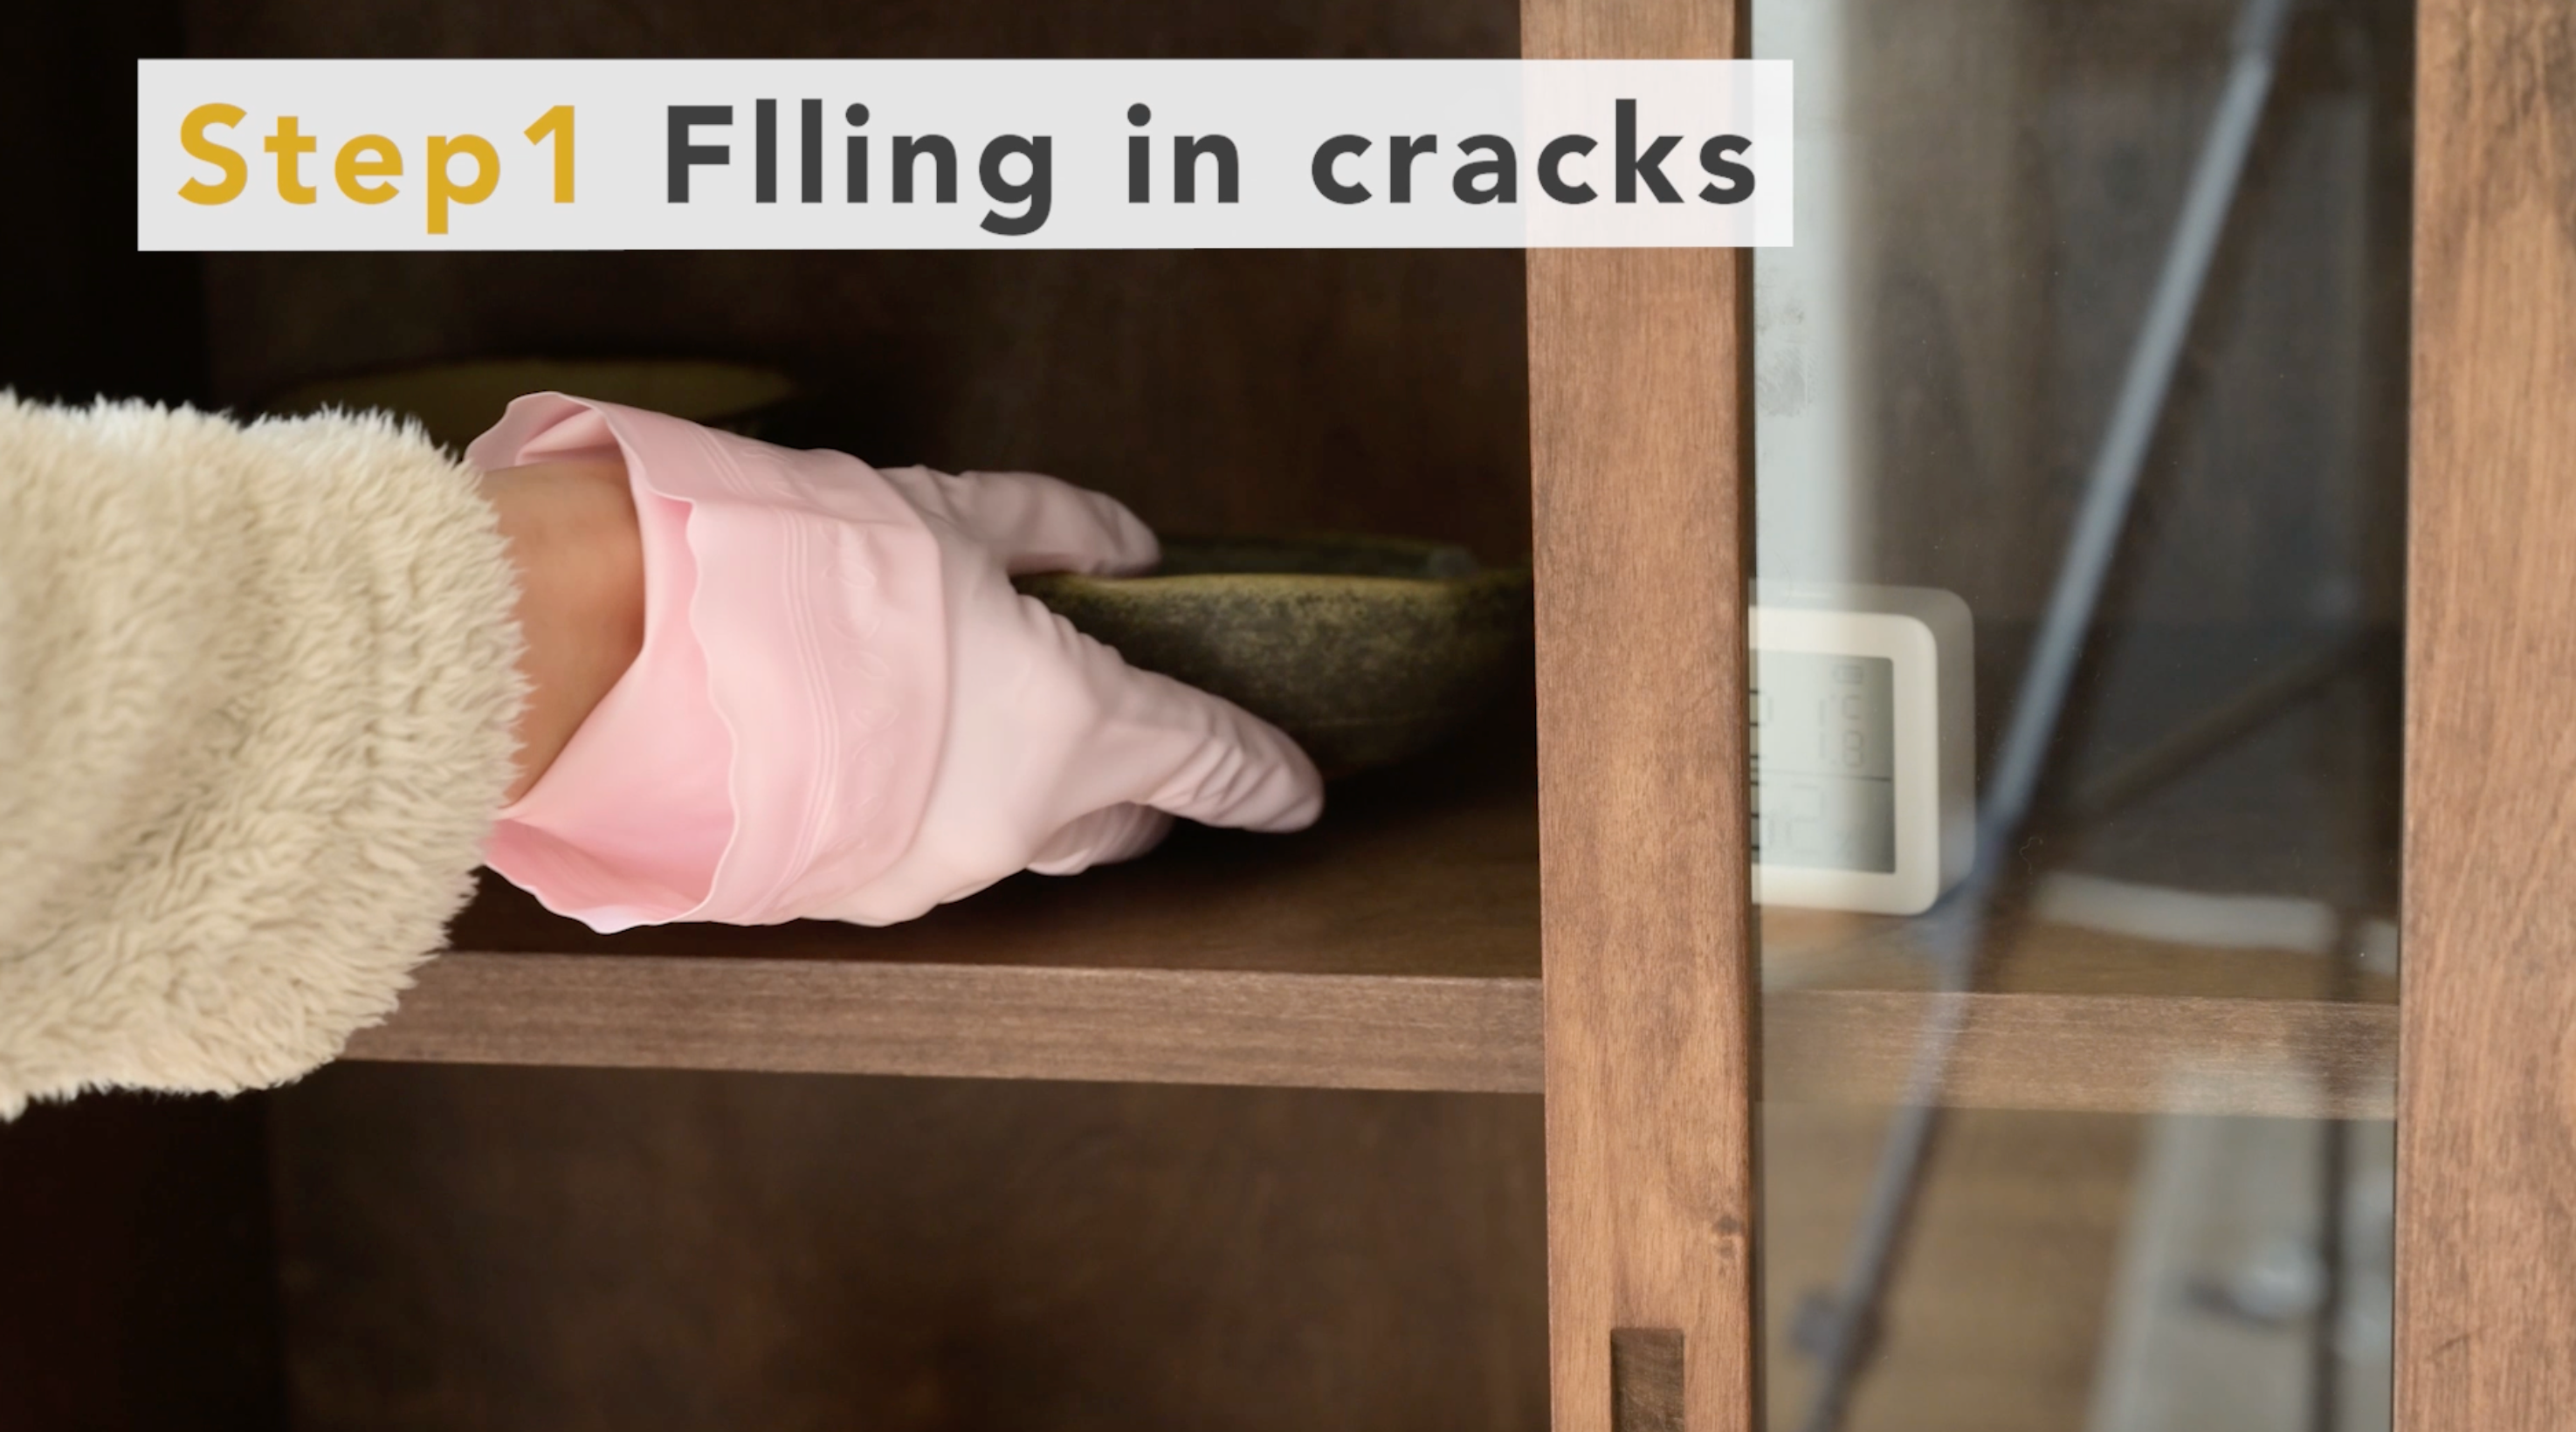
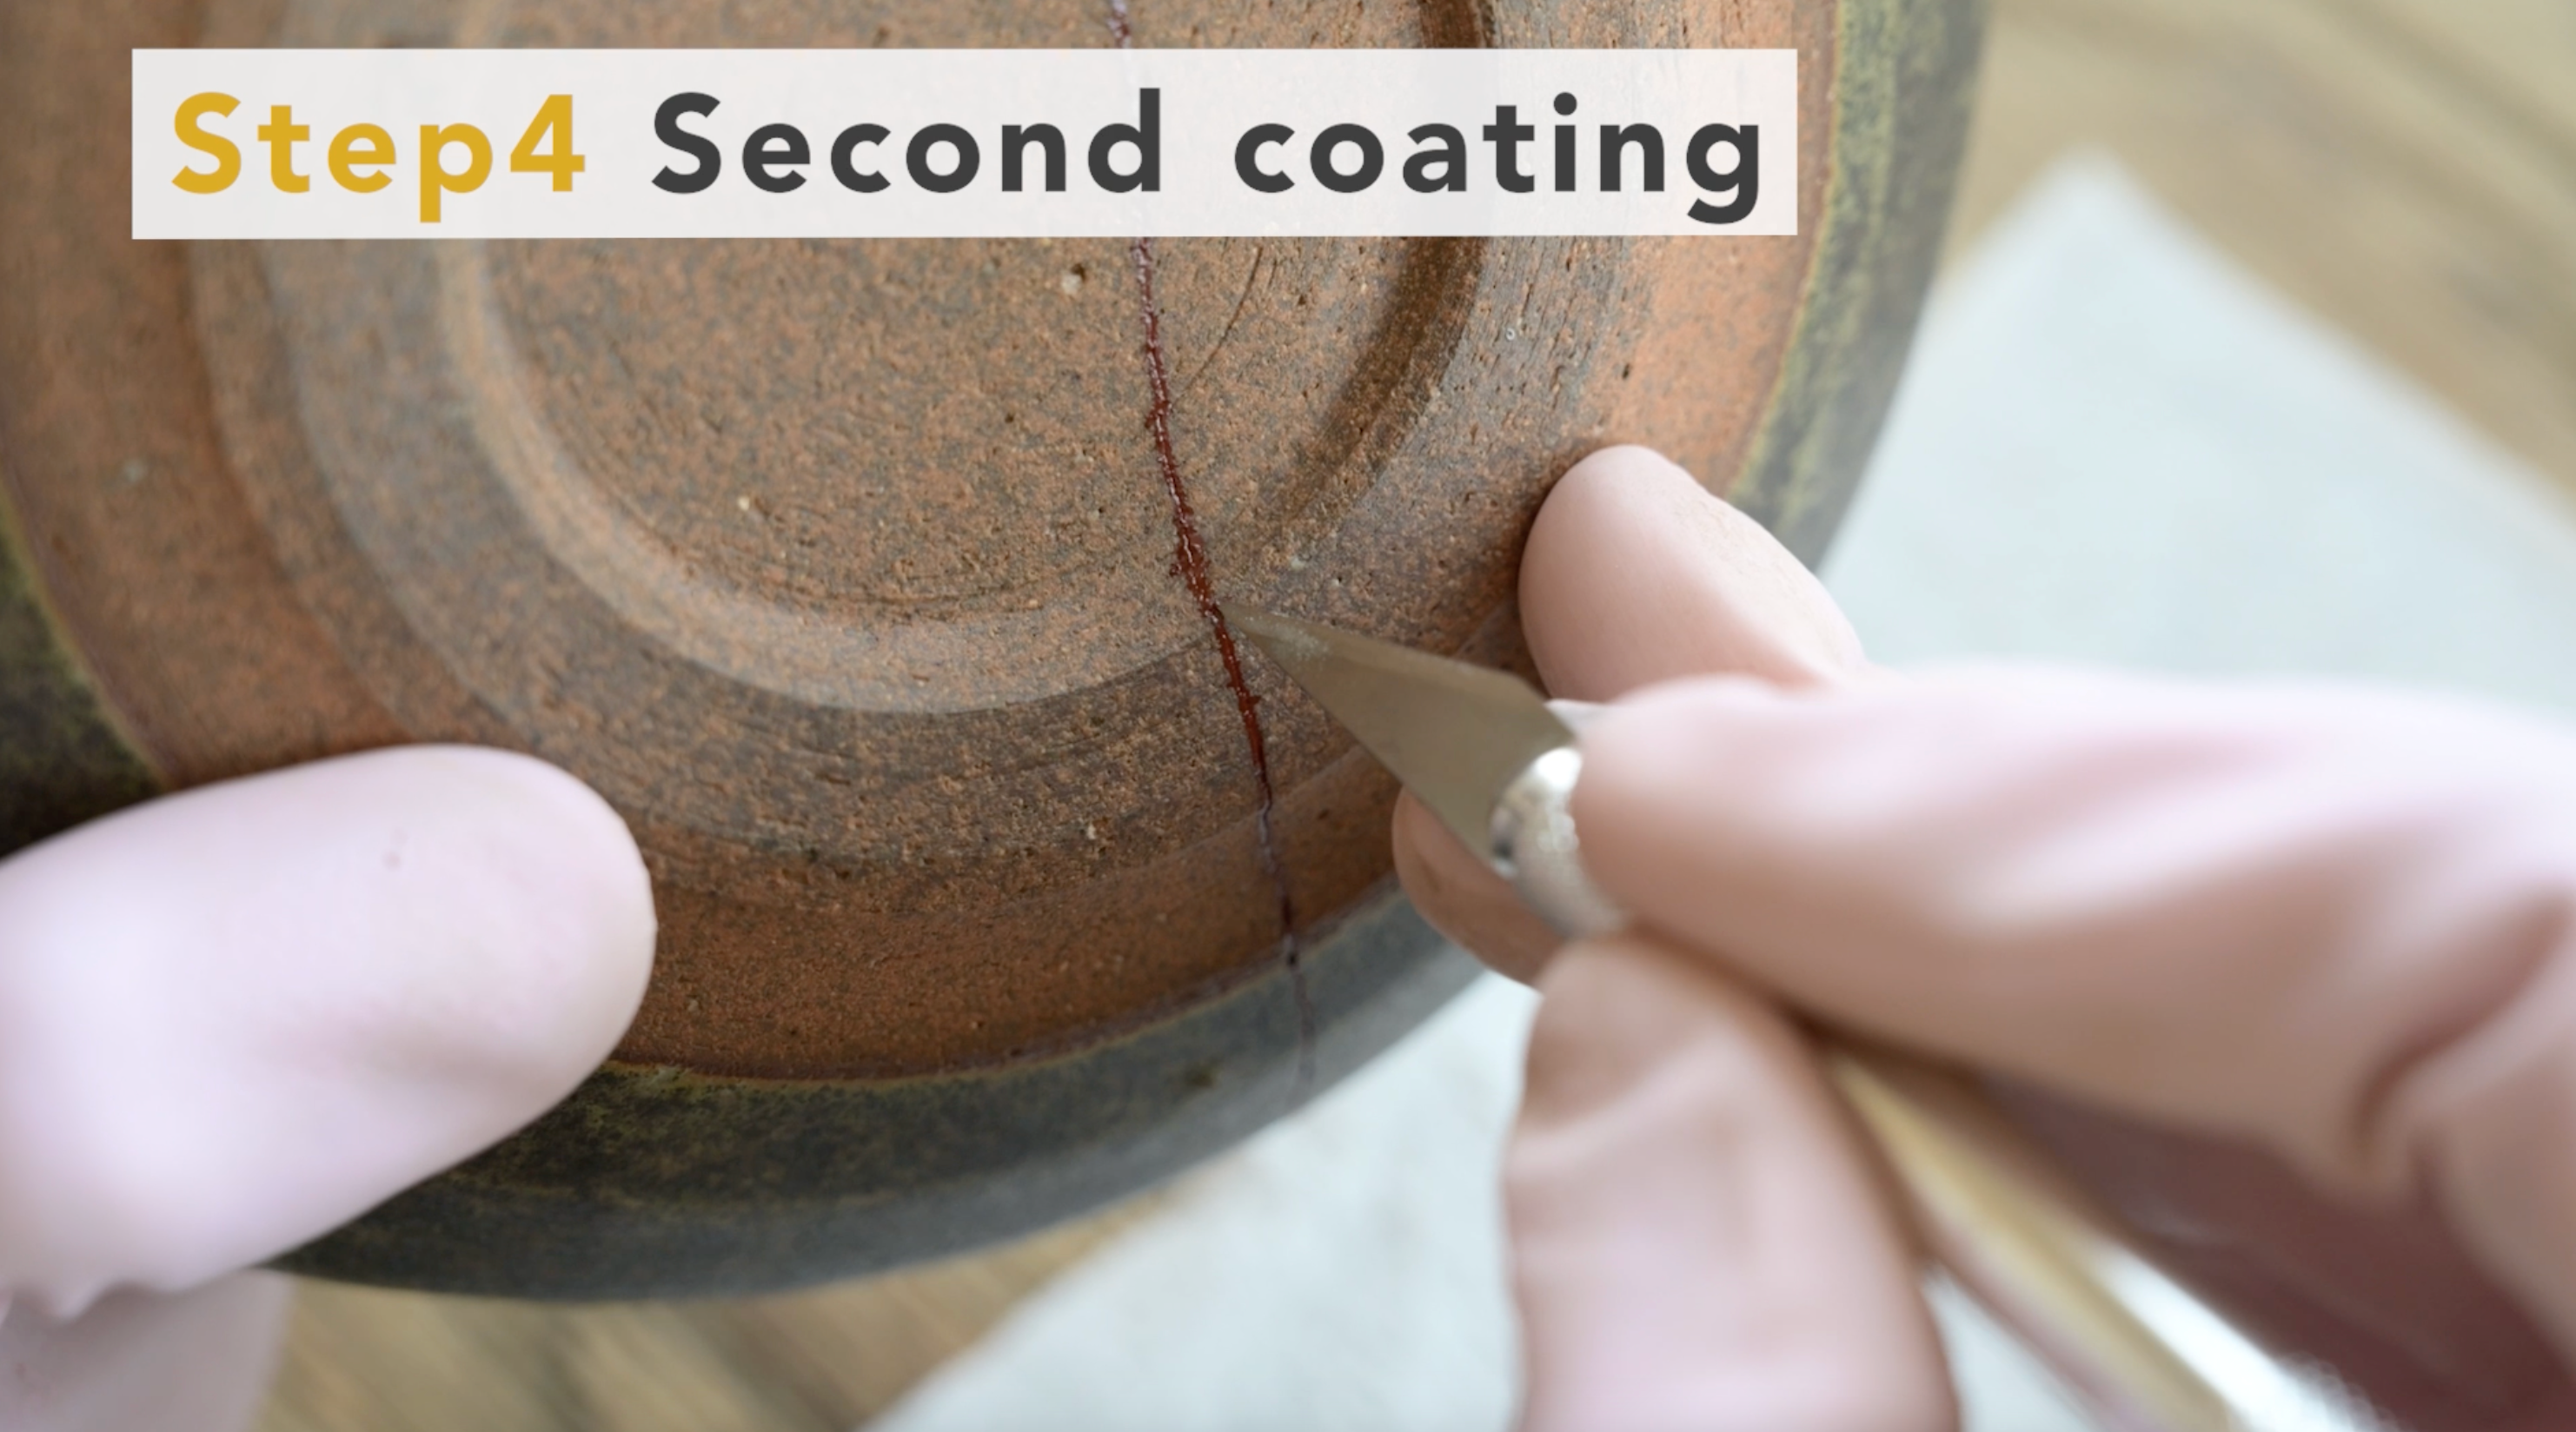
2. Wait a few days for the raw urushi to harden
The soaking process is complete.
Wait a few days for the raw urushi to harden.
Keep it in a place with a humidity of around 70% and a temperature of around 25 degrees Celsius.
- note
- One method is to place wet towels in cardboard boxes to maintain the right humidity for storage.
- The temperature should also be kept from getting cold by using air conditioning.
- In particular, urushi may not harden properly if the temperature falls below 20 degrees Celsius, so be careful to control both temperature and humidity after working on this and subsequent steps.
How to wash tools
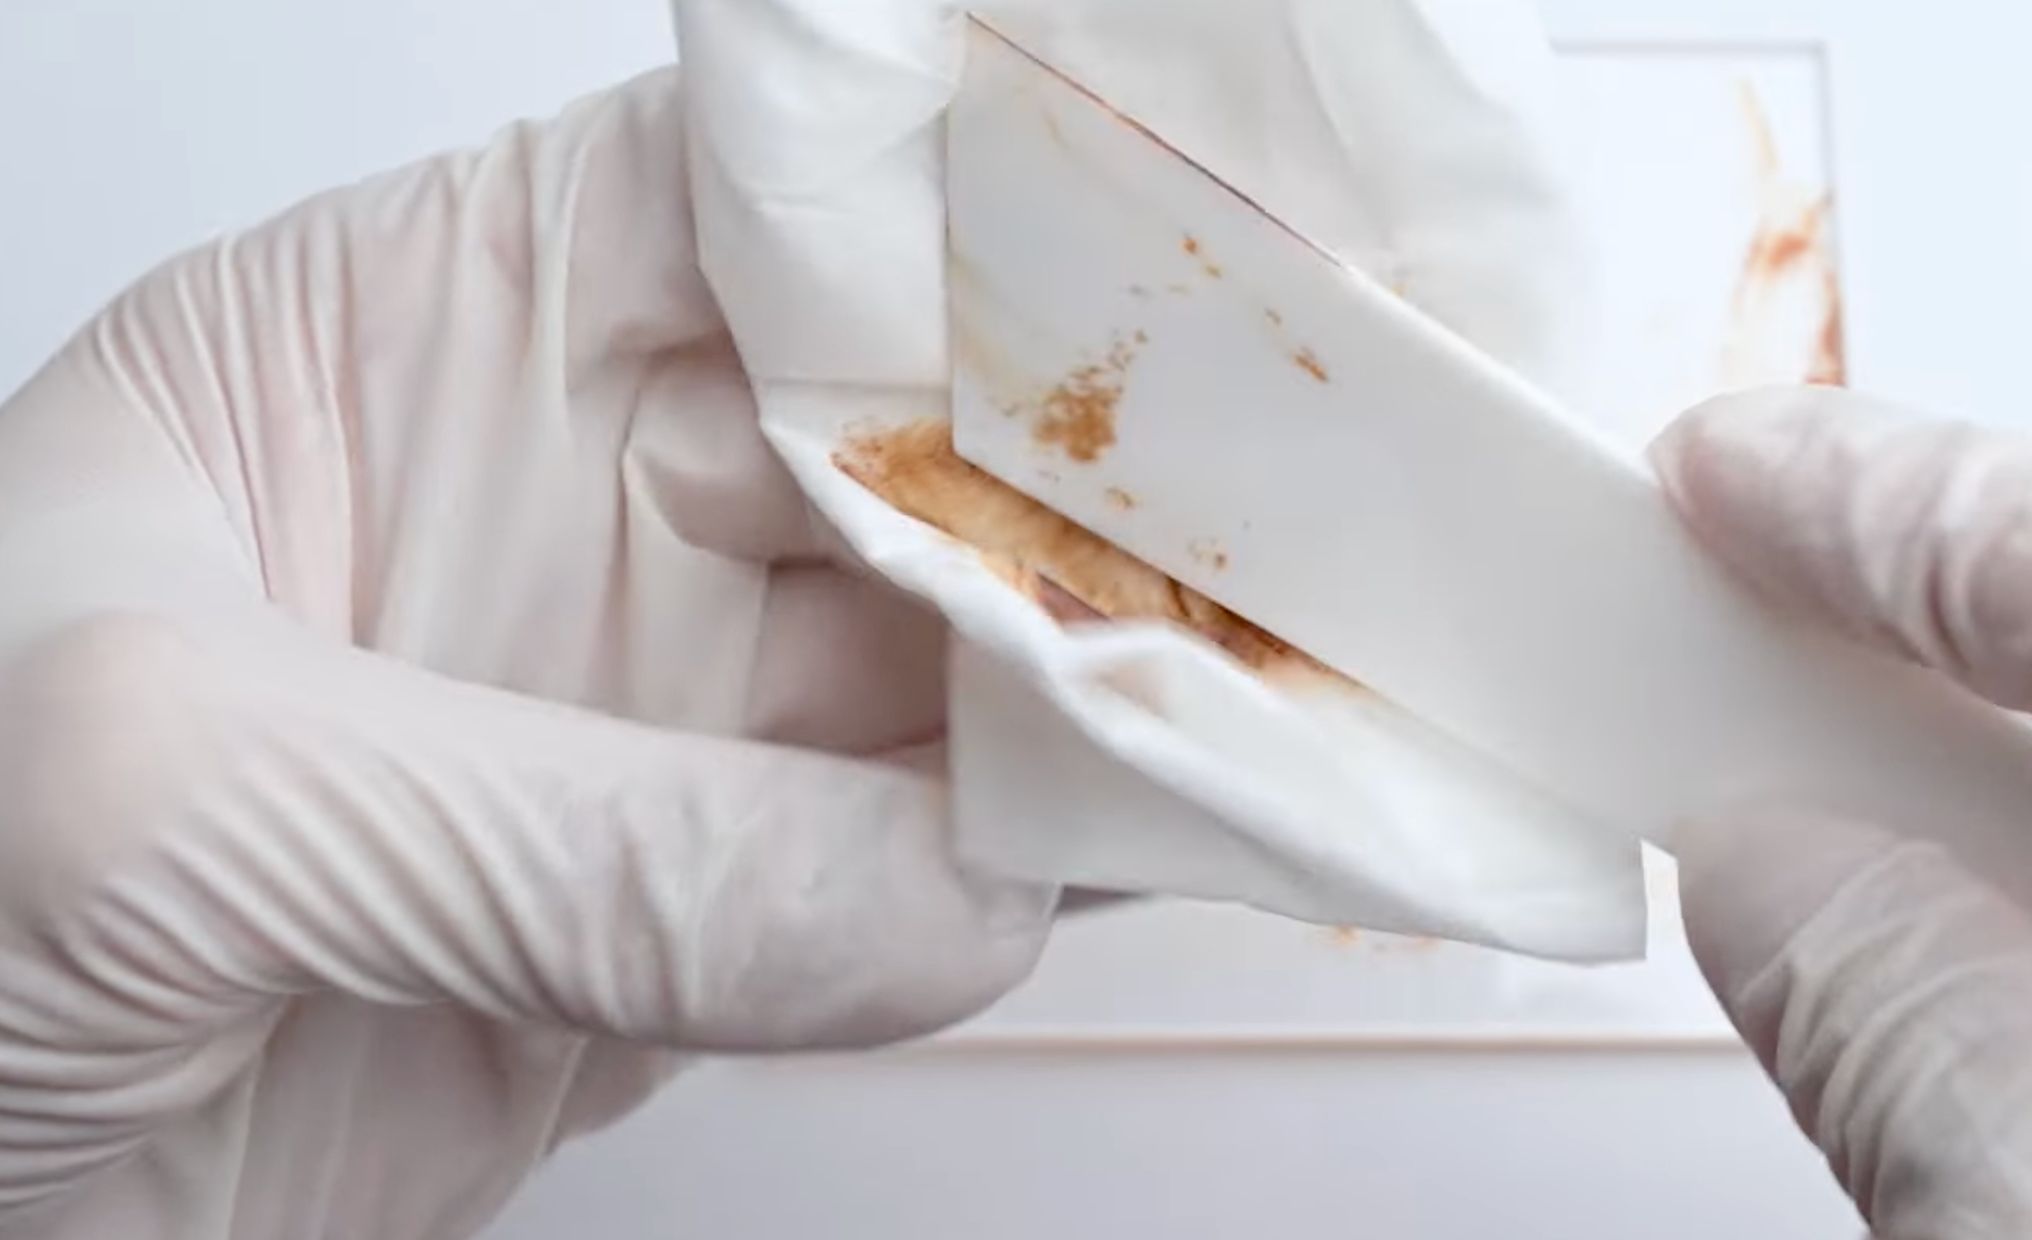
Wipe off any tools with urushi using a tissue moistened with ethanol.
All tools except for the brush can be wiped off with ethanol.
How to wash brushes
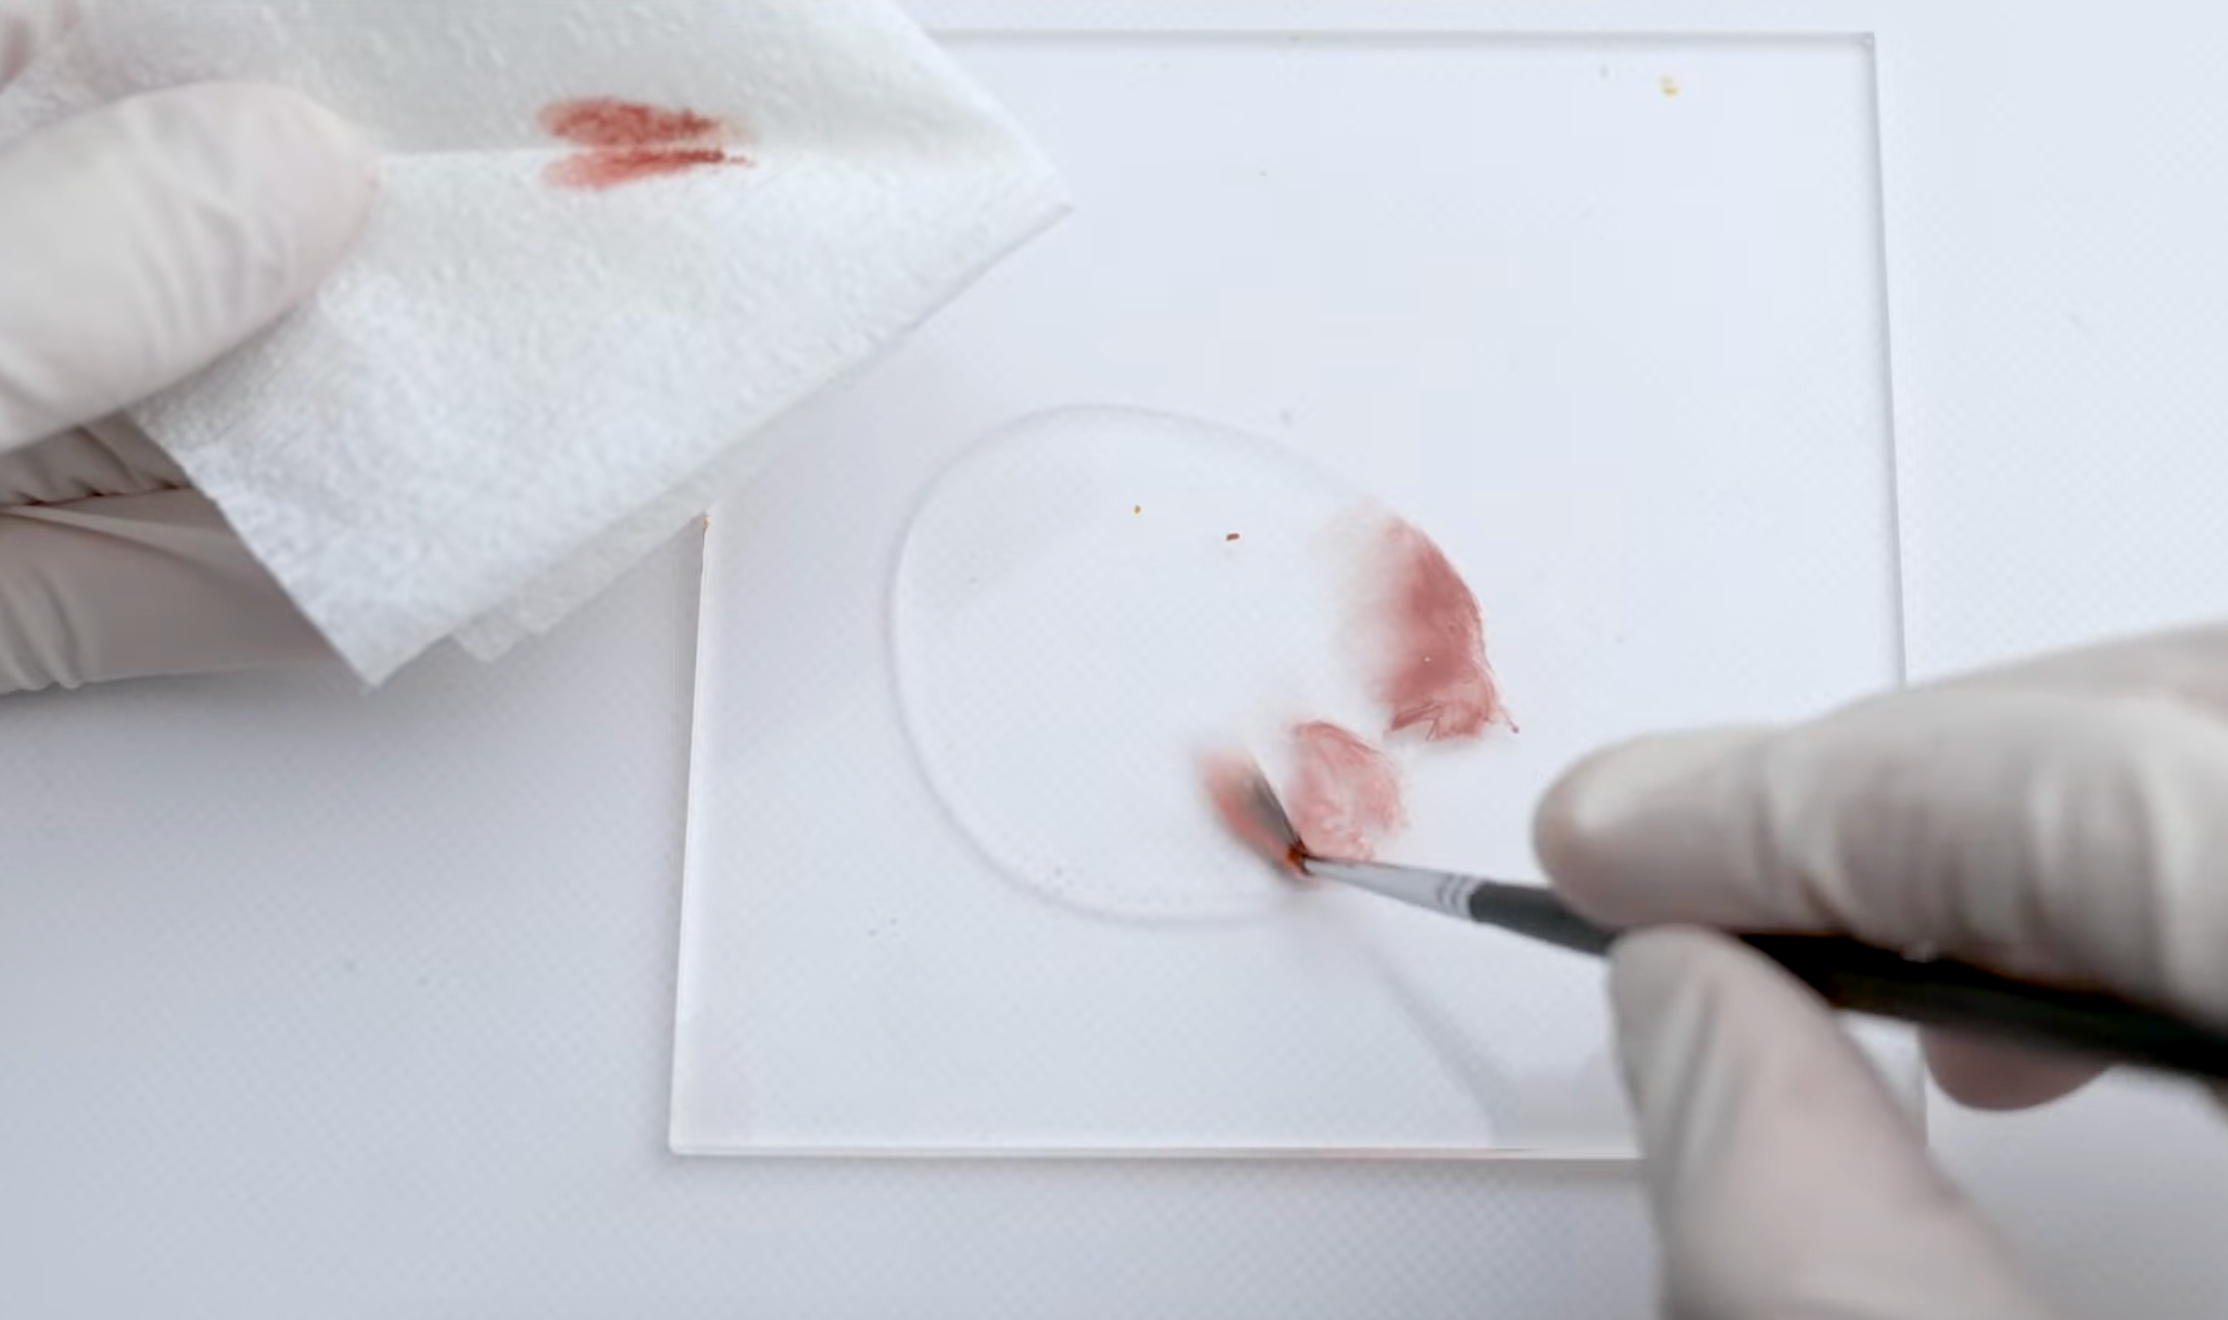
Wash brushes after use with vegetable oil such as rapeseed oil.
Dip the brush into the oil that has been put out on the acrylic plate and wipe it off with a tissue.
Repeat this process until there is almost no color on the tissue.
Finally, put the cap on and store the brush with a little oil remaining on it.
Otherwise, the brush tip may harden.
Finally, completely wipe off any oil remaining on the acrylic plate with ethanol.
If even a small amount of oil is left, it may mix with the oil and prevent the urushi from hardening next time.
*Wear gloves during the entire process, as urushi can cause severe rash.
*We assume no responsibility for any health hazards.
1. Pouring raw urushi into cracks
A cracked pottery is repaired by pouring raw urushi into the cracks.
However, this bowl is not well glazed and may not be able to remove urushi stains.
It is necessary to work carefully to avoid staining it throughout the entire process.
So, first apply masking tape around the crack.
Then, apply raw urushi to the gaps in the tape.
*Wipe the brush tip thoroughly with ethanol first before use.
※Thin glazed ceramics should be protected with masking tapes or use black urushi to fill in as in the Lesson 04.
Areas with deep cracks will quickly soak up the raw urushi, so place additional raw urushi on those areas.
Place raw urushi on only one side of the pottery and see how it goes.
By doing so, you will be able to see how far the urushi has soaked into the cracks.
Wait a few minutes and the urushi will gradually seep out.
There is no glaze here, so if left as it is, urushi might spread and cause staining.
So, wipe it down with alcohol now.
White, thin glazed ceramics may leave stains with this method, so it is better to use black urushi instead of raw urushi.
Wipe off the rushi on the front side as well.
After wiping off urushi, remove the tape.
Deep cracks should be kept close together and taped.
2. Wait a few days for the raw urushi to harden
The soaking process is complete.
Wait a few days for the raw urushi to harden.
Keep it in a place with a humidity of around 70% and a temperature of around 25 degrees Celsius.
- note
- One method is to place wet towels in cardboard boxes to maintain the right humidity for storage.
- The temperature should also be kept from getting cold by using air conditioning.
- In particular, urushi may not harden properly if the temperature falls below 20 degrees Celsius, so be careful to control both temperature and humidity after working on this and subsequent steps.
How to wash tools
Wipe off any tools with urushi using a tissue moistened with ethanol.
All tools except for the brush can be wiped off with ethanol.
How to wash brushes
Wash brushes after use with vegetable oil such as rapeseed oil.
Dip the brush into the oil that has been put out on the acrylic plate and wipe it off with a tissue.
Repeat this process until there is almost no color on the tissue.
Finally, put the cap on and store the brush with a little oil remaining on it.
Otherwise, the brush tip may harden.
Finally, completely wipe off any oil remaining on the acrylic plate with ethanol.
If even a small amount of oil is left, it may mix with the oil and prevent the urushi from hardening next time.

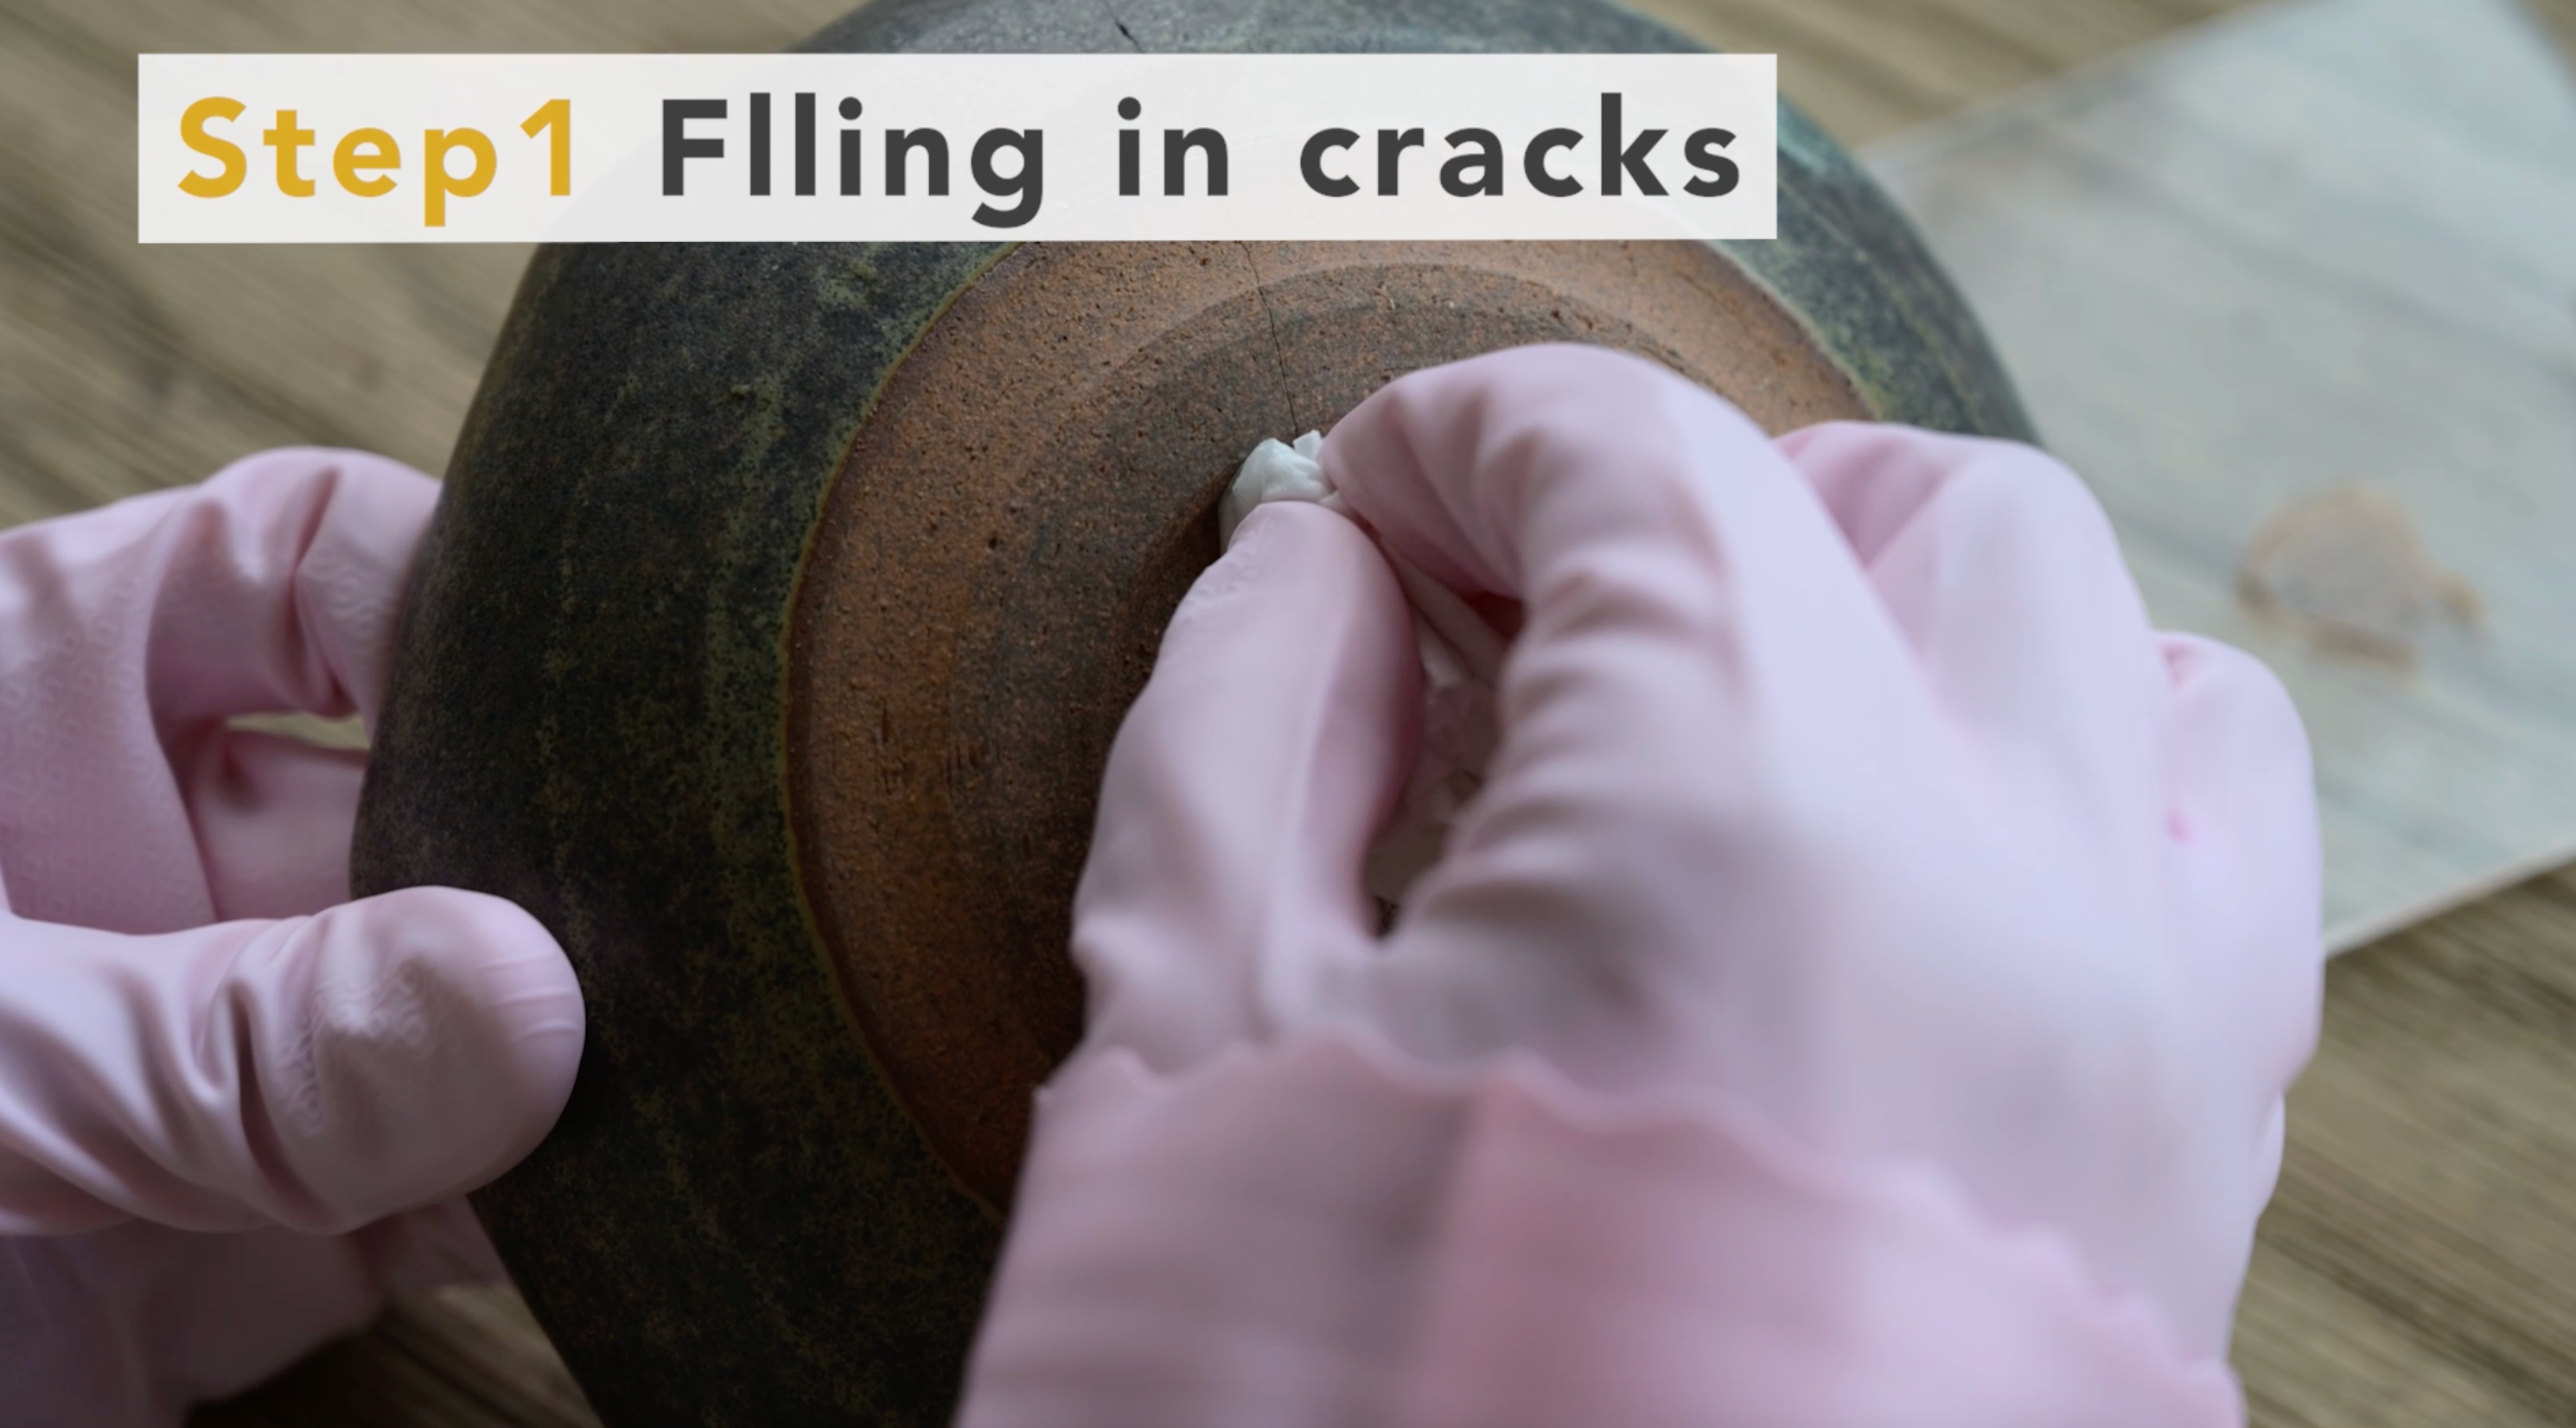
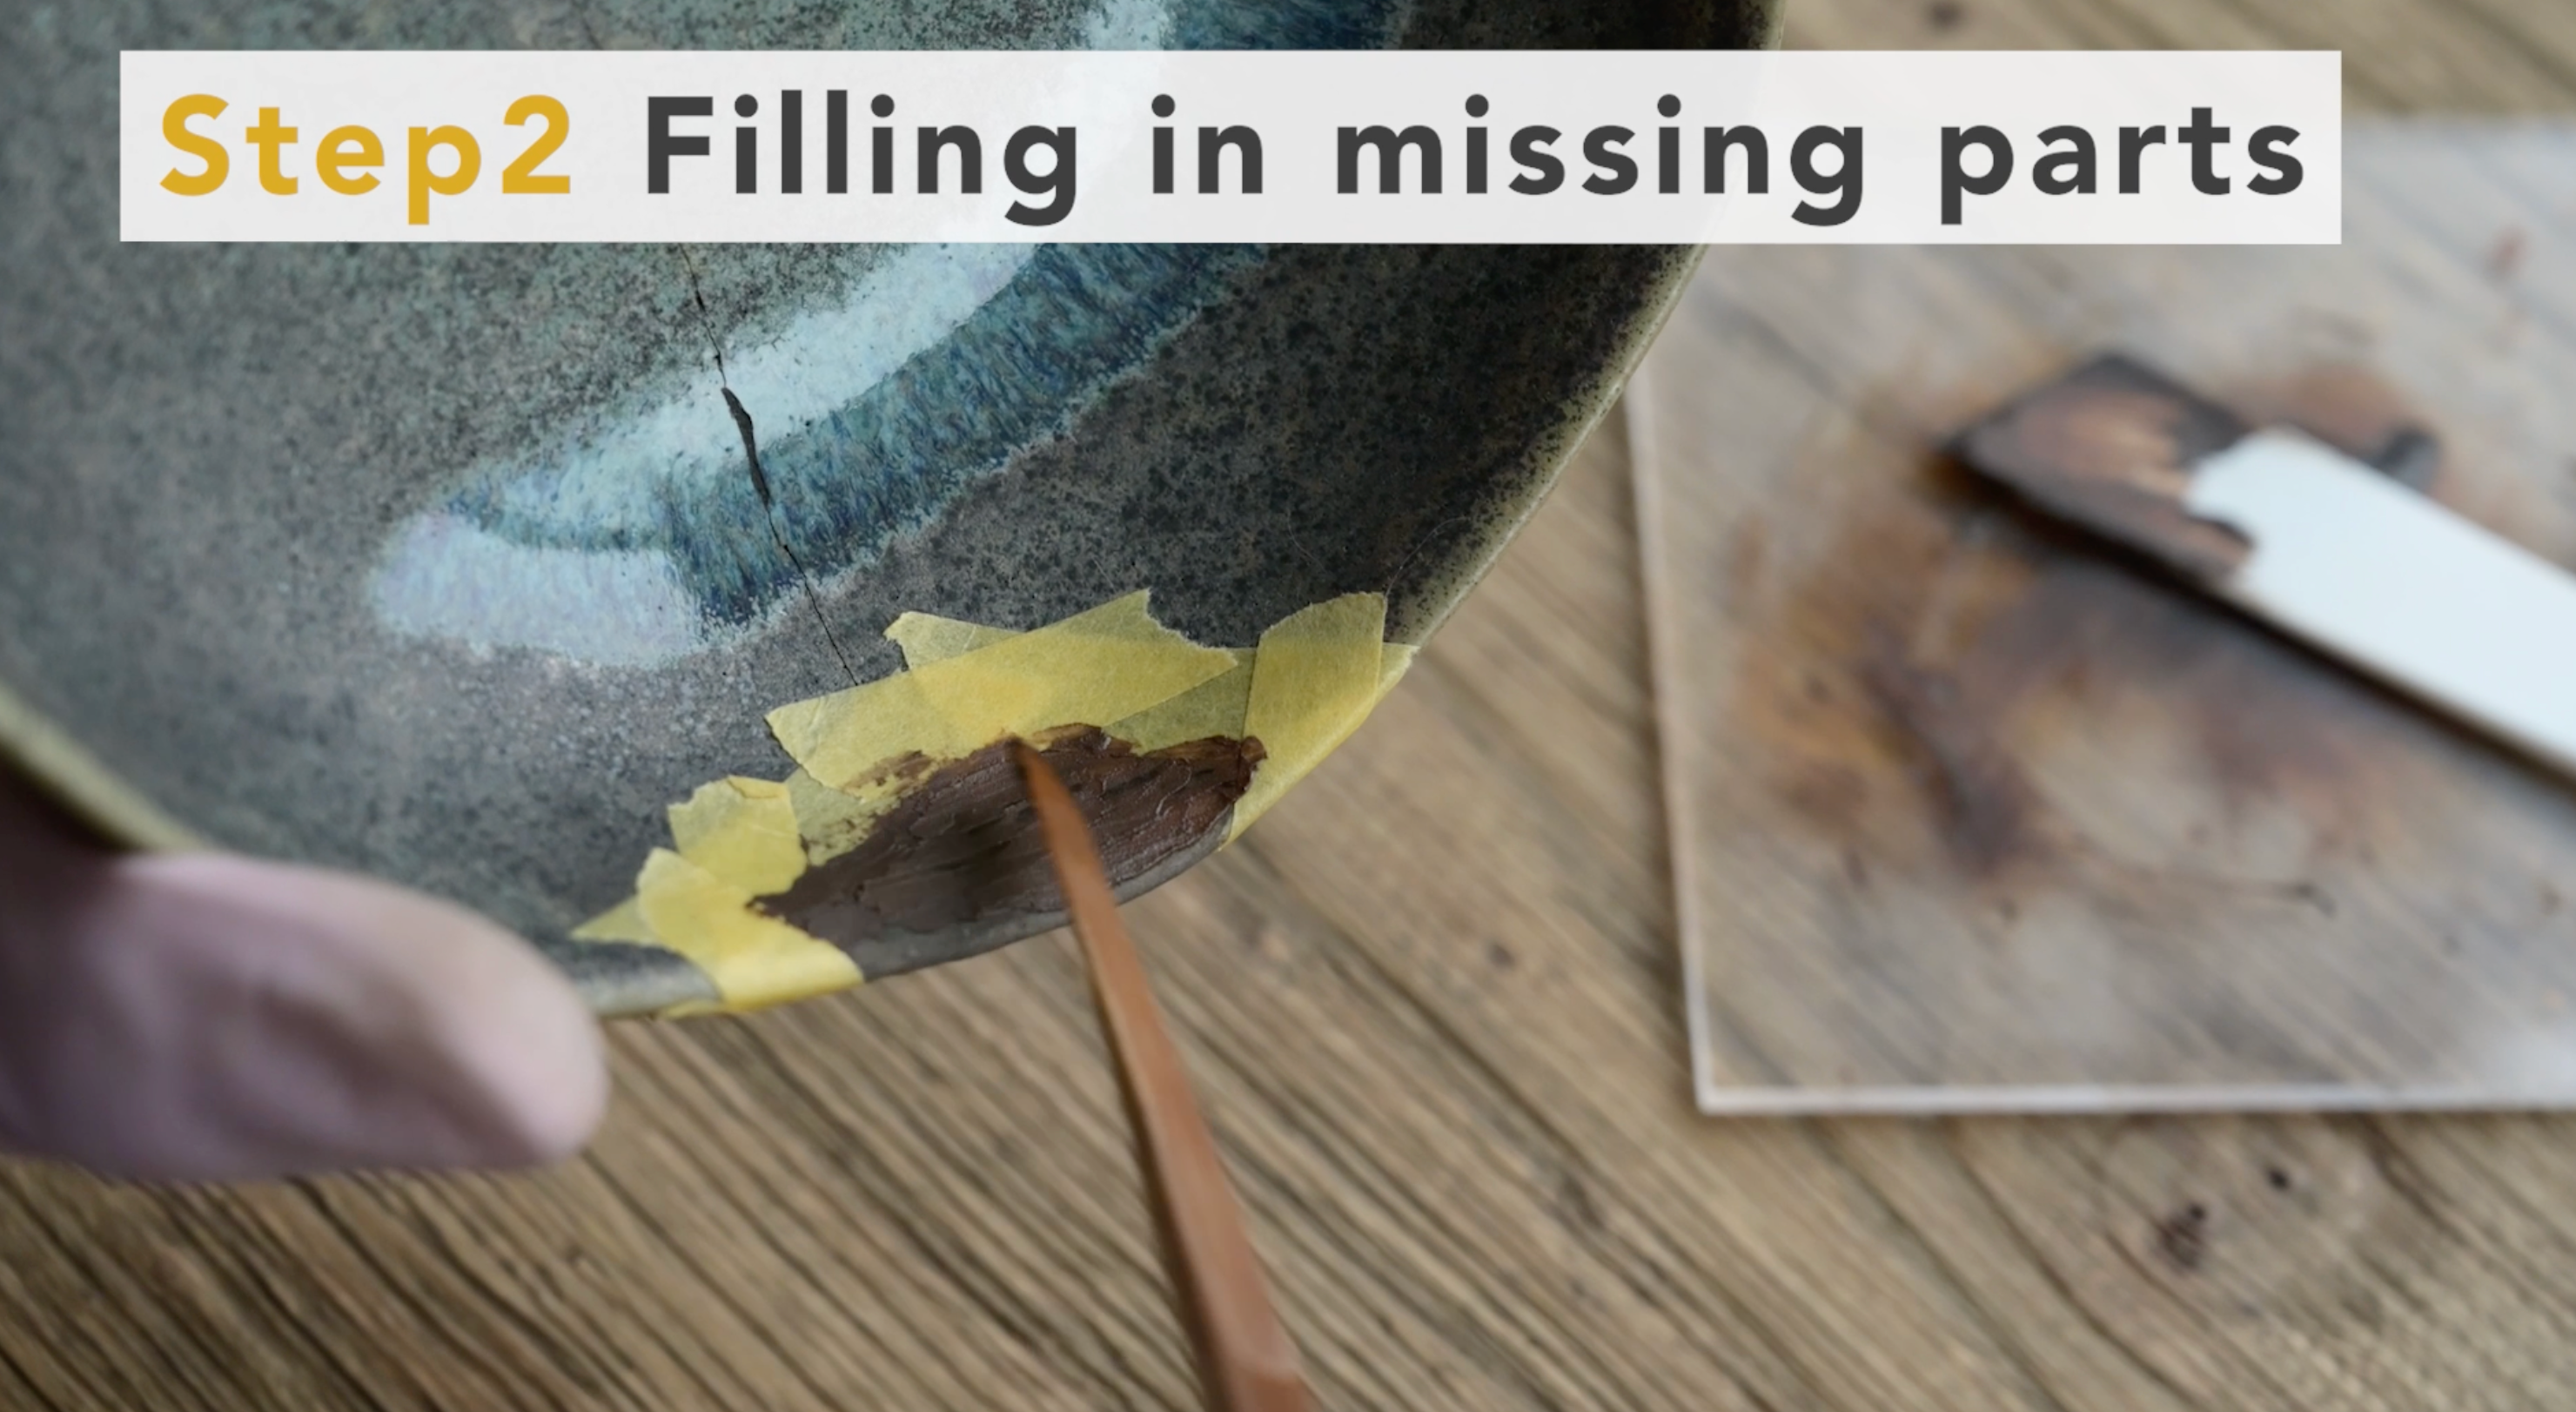
1. Scrape off excess raw urushi
Scrape off any raw urushi from the surrounding area with a cutter and wipe it off with alcohol.
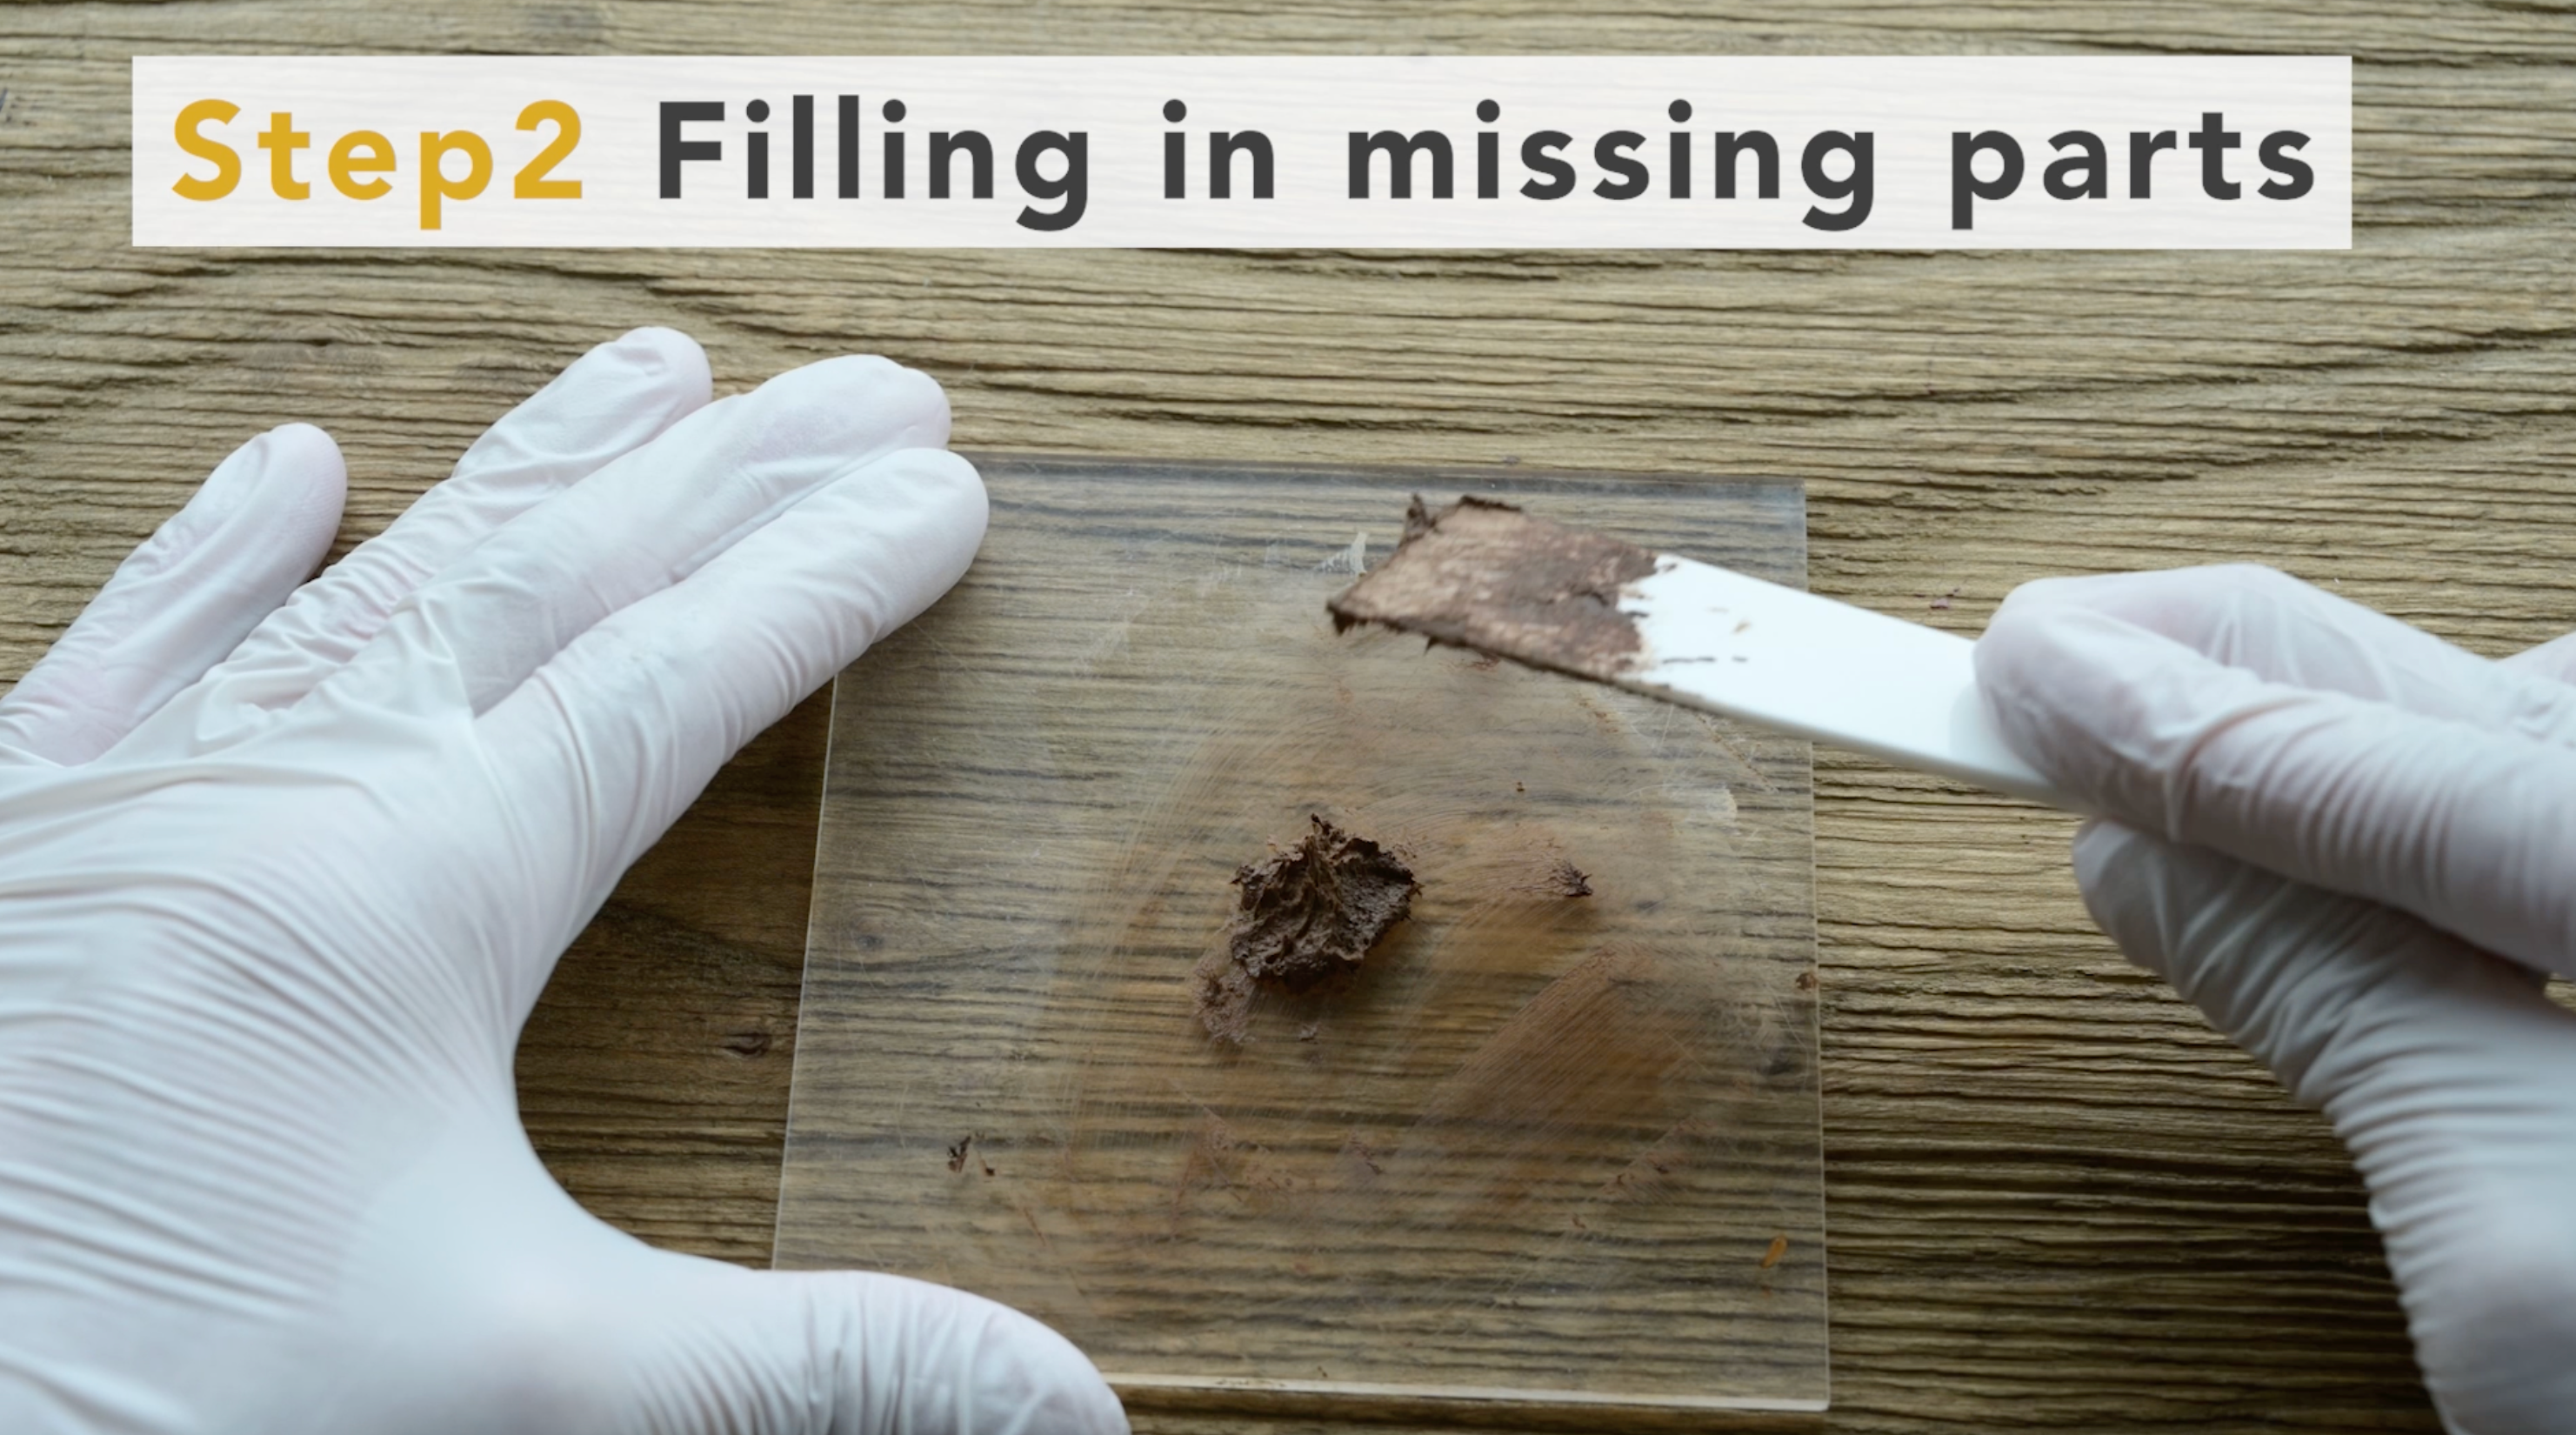
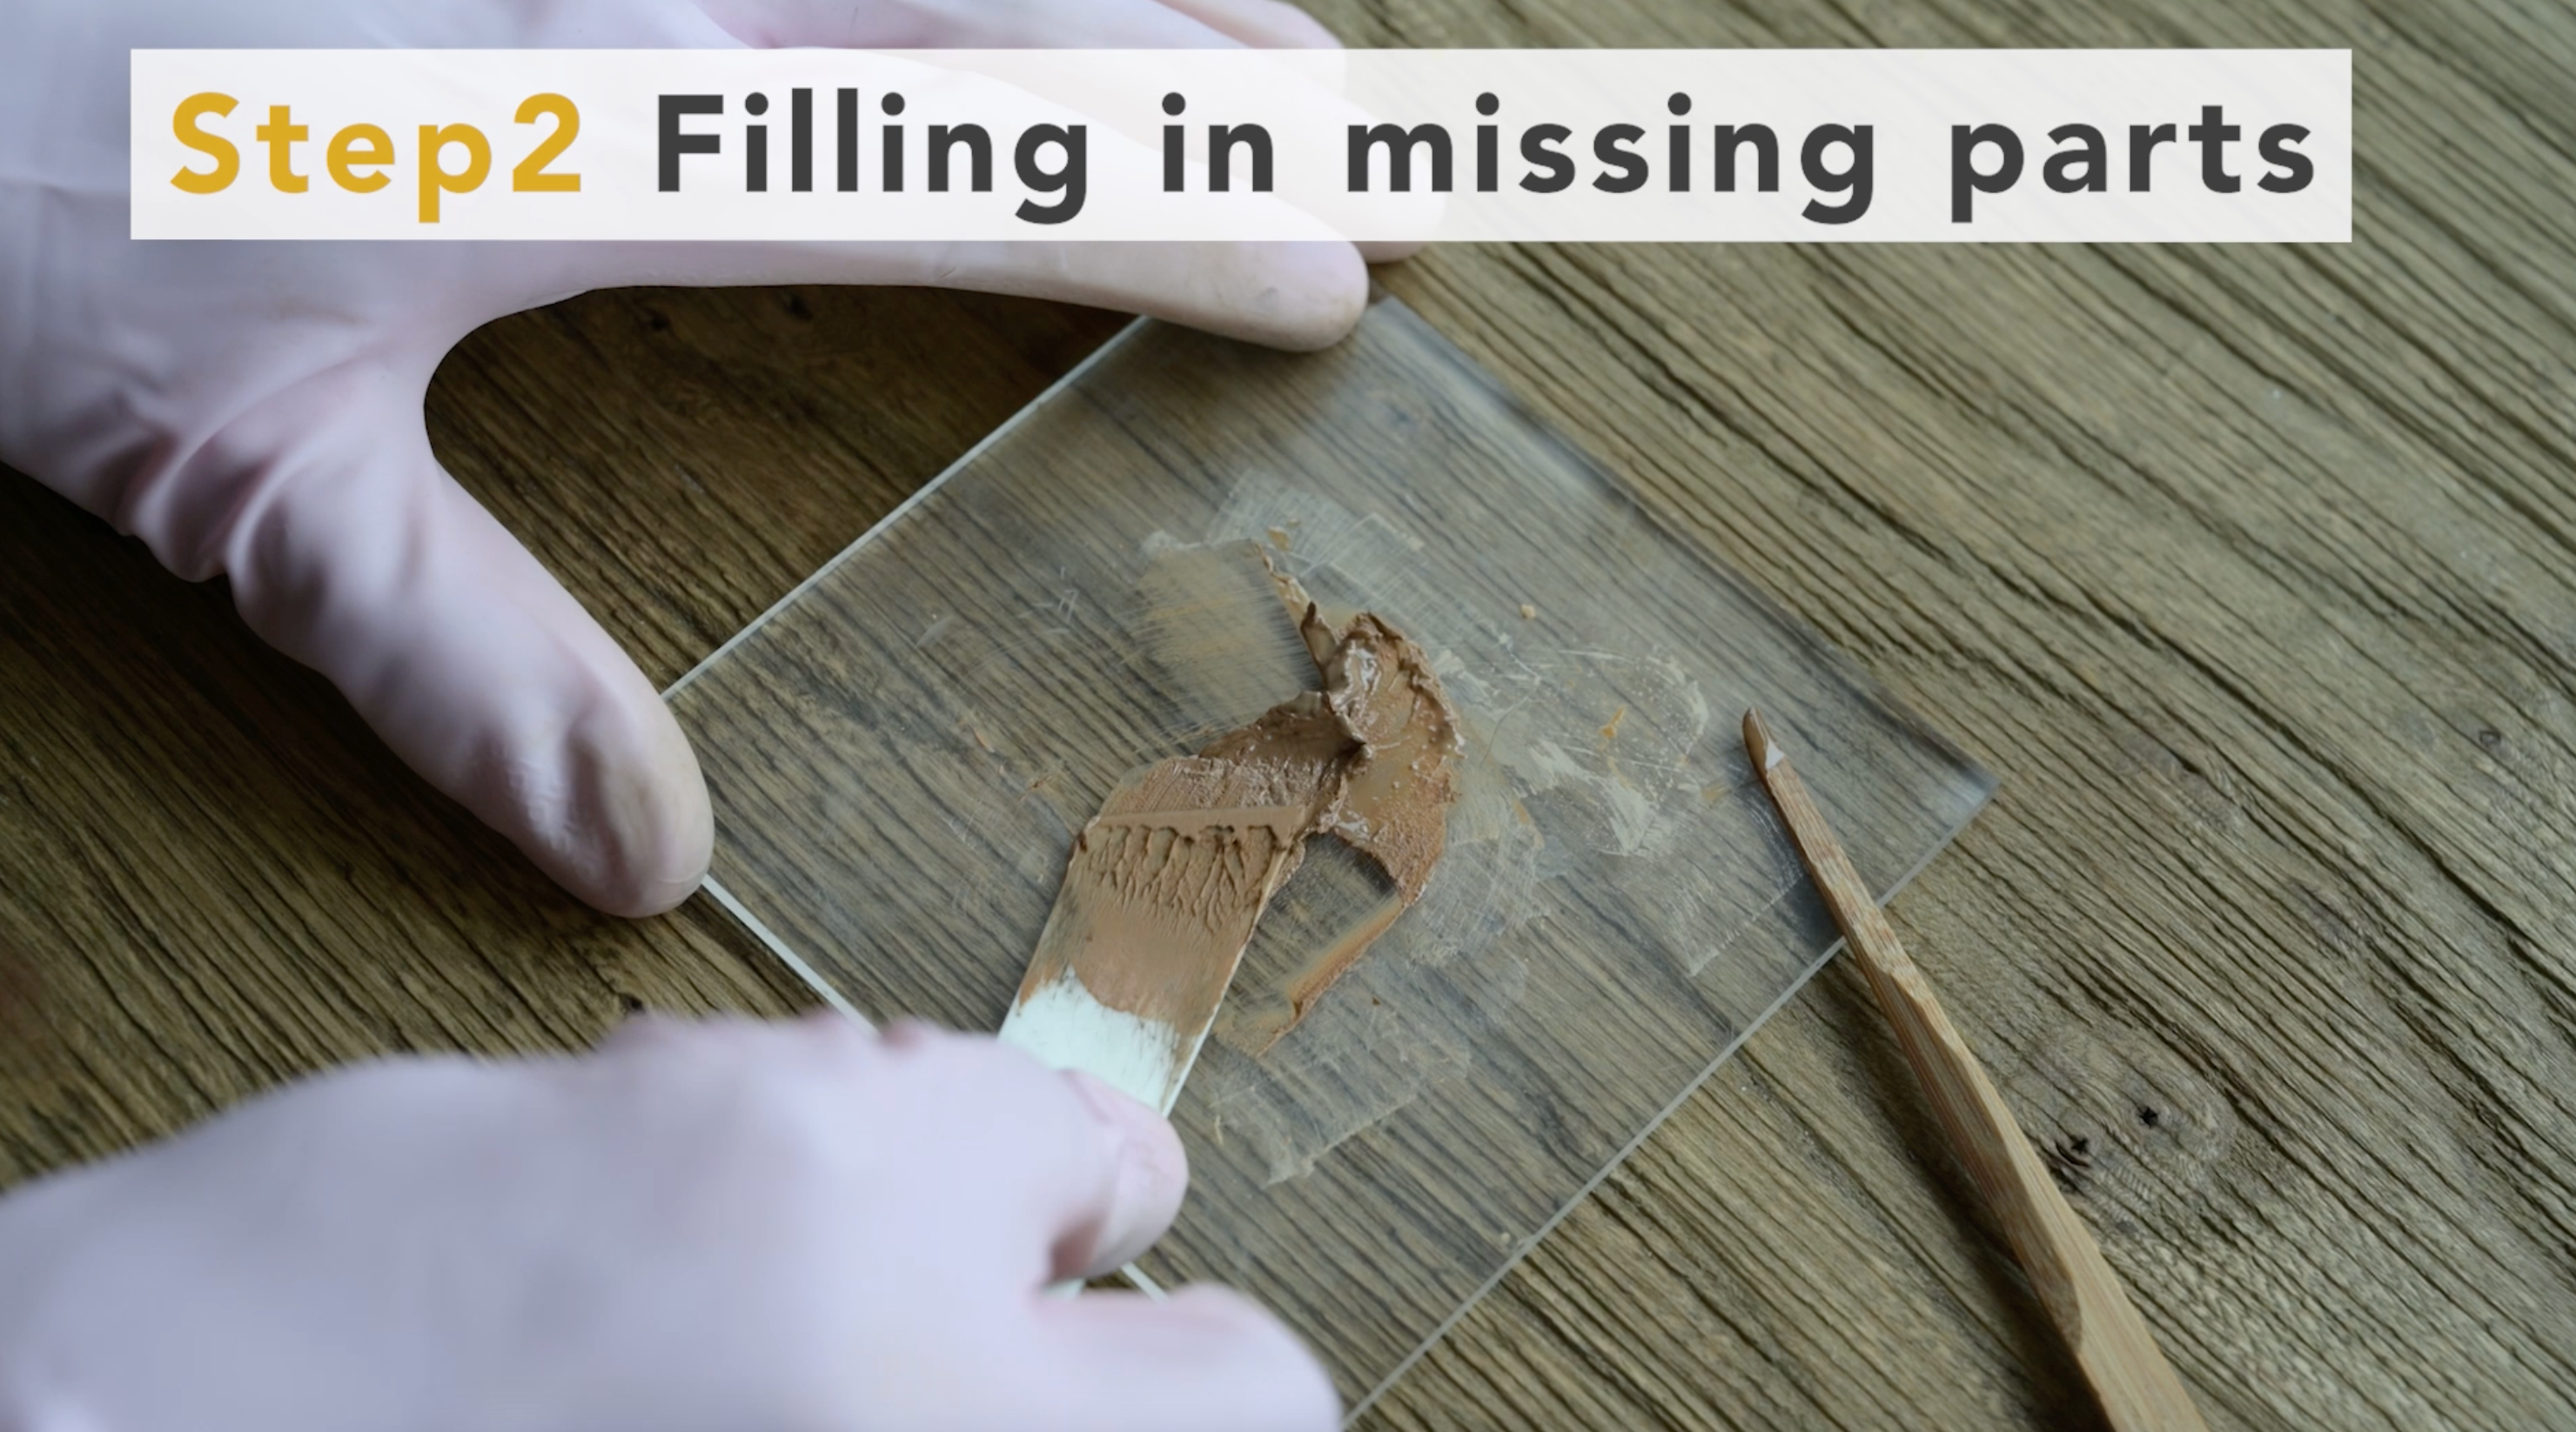
2. Making "Kokuso-urushi"
Once excess raw urushi is removed, we will use "Kokuso-urushi" to fill the missing area.
In the Basic Tutorial, we used wood powder, but this time we will show you another way to make it.
It is easy to dry and strong even when applied thickly.
- Ingredients for Kokuso-Urushi
- Tonoko: 3 grated spoonful
- Jinoko: 1 grated spoonful
- Water: 1 grated spoonful
- Raw urushi: 2 grated spoonful
- Kokuso wata: 1 grated spoonful
- ※With 0.1ml measuring spoon
First, mix tonoko, jinoko and water on an acrylic board and knead.
Then add raw urushi and knead well with a spatula.
Finally, add Kokuso wata and knead to complete the process.
The kokuso-urushi dries quickly, so make it as small as possible and place the spatula on top to keep it out of the air.
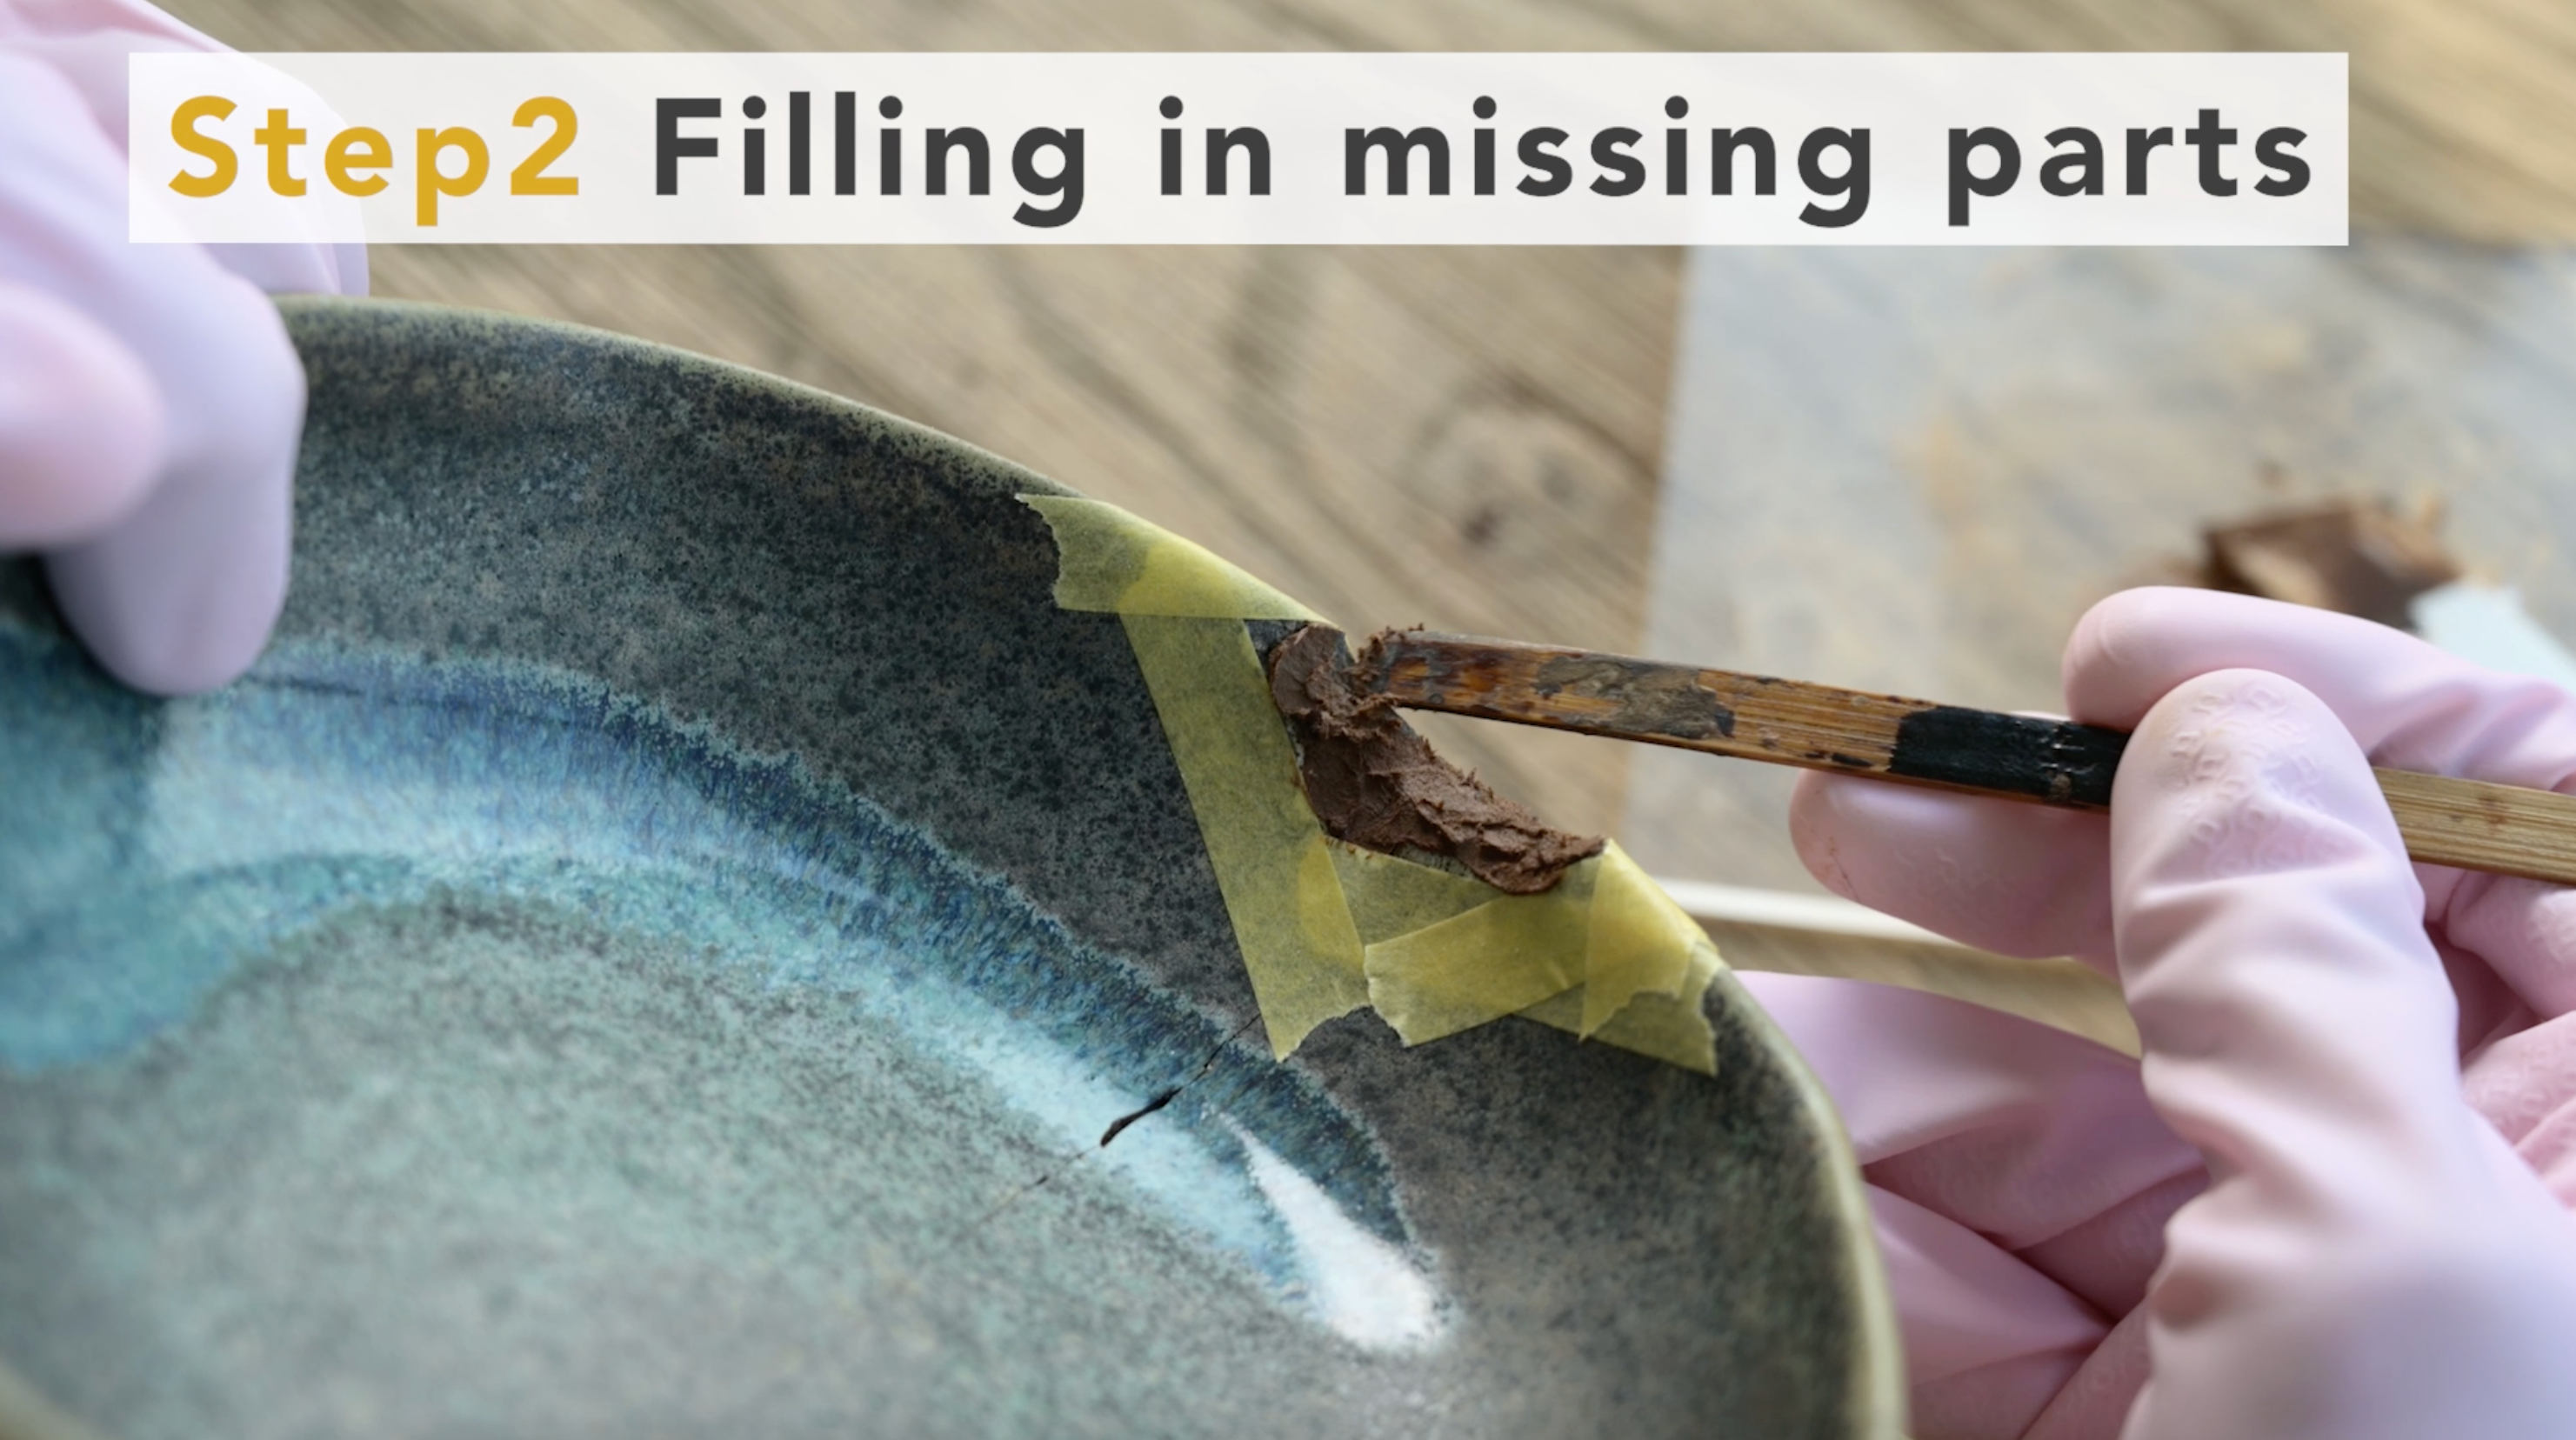
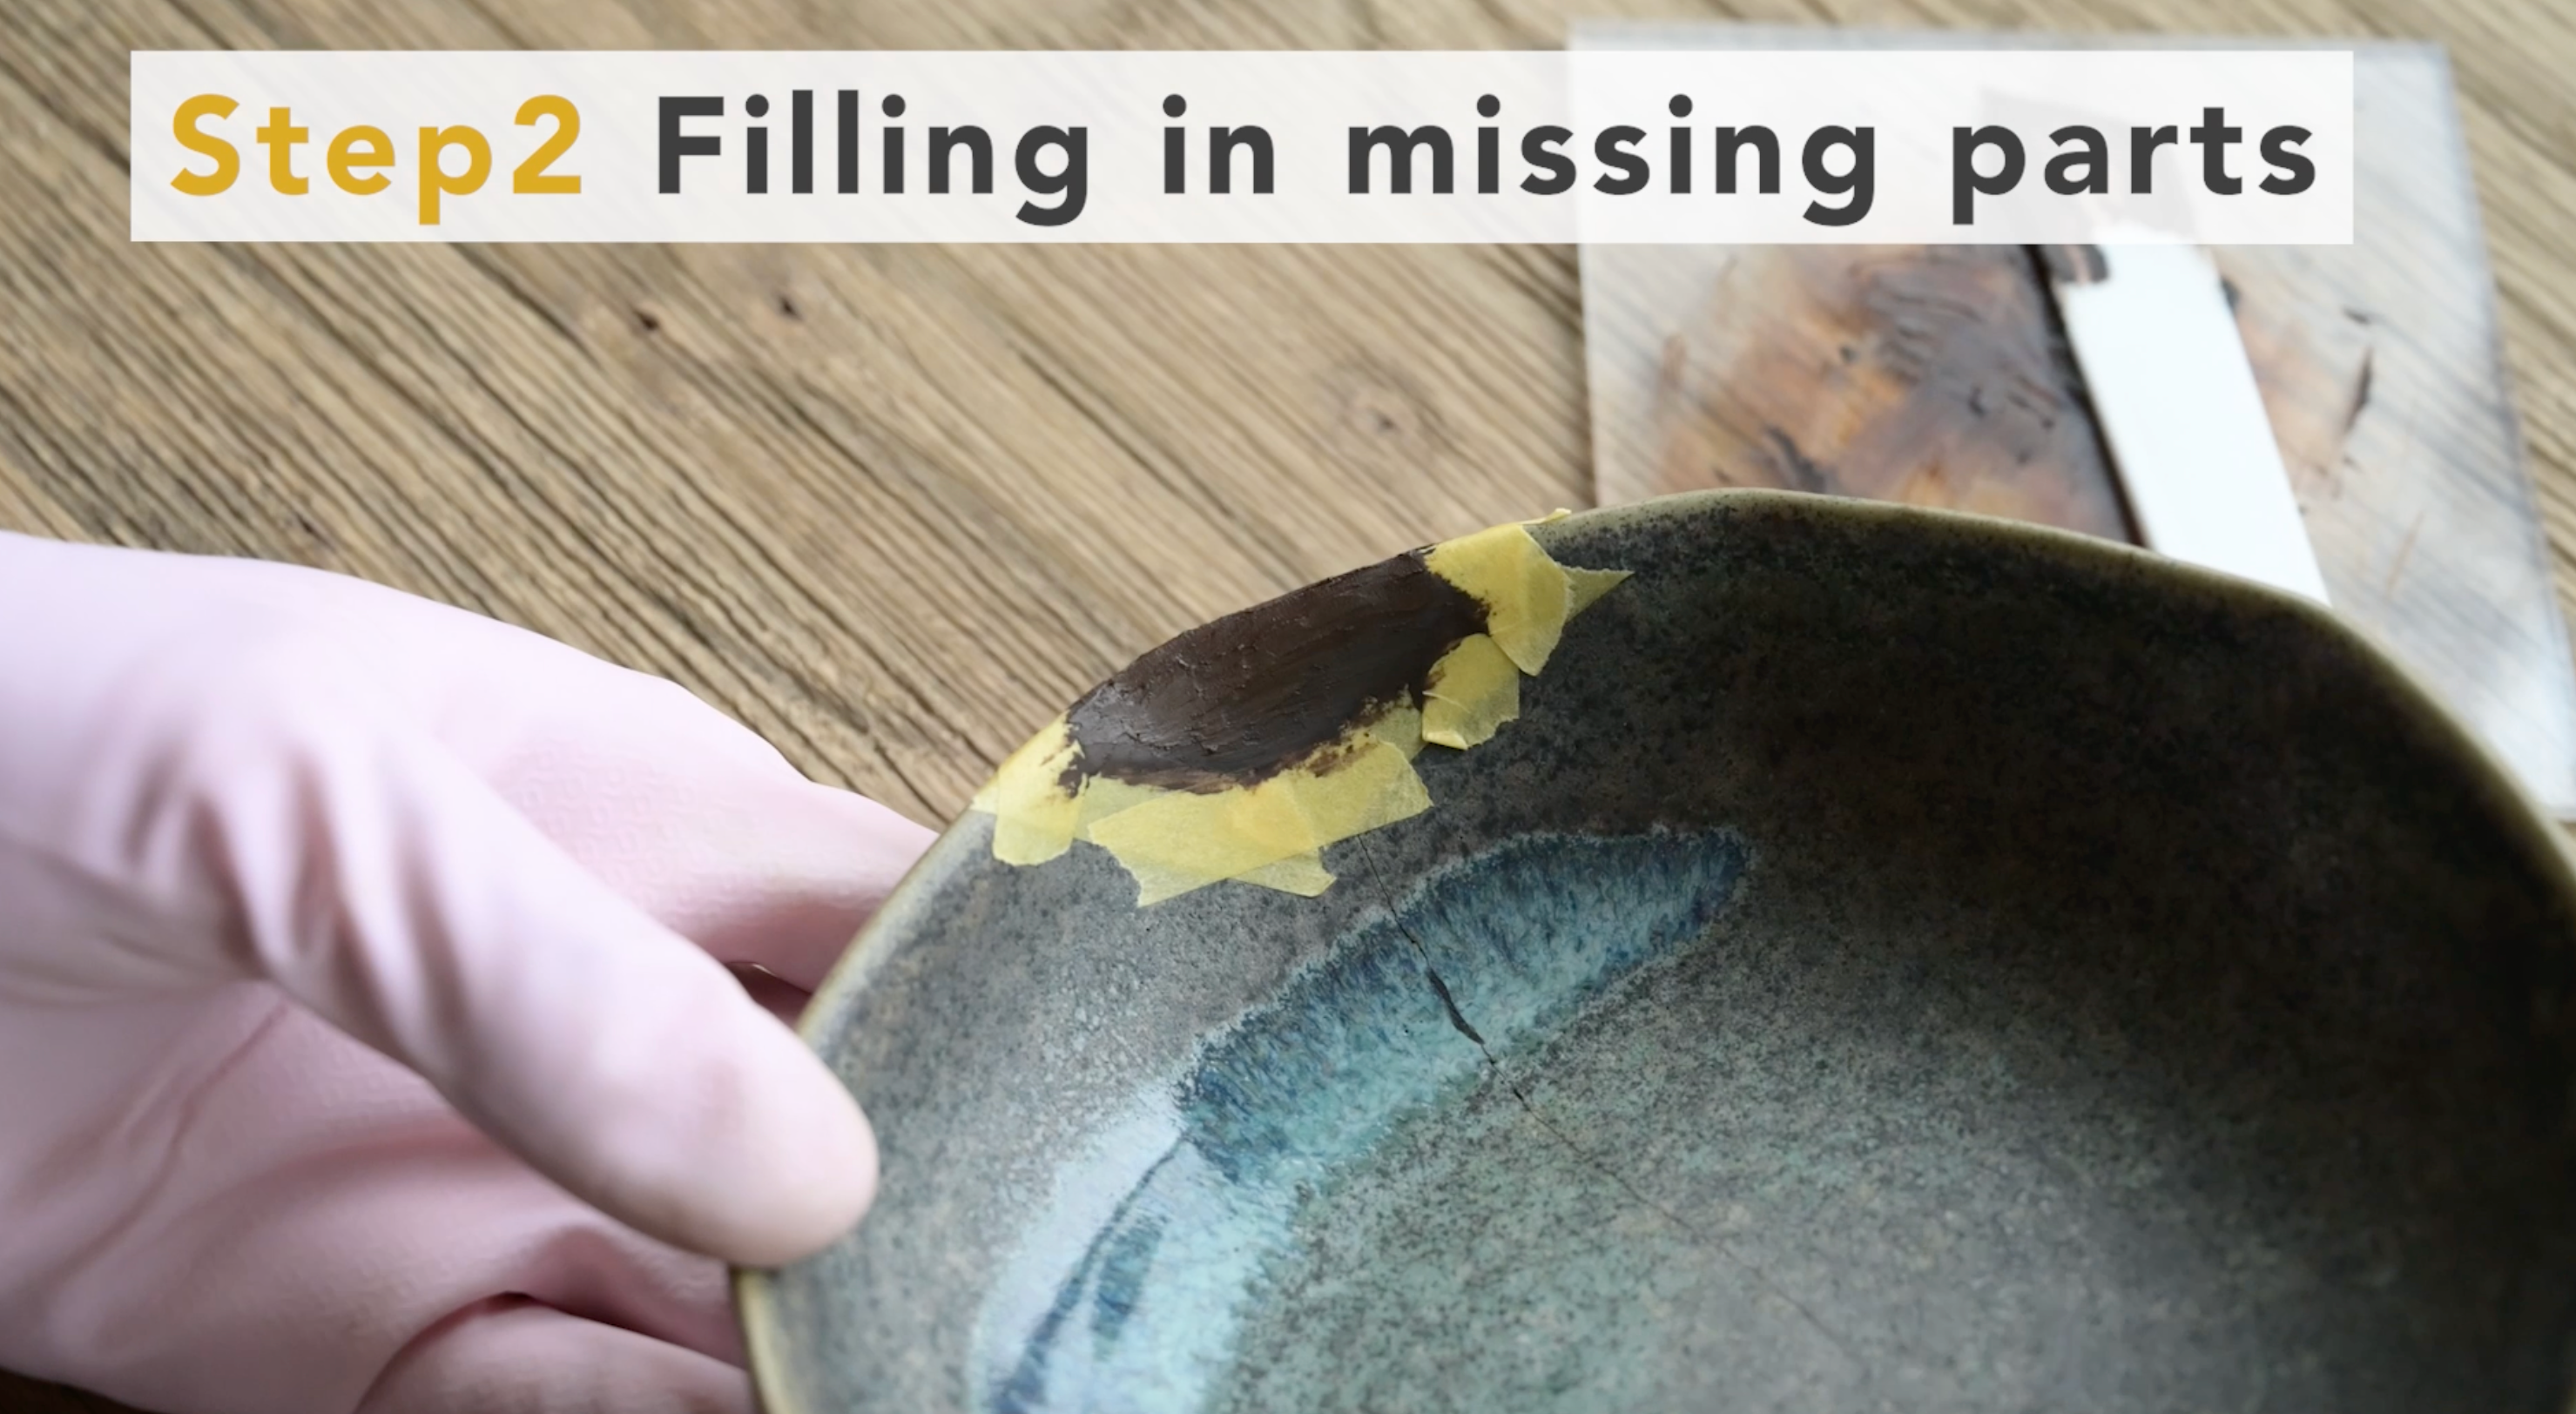
3. Apply kokuso-urushi to the missing parts
Use Kokuso urushi to fill in the missing parts.
Thin glazed ceramics should have masking tape around them beforehand to prevent staining.
When applying kokuso urushi, keep the thickness to about 3mm at a time.
This is because if it is applied too thickly, the core may not harden.
For chips deeper than 4mm, repeat this step several times.
If kokuso urushi becomes dry, remake it.
If dry kokuso urushi is applied, it will be easier to peel off later.
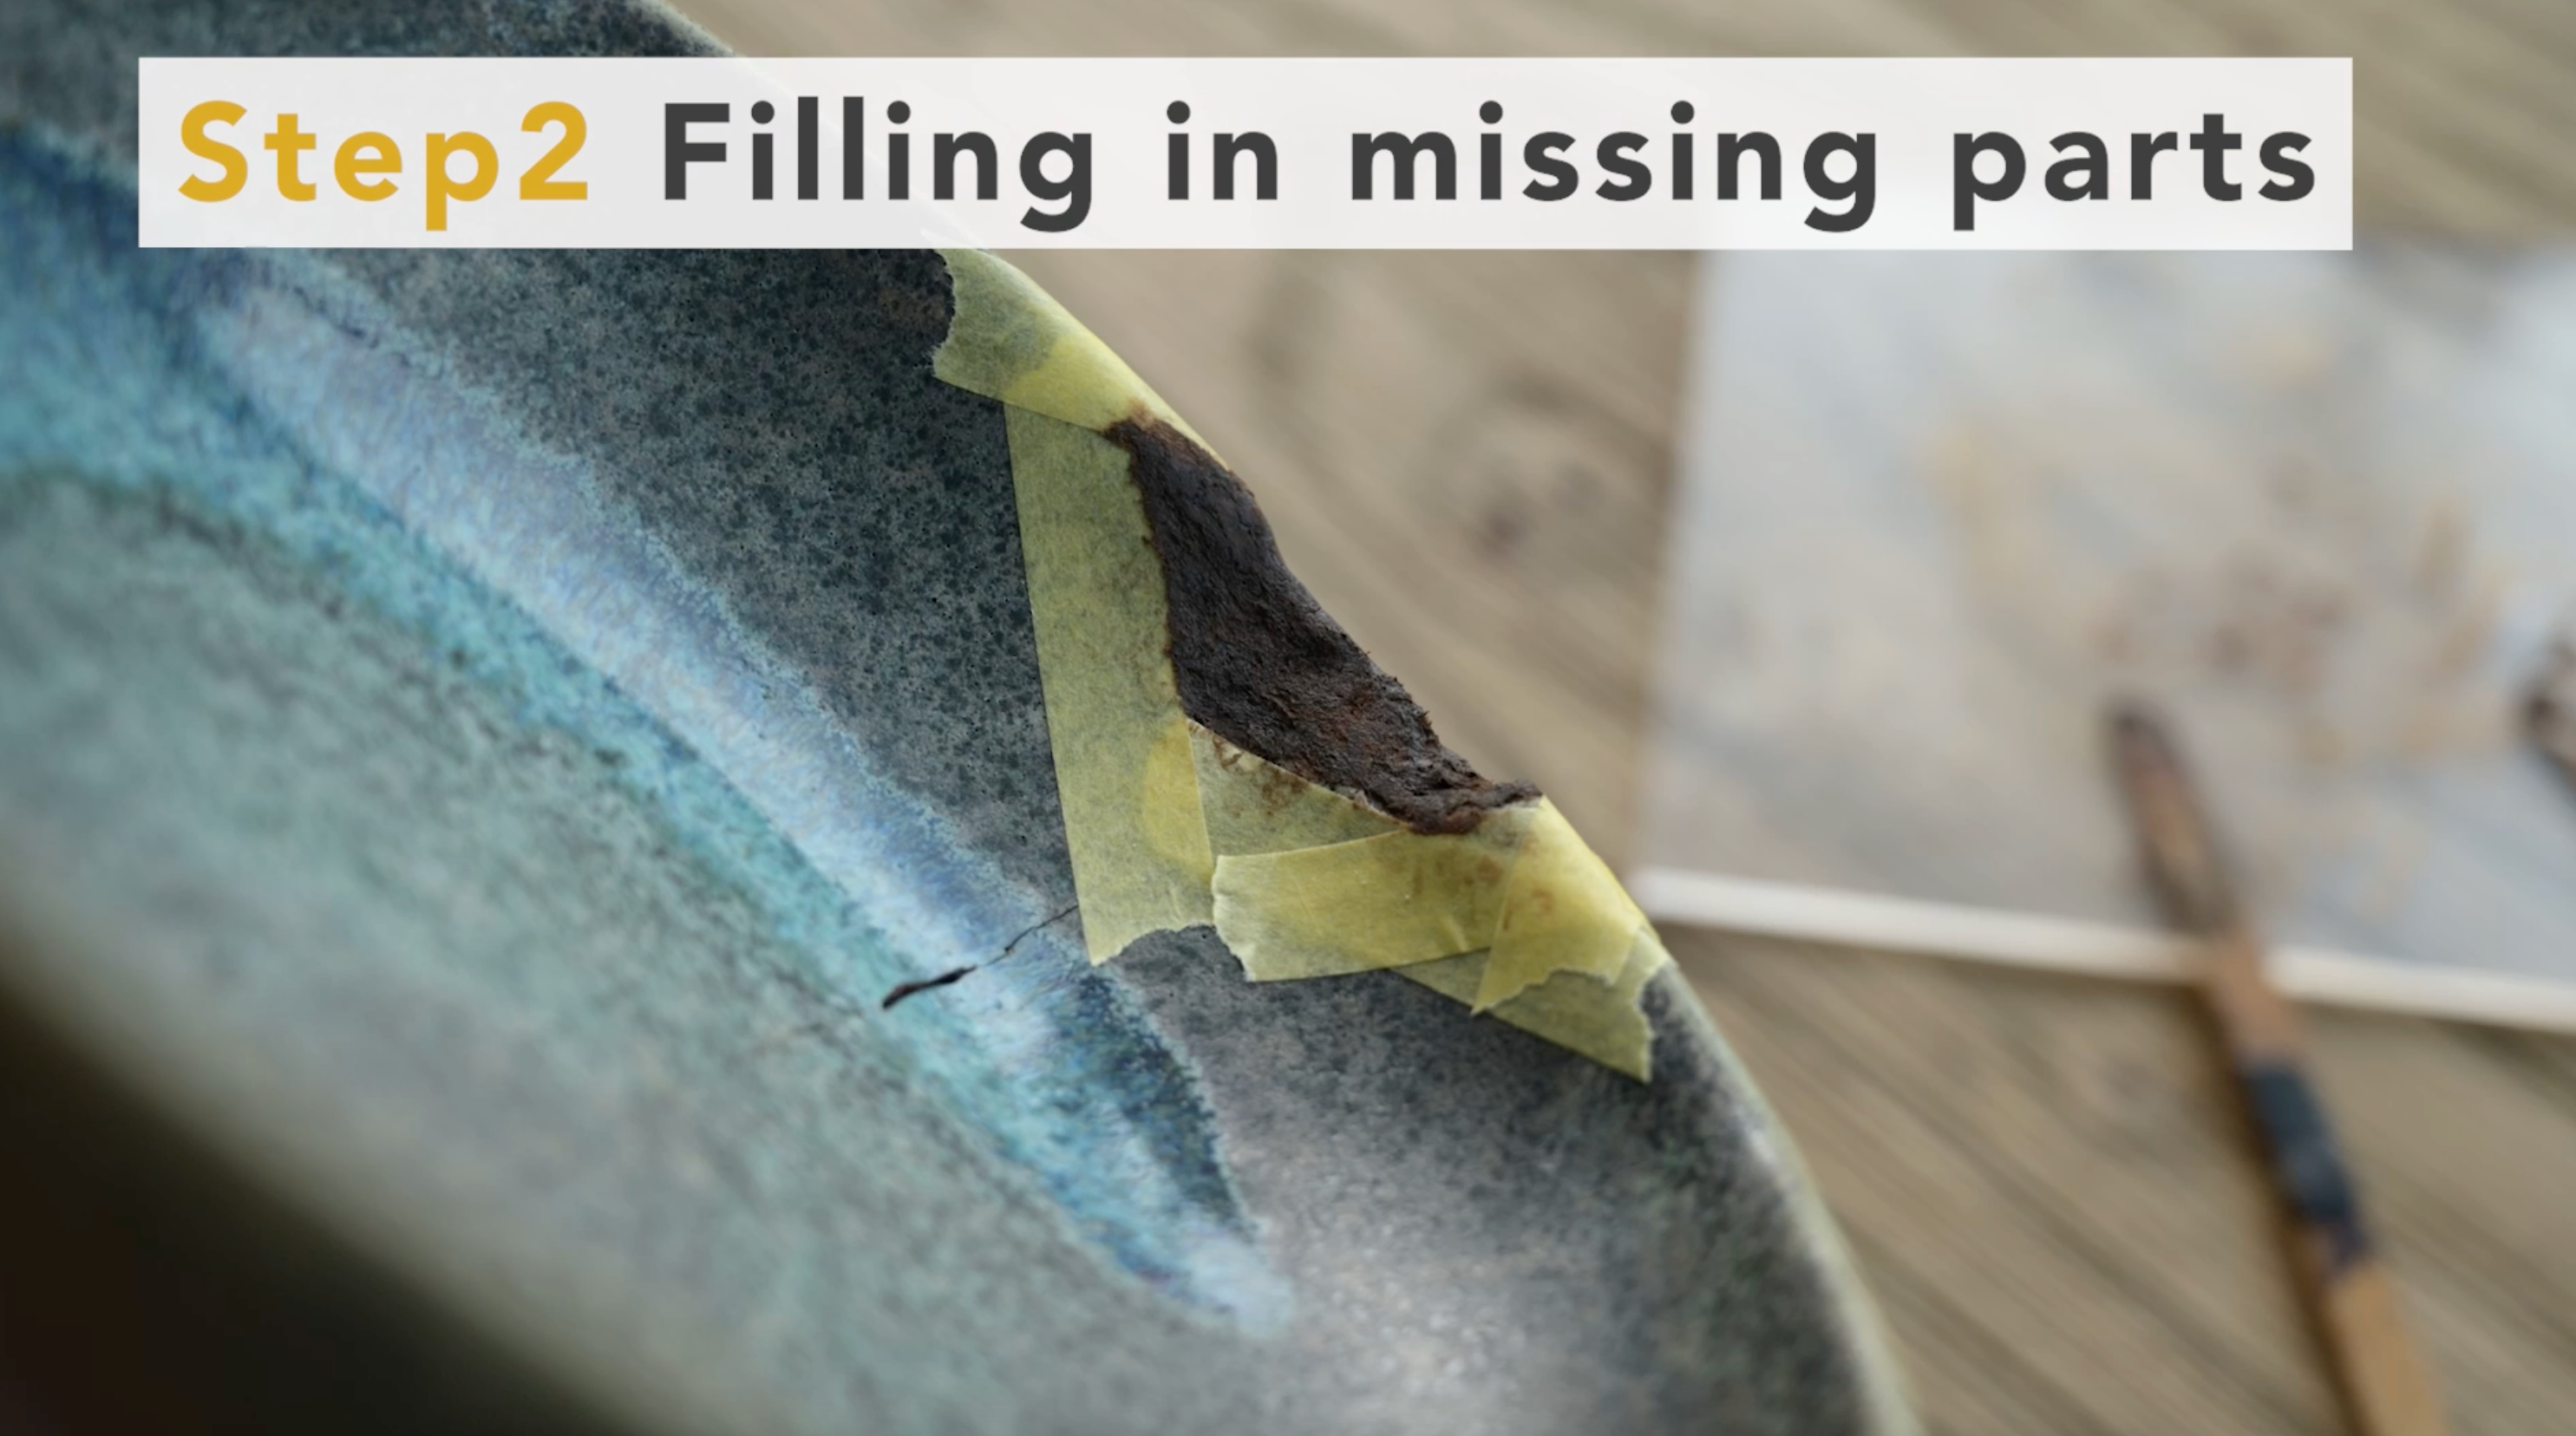
4. Wait about a week to harden
Wait a week for the kokuso-urushi to harden.
Repeat 1-4 process for any areas that were not filled in this time.
The kokuso-urushi does not need much humidity to harden, but it may not harden sufficiently in dry areas, for example.
To be safe, keep it in a place with a humidity of around 70% and a temperature of around 25 degrees Celsius.
- note
- One method is to place wet towels in cardboard boxes to maintain the right humidity for storage.
- The temperature should also be kept from getting cold by using air conditioning.
- In particular, urushi may not harden properly if the temperature falls below 20 degrees Celsius, so be careful to control both temperature and humidity after working on this and subsequent steps.

5. Scrape off excess Kokuso-urushi
When most of the missing areas are filled in, scrape it off with a cutter.
Thin stains should be wiped up with ethanol.
Shave it as much as possible to get as close to the original ceramics shape as possible.
The lacks will be filled in the next step, so now let's shave off the excess and shape it.
6. Making "Sabi-urushi"
Once excess kokuso-urushi is removed, we will use "Sabi-urushi" to fill the fine dents.
- Ingredients for Sabi-Urushi
- Tonoko: 2 grated spoonful
- Water: 1 grated spoonful
- Raw urushi: 1 grated spoonful
- ※With 0.1ml measuring spoon
First, take Tonoko on an acrylic plate, add water and mix them.
Then, add raw urushi and knead with a spatula.
The sabi-urushi dries quickly, so make it as small as possible and place the spatula on top to keep it out of the air.
7. Apply sabi-urushi
Then, apply sabi-urushi to the surface of the missing area.
※Use masking tape to protect unglazed pottery from stains.
The purpose of this step is to flatten the surface.
So, apply it so that no dents are left.
Normally, the grooves of the cracks are also filled with sabi urushi.
However, since there is a possibility of staining ceramics, they will be filled with black urushi next time.
8. Wait a few days to harden
Wait a few days for the sabi-urushi to harden.
The sabi-urushi does not need much humidity to harden, but it may not harden sufficiently in dry areas, for example.
To be safe, keep it in a place with a humidity of around 70% and a temperature of around 25 degrees Celsius.
- Note
- If you try to fill large chips with sabi-urushi, only the surface of the sabi-urushi might dry, leaving the inside dull. If the groove is more than 1mm deep, use "Kokuso-urushi" used for chipped repair.
- note
- One method is to place wet towels in cardboard boxes to maintain the right humidity for storage.
- The temperature should also be kept from getting cold by using air conditioning.
- In particular, urushi may not harden properly if the temperature falls below 20 degrees Celsius, so be careful to control both temperature and humidity after working on this and subsequent steps.
How to wash tools
Wipe off any tools with urushi using a tissue moistened with ethanol.
All tools except for the brush can be wiped off with ethanol.
1. Scrape off excess raw urushi
Scrape off any raw urushi from the surrounding area with a cutter and wipe it off with alcohol.
2. Making "Kokuso-urushi"
Once excess raw urushi is removed, we will use "Kokuso-urushi" to fill the missing area.
In the Basic Tutorial, we used wood powder, but this time we will show you another way to make it.
It is easy to dry and strong even when applied thickly.
- Ingredients for Kokuso-Urushi
- Tonoko: 3 grated spoonful
- Jinoko: 1 grated spoonful
- Water: 1 grated spoonful
- Raw urushi: 2 grated spoonful
- Kokuso wata: 1 grated spoonful
- ※With 0.1ml measuring spoon
First, mix tonoko, jinoko and water on an acrylic board and knead.
Then add raw urushi and knead well with a spatula.
Finally, add Kokuso wata and knead to complete the process.
The kokuso-urushi dries quickly, so make it as small as possible and place the spatula on top to keep it out of the air.
3. Apply kokuso-urushi to the missing parts
Use Kokuso urushi to fill in the missing parts.
Thin glazed ceramics should have masking tape around them beforehand to prevent staining.
When applying kokuso urushi, keep the thickness to about 3mm at a time.
This is because if it is applied too thickly, the core may not harden.
For chips deeper than 4mm, repeat this step several times.
If kokuso urushi becomes dry, remake it.
If dry kokuso urushi is applied, it will be easier to peel off later.
4. Wait about a week to harden
Wait a week for the kokuso-urushi to harden.
Repeat 1-4 process for any areas that were not filled in this time.
The kokuso-urushi does not need much humidity to harden, but it may not harden sufficiently in dry areas, for example.
To be safe, keep it in a place with a humidity of around 70% and a temperature of around 25 degrees Celsius.
- note
- One method is to place wet towels in cardboard boxes to maintain the right humidity for storage.
- The temperature should also be kept from getting cold by using air conditioning.
- In particular, urushi may not harden properly if the temperature falls below 20 degrees Celsius, so be careful to control both temperature and humidity after working on this and subsequent steps.
5. Scrape off excess Kokuso-urushi
When most of the missing areas are filled in, scrape it off with a cutter.
Thin stains should be wiped up with ethanol.
Shave it as much as possible to get as close to the original ceramics shape as possible.
The lacks will be filled in the next step, so now let's shave off the excess and shape it.
6. Making "Sabi-urushi"
Once excess kokuso-urushi is removed, we will use "Sabi-urushi" to fill the fine dents.
- Ingredients for Sabi-Urushi
- Tonoko: 2 grated spoonful
- Water: 1 grated spoonful
- Raw urushi: 1 grated spoonful
- ※With 0.1ml measuring spoon
First, take Tonoko on an acrylic plate, add water and mix them.
Then, add raw urushi and knead with a spatula.
The sabi-urushi dries quickly, so make it as small as possible and place the spatula on top to keep it out of the air.
7. Apply sabi-urushi
Then, apply sabi-urushi to the surface of the missing area.
※Use masking tape to protect unglazed pottery from stains.
The purpose of this step is to flatten the surface.
So, apply it so that no dents are left.
Normally, the grooves of the cracks are also filled with sabi urushi.
However, since there is a possibility of staining ceramics, they will be filled with black urushi next time.
8. Wait a few days to harden
Wait a few days for the sabi-urushi to harden.
The sabi-urushi does not need much humidity to harden, but it may not harden sufficiently in dry areas, for example.
To be safe, keep it in a place with a humidity of around 70% and a temperature of around 25 degrees Celsius.
- Note
- If you try to fill large chips with sabi-urushi, only the surface of the sabi-urushi might dry, leaving the inside dull. If the groove is more than 1mm deep, use "Kokuso-urushi" used for chipped repair.
- note
- One method is to place wet towels in cardboard boxes to maintain the right humidity for storage.
- The temperature should also be kept from getting cold by using air conditioning.
- In particular, urushi may not harden properly if the temperature falls below 20 degrees Celsius, so be careful to control both temperature and humidity after working on this and subsequent steps.
How to wash tools
Wipe off any tools with urushi using a tissue moistened with ethanol.
All tools except for the brush can be wiped off with ethanol.
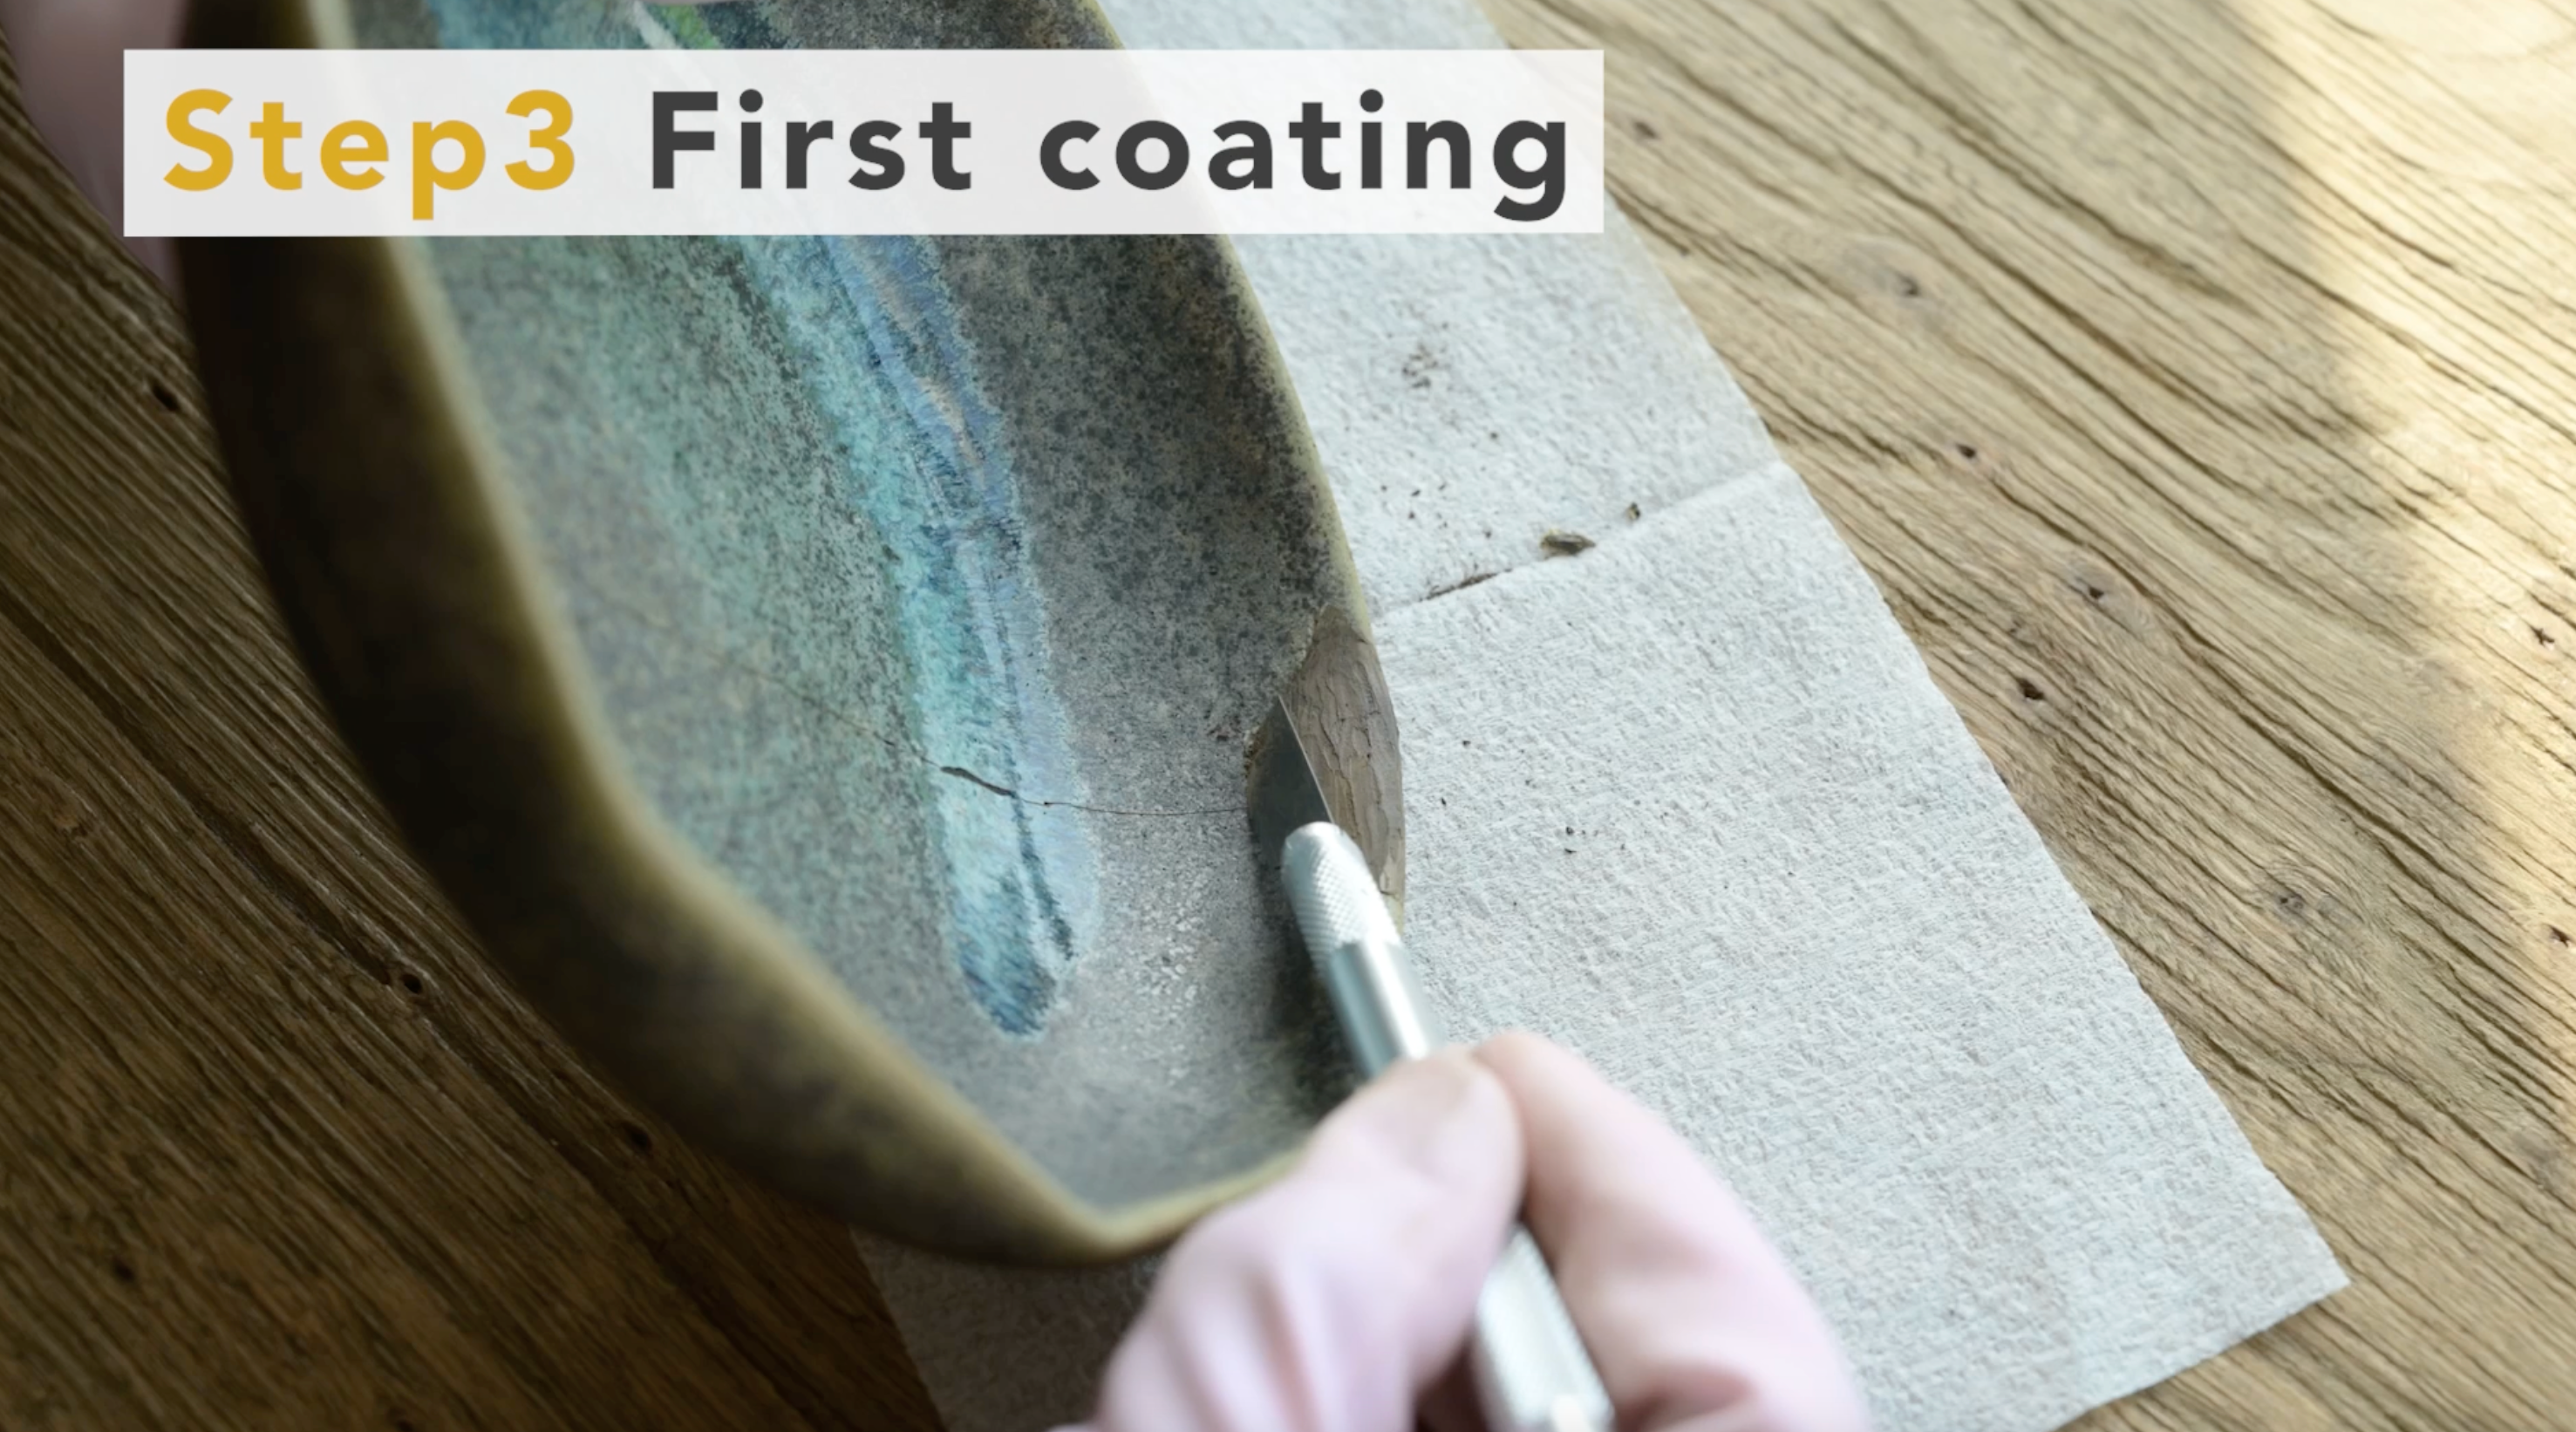
1. Scrape off the sabi-urushi
After the sabi-urushi has hardened, scrape off it on the overhangs with a cutter to make the seams flat and even.
If the surface is large and difficult to smooth with a cutter, use a sandpaper to smooth the surface as much as possible.
Wipe off any dirt on the surface of the ceramics with an ethanol-soaked tissue as appropriate.
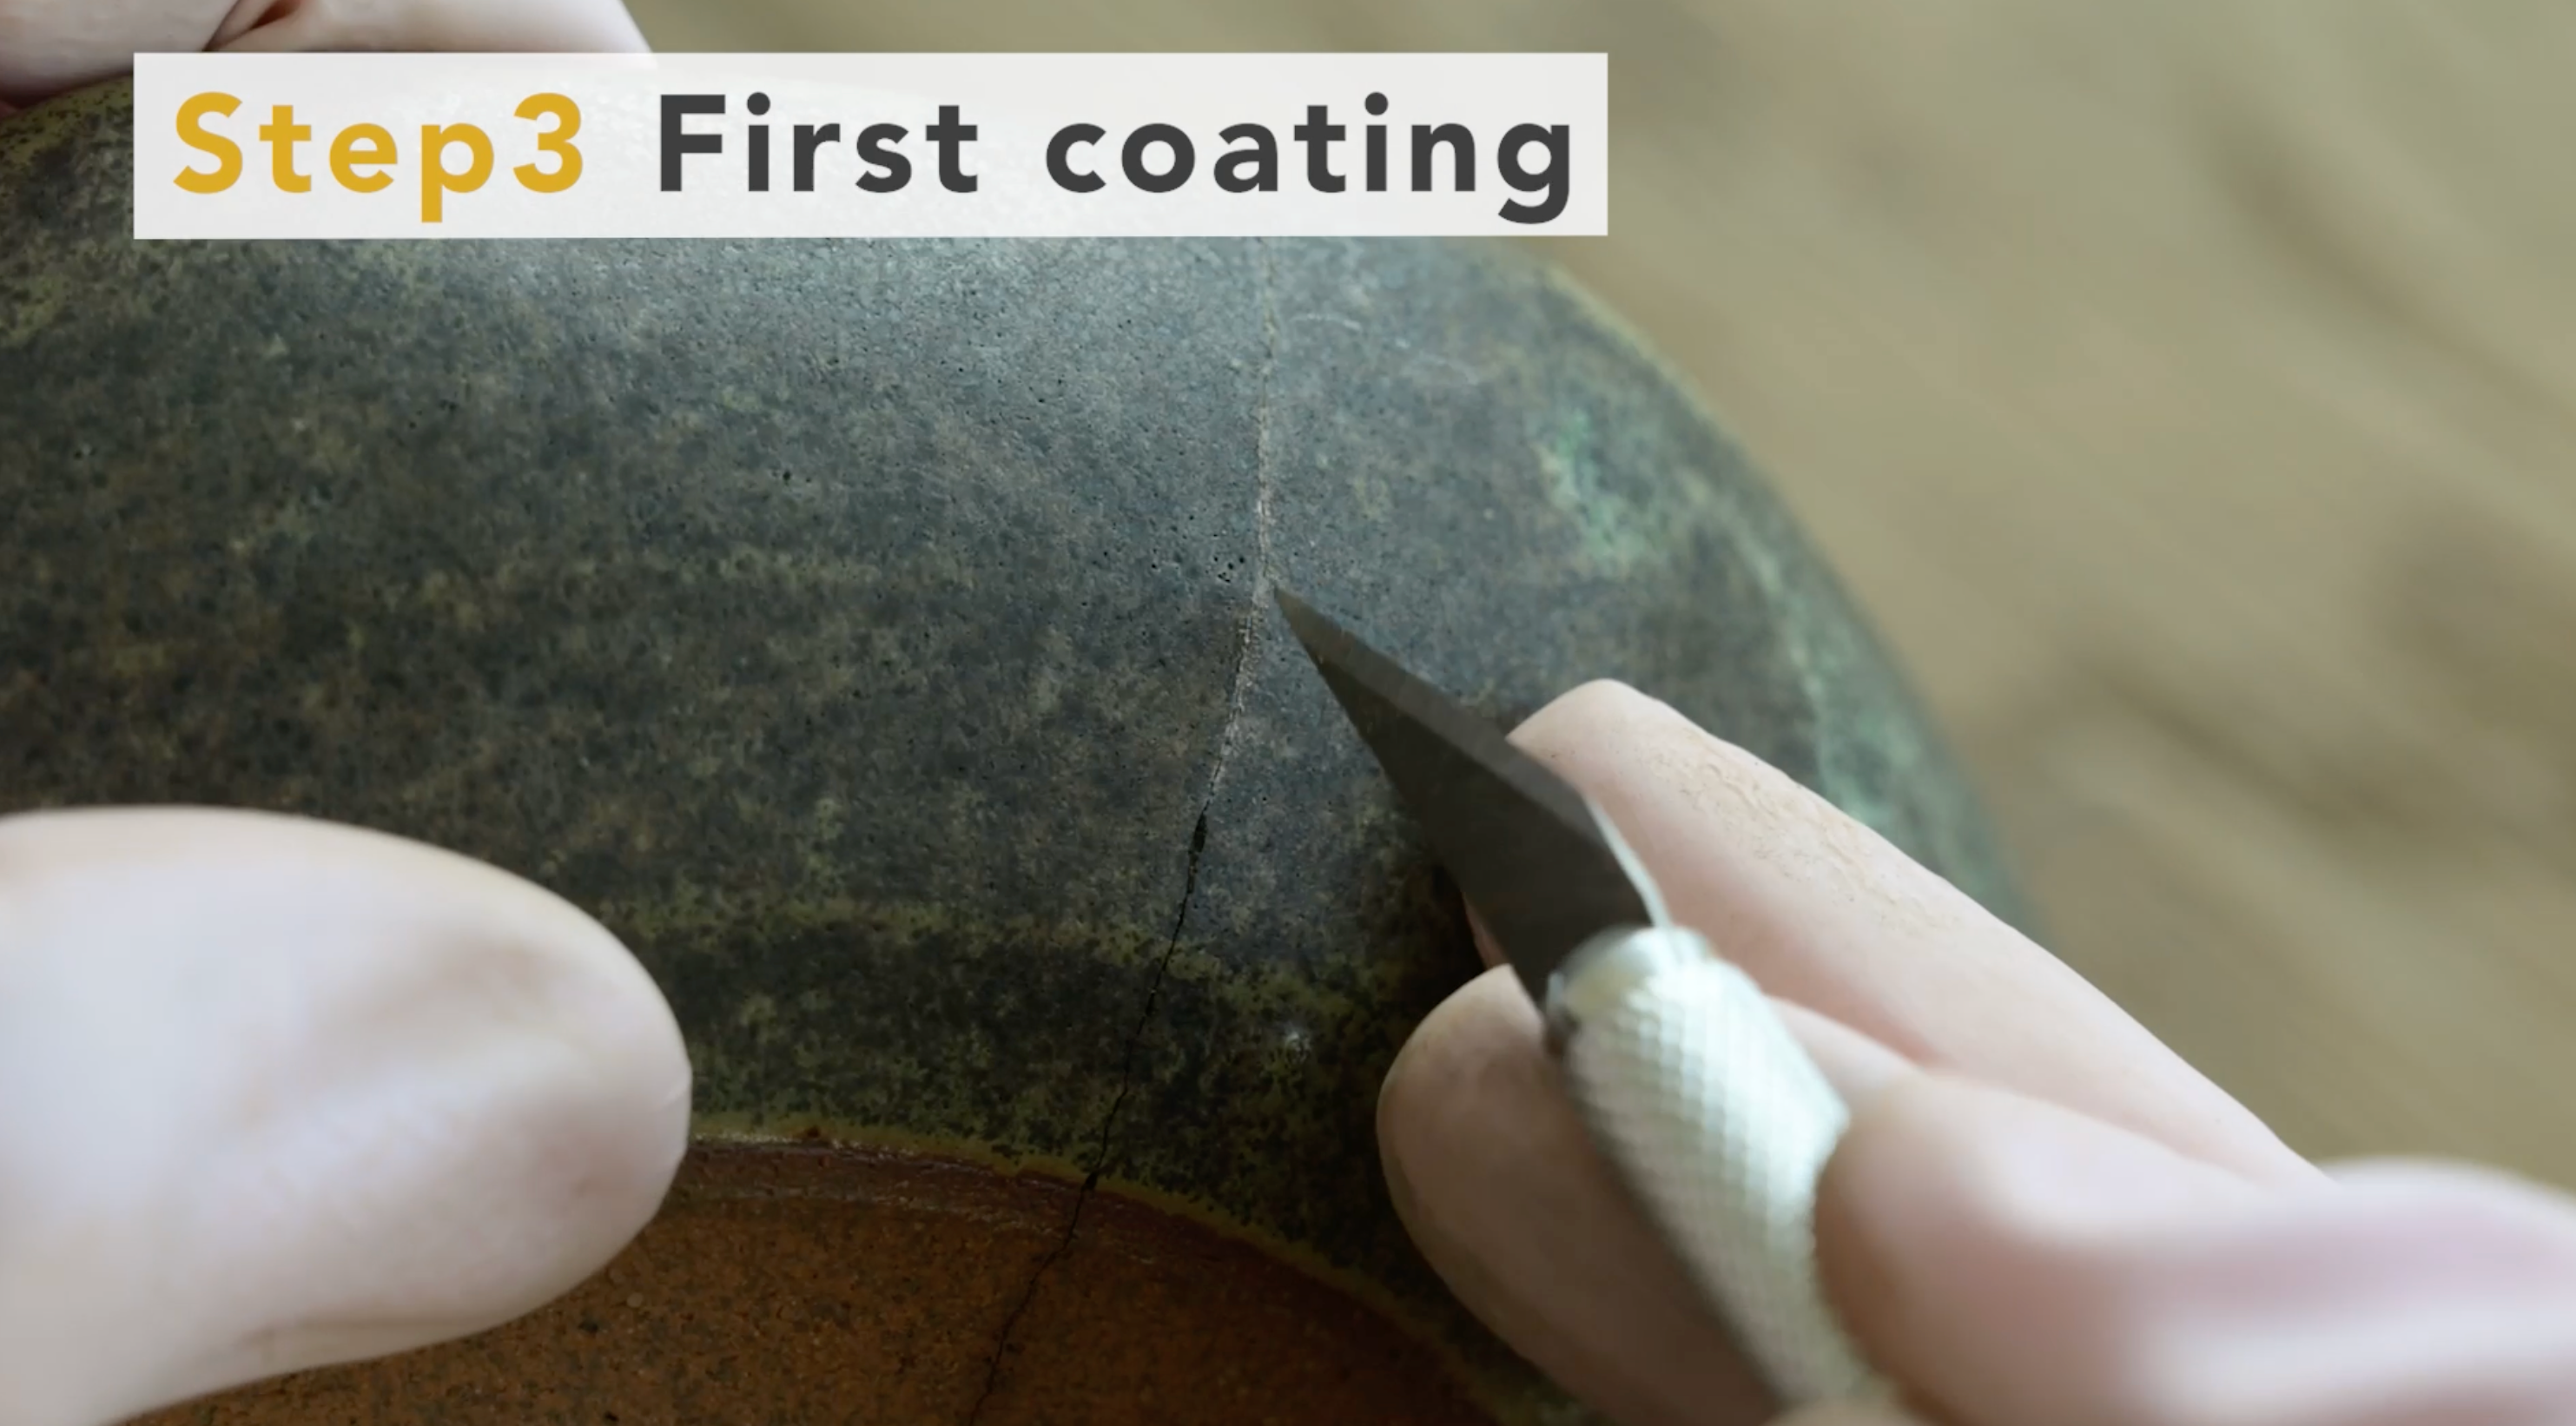
2. Make a groove in the crack
Use a cutter to make a groove in the crack.
This will prevent the bengara urushi to be applied later from peeling off.
It is easy to make the width of the groove with the cutter blade facing sideways.
3. Coating the seams with "Bengara urushi"
Once the surface is smooth, apply bengara urushi.
Wipe the brush tip thoroughly with ethanol first before use.
It is recommended to apply the inside first because if you apply the outside first, you may touch the seam when applying the inside.
Apply a slightly thicker coat, with the intention of filling in the grooves.
Use a flat brush for chipped areas.
The purpose of this process is not to simply coat the seams, but to fill in the small dents by pouring bengara urushi into the seams to further flatten the surface.
Work as if you were "filling in the gaps with urushi" rather than "applying urushi".
In lesson 04, black urushi was used for coating and bengara urushi was used for finishing.
However, in the case of Gintsugi, black urushi is used for finishing and bengara urushi is used for coating because the silver color is more beautiful when the undercoat of the finish is black.
4. Wait few days to harden
When you have finished coating, leave it in the humid room and wait for a few days.
Also, keep the temperature around 25°C and the humidity around 70% because it will not harden if the temperature and humidity is too low.
On the other hand, too high a humidity of 80% or more is not good, as it may cause wrinkles when the urushi hardens.
- note
- One method is to place wet towels in cardboard boxes to maintain the right humidity for storage.
- The temperature should also be kept from getting cold by using air conditioning.
- In particular, urushi may not harden properly if the temperature falls below 20 degrees Celsius, so be careful to control both temperature and humidity after working on this and subsequent steps.
How to wash brushes
Wash brushes after use with vegetable oil such as rapeseed oil.
Dip the brush into the oil that has been put out on the acrylic plate and wipe it off with a tissue.
Repeat this process until there is almost no color on the tissue.
Finally, put the cap on and store the brush with a little oil remaining on it.
Otherwise, the brush tip may harden.
Finally, completely wipe off any oil remaining on the acrylic plate with ethanol.
If even a small amount of oil is left, it may mix with the oil and prevent the urushi from hardening next time.
1. Scrape off the sabi-urushi
After the sabi-urushi has hardened, scrape off it on the overhangs with a cutter to make the seams flat and even.
If the surface is large and difficult to smooth with a cutter, use a sandpaper to smooth the surface as much as possible.
Wipe off any dirt on the surface of the ceramics with an ethanol-soaked tissue as appropriate.
2. Make a groove in the crack
Use a cutter to make a groove in the crack.
This will prevent the bengara urushi to be applied later from peeling off.
It is easy to make the width of the groove with the cutter blade facing sideways.
3. Coating the seams with "Bengara urushi"
Once the surface is smooth, apply bengara urushi.
Wipe the brush tip thoroughly with ethanol first before use.
It is recommended to apply the inside first because if you apply the outside first, you may touch the seam when applying the inside.
Apply a slightly thicker coat, with the intention of filling in the grooves.
Use a flat brush for chipped areas.
The purpose of this process is not to simply coat the seams, but to fill in the small dents by pouring bengara urushi into the seams to further flatten the surface.
Work as if you were "filling in the gaps with urushi" rather than "applying urushi".
In lesson 04, black urushi was used for coating and bengara urushi was used for finishing.
However, in the case of Gintsugi, black urushi is used for finishing and bengara urushi is used for coating because the silver color is more beautiful when the undercoat of the finish is black.
4. Wait few days to harden
When you have finished coating, leave it in the humid room and wait for a few days.
Also, keep the temperature around 25°C and the humidity around 70% because it will not harden if the temperature and humidity is too low.
On the other hand, too high a humidity of 80% or more is not good, as it may cause wrinkles when the urushi hardens.
- note
- One method is to place wet towels in cardboard boxes to maintain the right humidity for storage.
- The temperature should also be kept from getting cold by using air conditioning.
- In particular, urushi may not harden properly if the temperature falls below 20 degrees Celsius, so be careful to control both temperature and humidity after working on this and subsequent steps.
How to wash brushes
Wash brushes after use with vegetable oil such as rapeseed oil.
Dip the brush into the oil that has been put out on the acrylic plate and wipe it off with a tissue.
Repeat this process until there is almost no color on the tissue.
Finally, put the cap on and store the brush with a little oil remaining on it.
Otherwise, the brush tip may harden.
Finally, completely wipe off any oil remaining on the acrylic plate with ethanol.
If even a small amount of oil is left, it may mix with the oil and prevent the urushi from hardening next time.
1. Polish the seams with an abrasive sheets
After the first coat of bengara urushi dries, polish the seams using soft abrasive sheets.
The polishing sheet is soft and fine-grained, so it will not scratch the glaze even if it is polished directly.
However, the gilding and painting may come off, so protect it with masking tape beforehand.
For stains that are difficult to remove, it is also useful to use a cutter.
When the seams are flat enough that you can run your finger over them and not feel any bumps, wipe with ethanol.
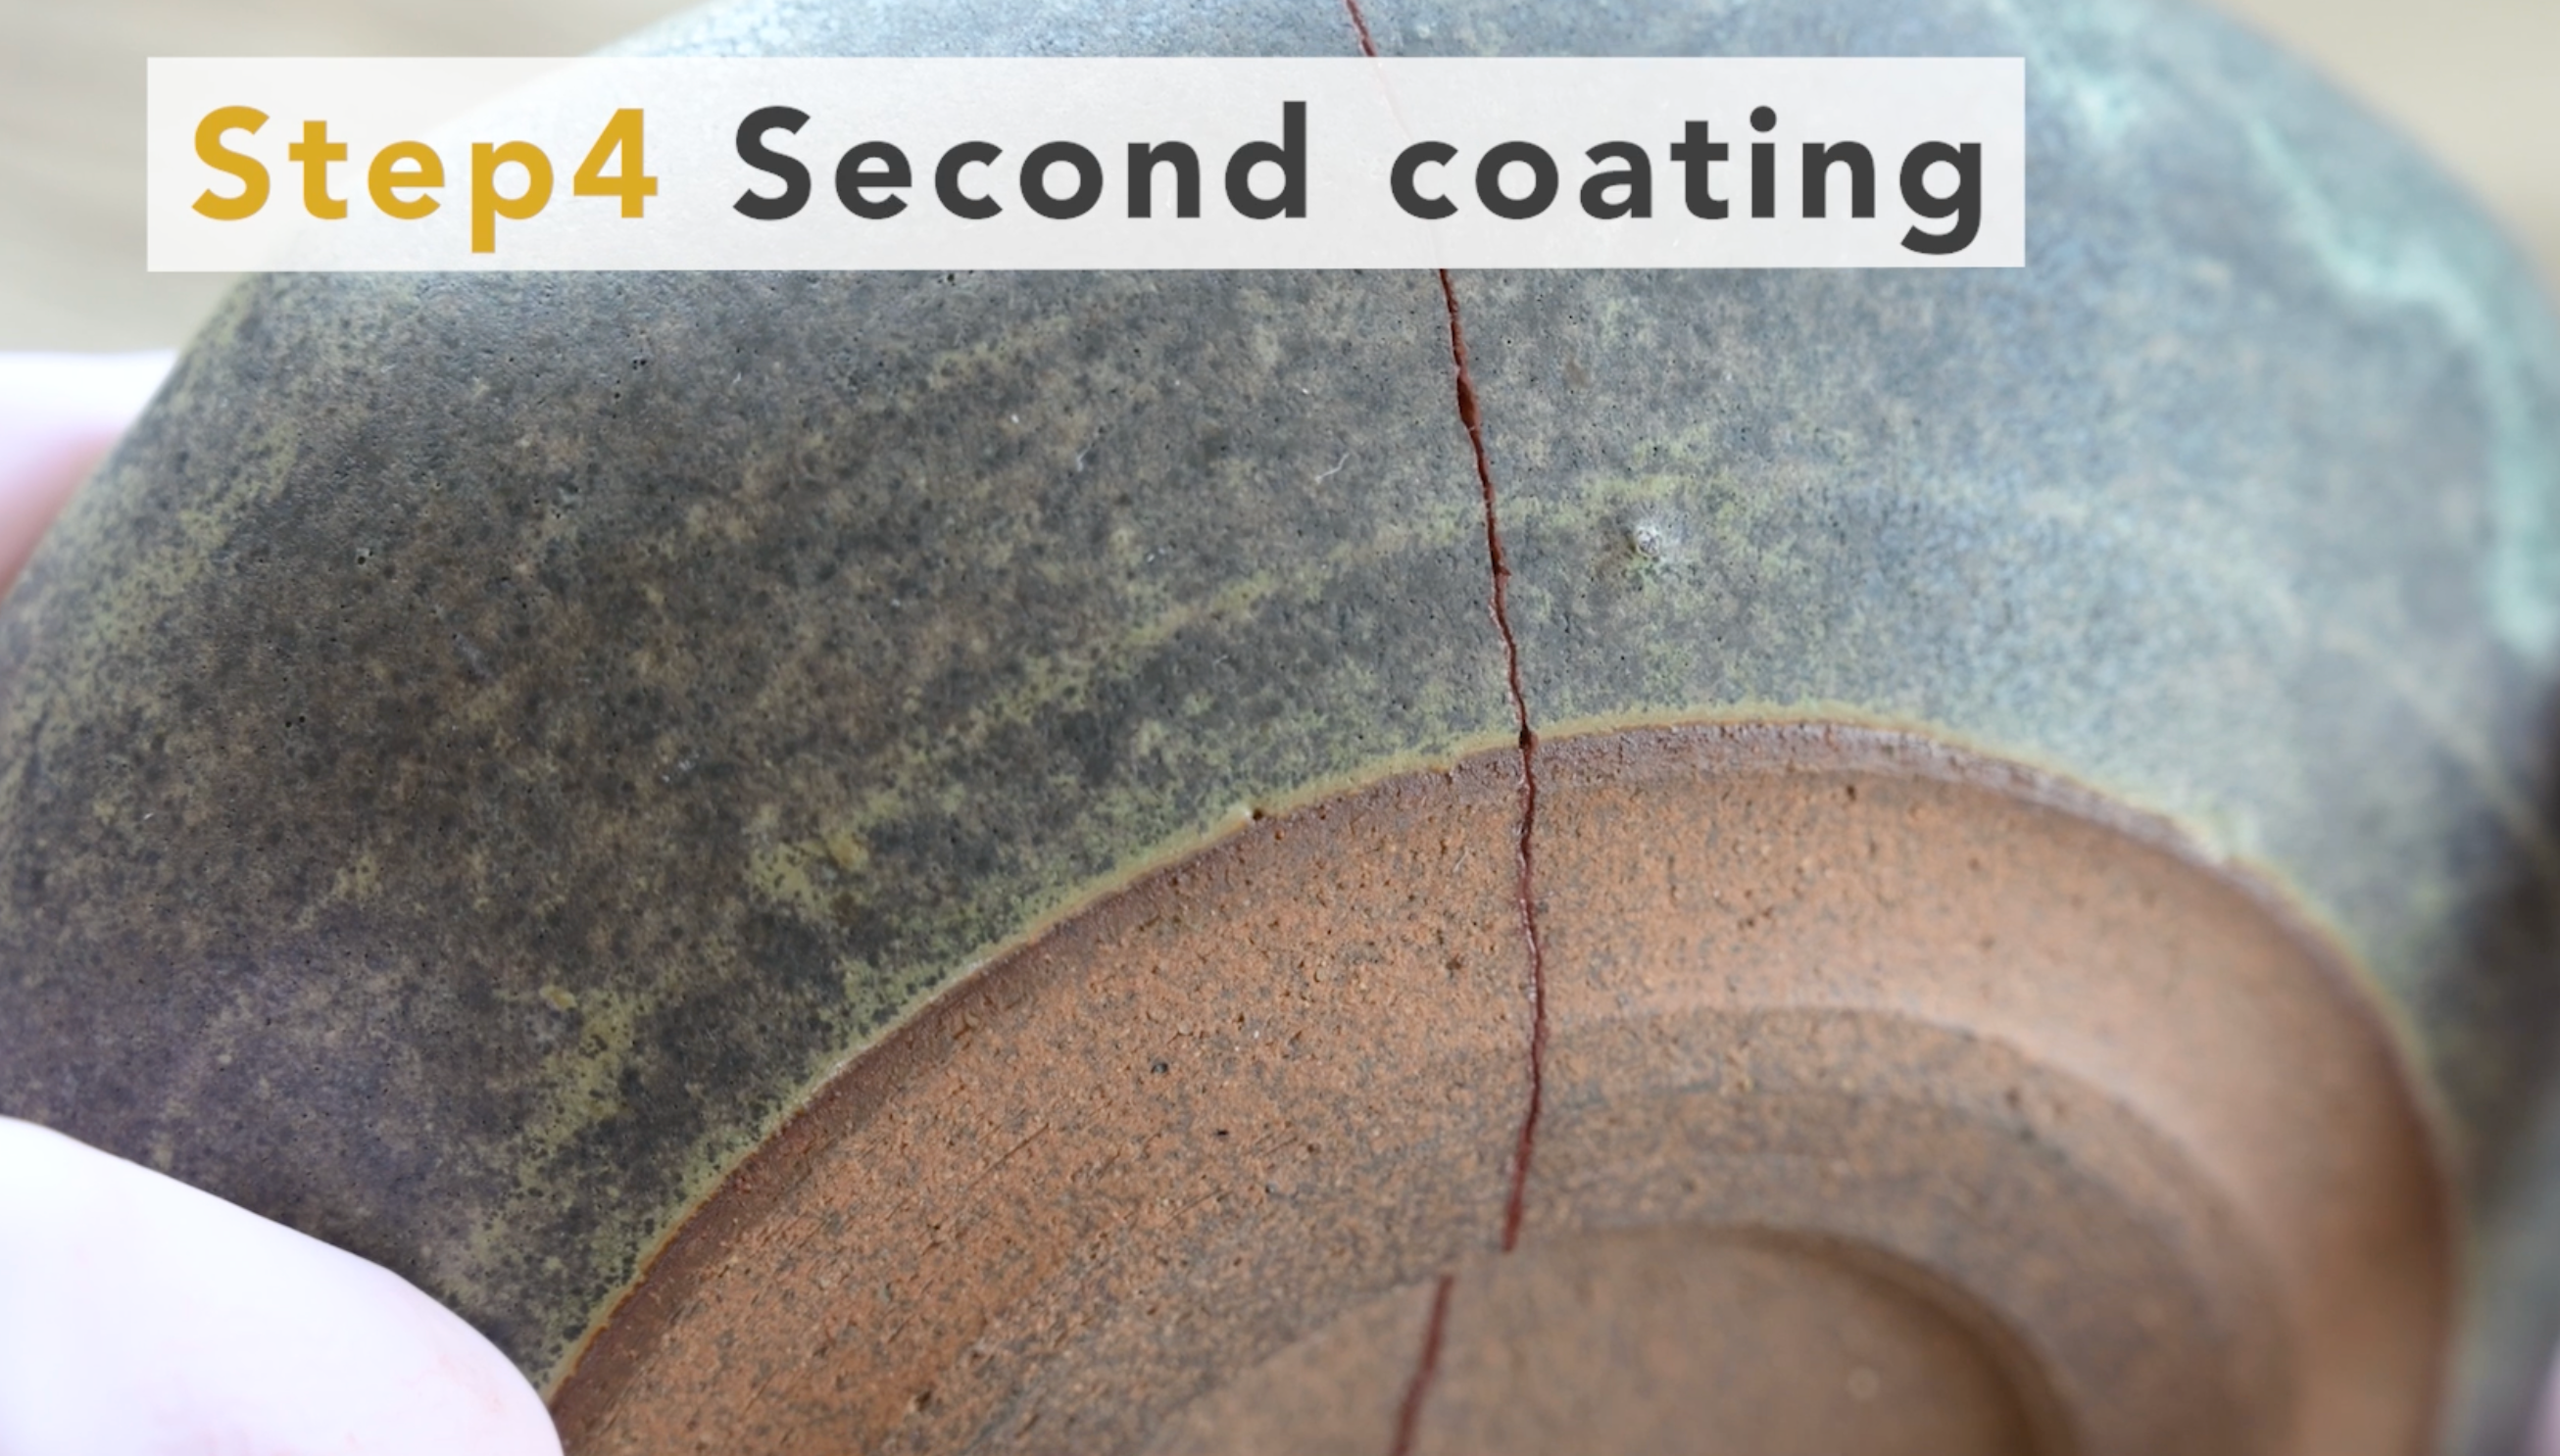
2. Coating with bengara urushi
Once polished, in many cases grooves and wrinkles still remain.
In such cases, coat the surface again using the same procedure as step 3.
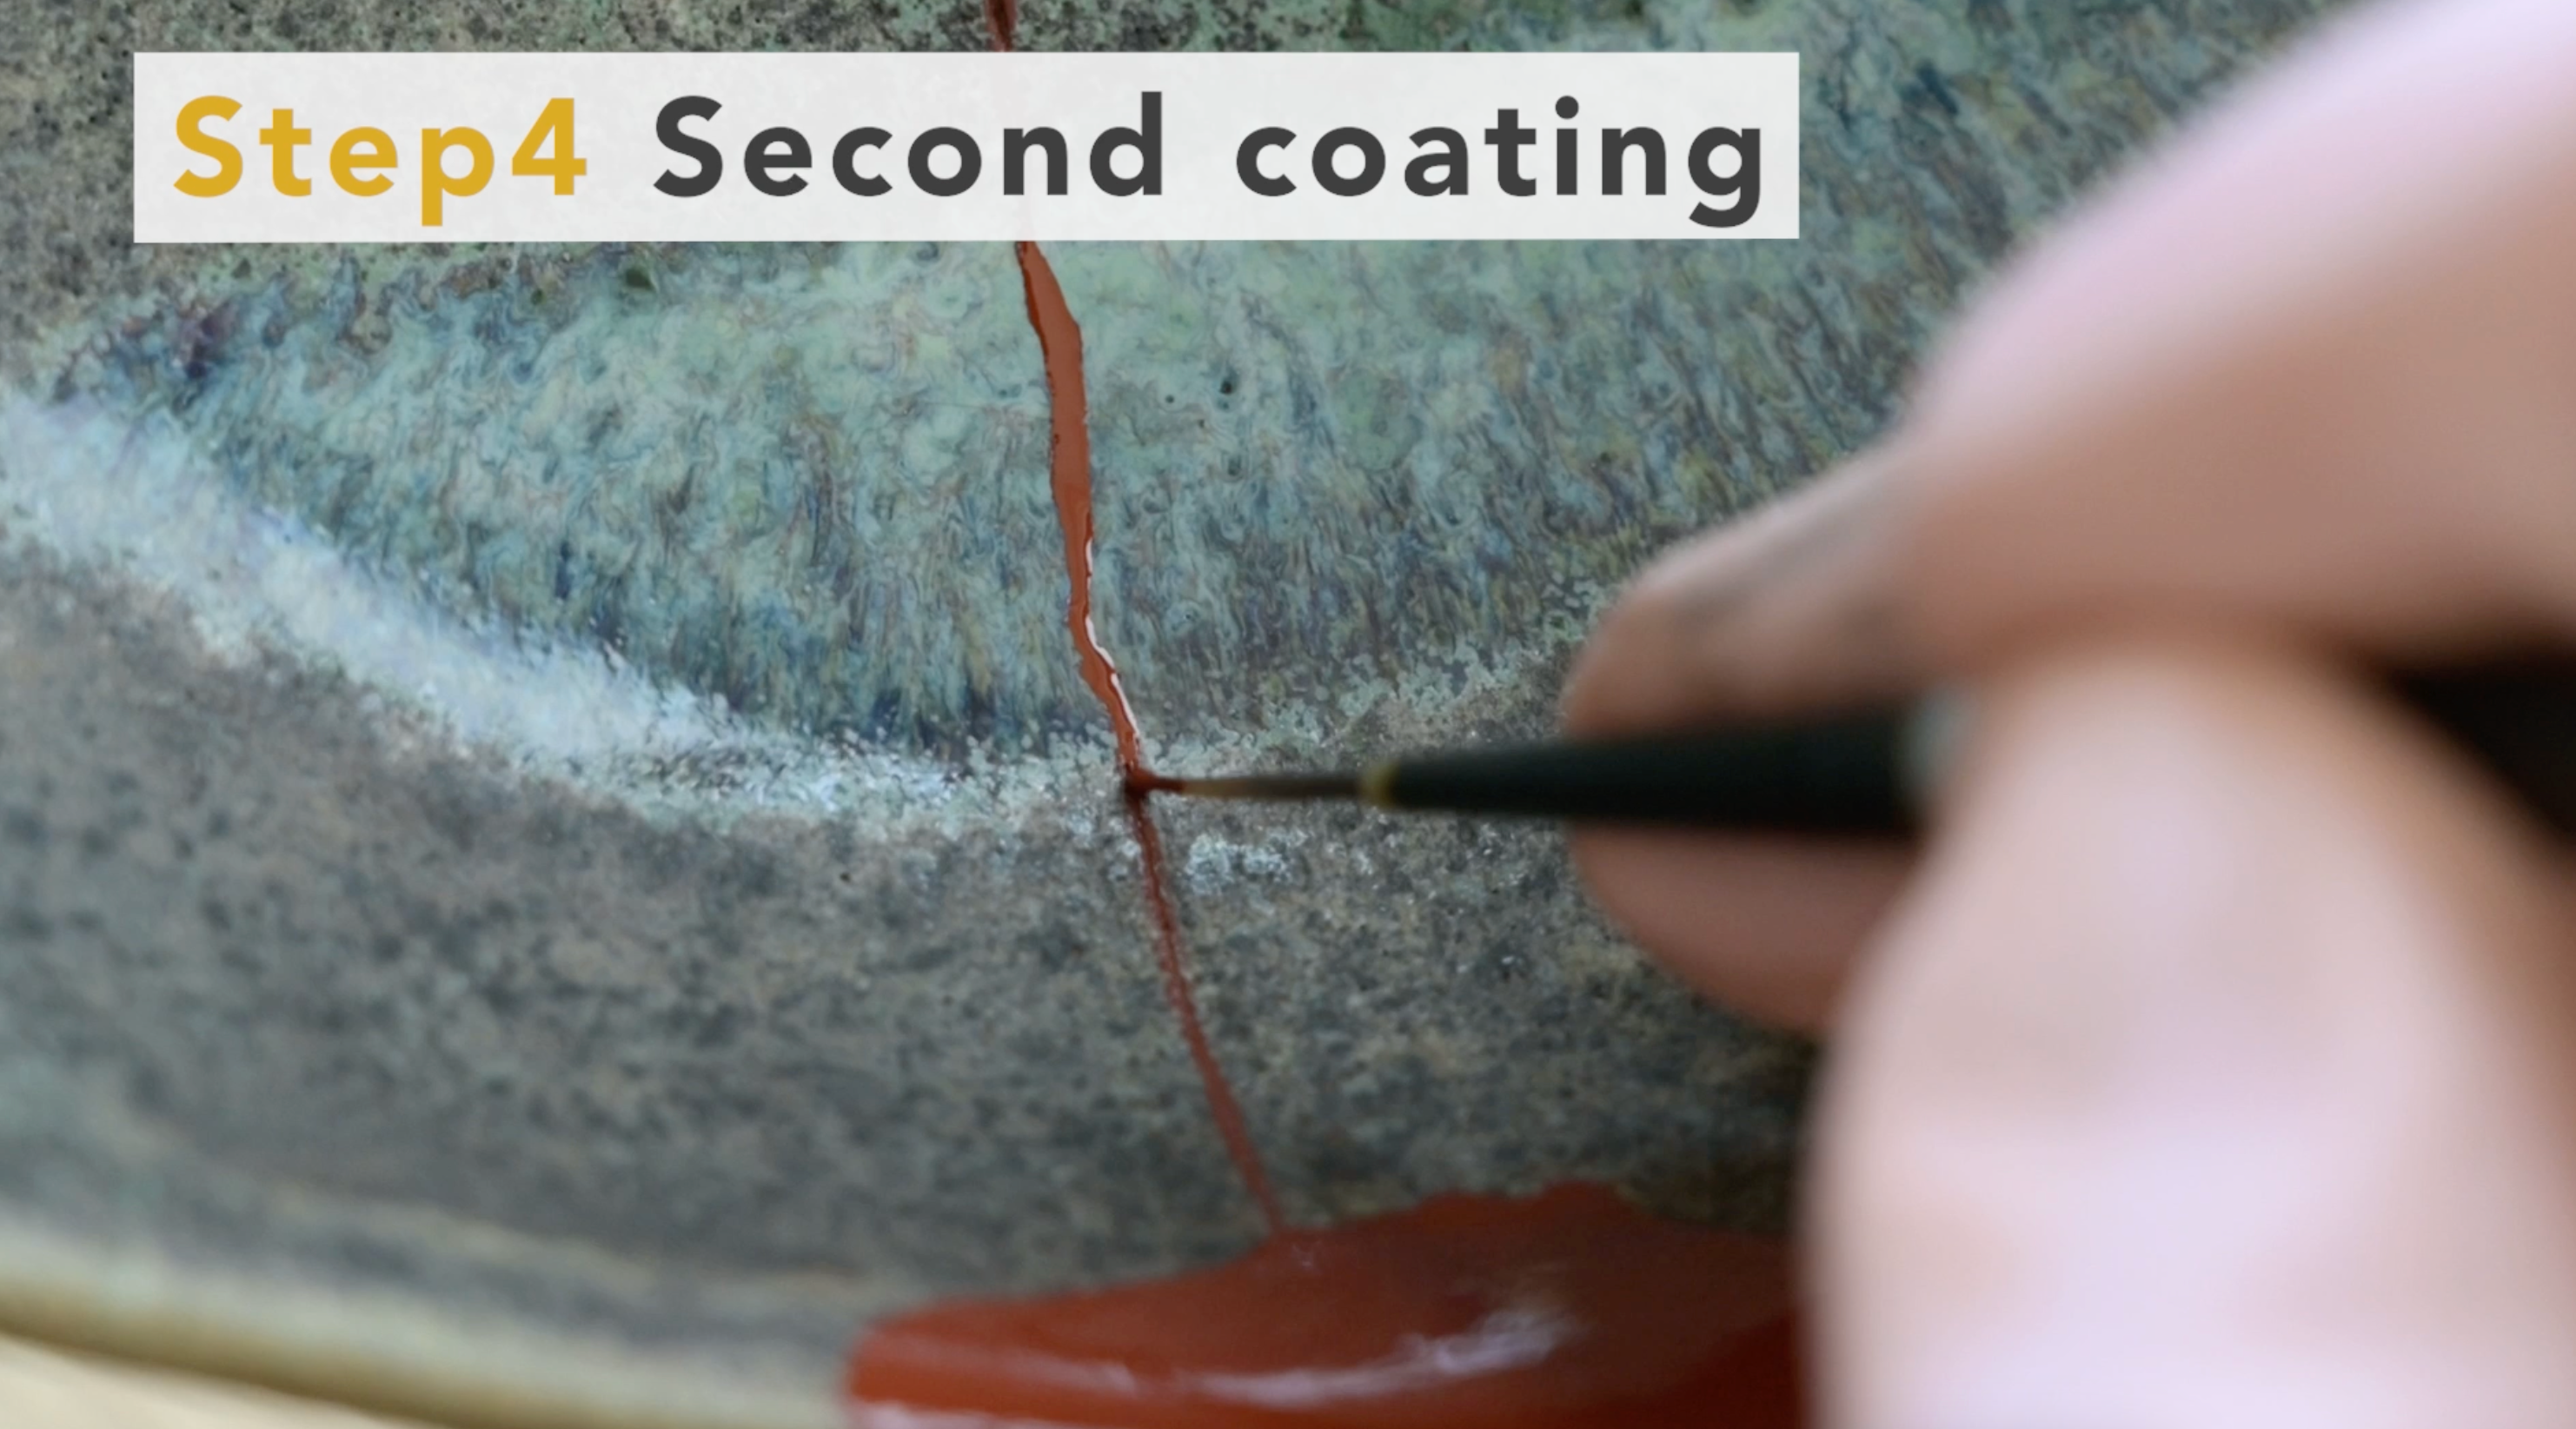
Wipe the brush tip thoroughly with ethanol first before use.
It is recommended that the entire area be reapplied, not just the grooved areas.
This is because there may be fine grooves that are not visible to the eye.
For visible grooves, apply a slightly thicker coat to fill them in.

3. Wait few days to harden
When you have finished coating, leave it in the humid room and wait for a few days.
Also, keep the temperature around 25°C and the humidity around 70% because it will not harden if the temperature and humidity is too low.
On the other hand, too high a humidity of 80% or more is not good, as it may cause wrinkles when the urushi hardens.
- note
- One method is to place wet towels in cardboard boxes to maintain the right humidity for storage.
- The temperature should also be kept from getting cold by using air conditioning.
- In particular, urushi may not harden properly if the temperature falls below 20 degrees Celsius, so be careful to control both temperature and humidity after working on this and subsequent steps.
How to wash brushes
Wash brushes after use with vegetable oil such as rapeseed oil.
Dip the brush into the oil that has been put out on the acrylic plate and wipe it off with a tissue.
Repeat this process until there is almost no color on the tissue.
Finally, put the cap on and store the brush with a little oil remaining on it.
Otherwise, the brush tip may harden.
Finally, completely wipe off any oil remaining on the acrylic plate with ethanol.
If even a small amount of oil is left, it may mix with the oil and prevent the urushi from hardening next time.
1. Polish the seams with an abrasive sheets
After the first coat of bengara urushi dries, polish the seams using soft abrasive sheets.
The polishing sheet is soft and fine-grained, so it will not scratch the glaze even if it is polished directly.
However, the gilding and painting may come off, so protect it with masking tape beforehand.
For stains that are difficult to remove, it is also useful to use a cutter.
When the seams are flat enough that you can run your finger over them and not feel any bumps, wipe with ethanol.
2. Coating with bengara urushi
Once polished, in many cases grooves and wrinkles still remain.
In such cases, coat the surface again using the same procedure as step 3.
Wipe the brush tip thoroughly with ethanol first before use.
It is recommended that the entire area be reapplied, not just the grooved areas.
This is because there may be fine grooves that are not visible to the eye.
For visible grooves, apply a slightly thicker coat to fill them in.
3. Wait few days to harden
When you have finished coating, leave it in the humid room and wait for a few days.
Also, keep the temperature around 25°C and the humidity around 70% because it will not harden if the temperature and humidity is too low.
On the other hand, too high a humidity of 80% or more is not good, as it may cause wrinkles when the urushi hardens.
- note
- One method is to place wet towels in cardboard boxes to maintain the right humidity for storage.
- The temperature should also be kept from getting cold by using air conditioning.
- In particular, urushi may not harden properly if the temperature falls below 20 degrees Celsius, so be careful to control both temperature and humidity after working on this and subsequent steps.
How to wash brushes
Wash brushes after use with vegetable oil such as rapeseed oil.
Dip the brush into the oil that has been put out on the acrylic plate and wipe it off with a tissue.
Repeat this process until there is almost no color on the tissue.
Finally, put the cap on and store the brush with a little oil remaining on it.
Otherwise, the brush tip may harden.
Finally, completely wipe off any oil remaining on the acrylic plate with ethanol.
If even a small amount of oil is left, it may mix with the oil and prevent the urushi from hardening next time.
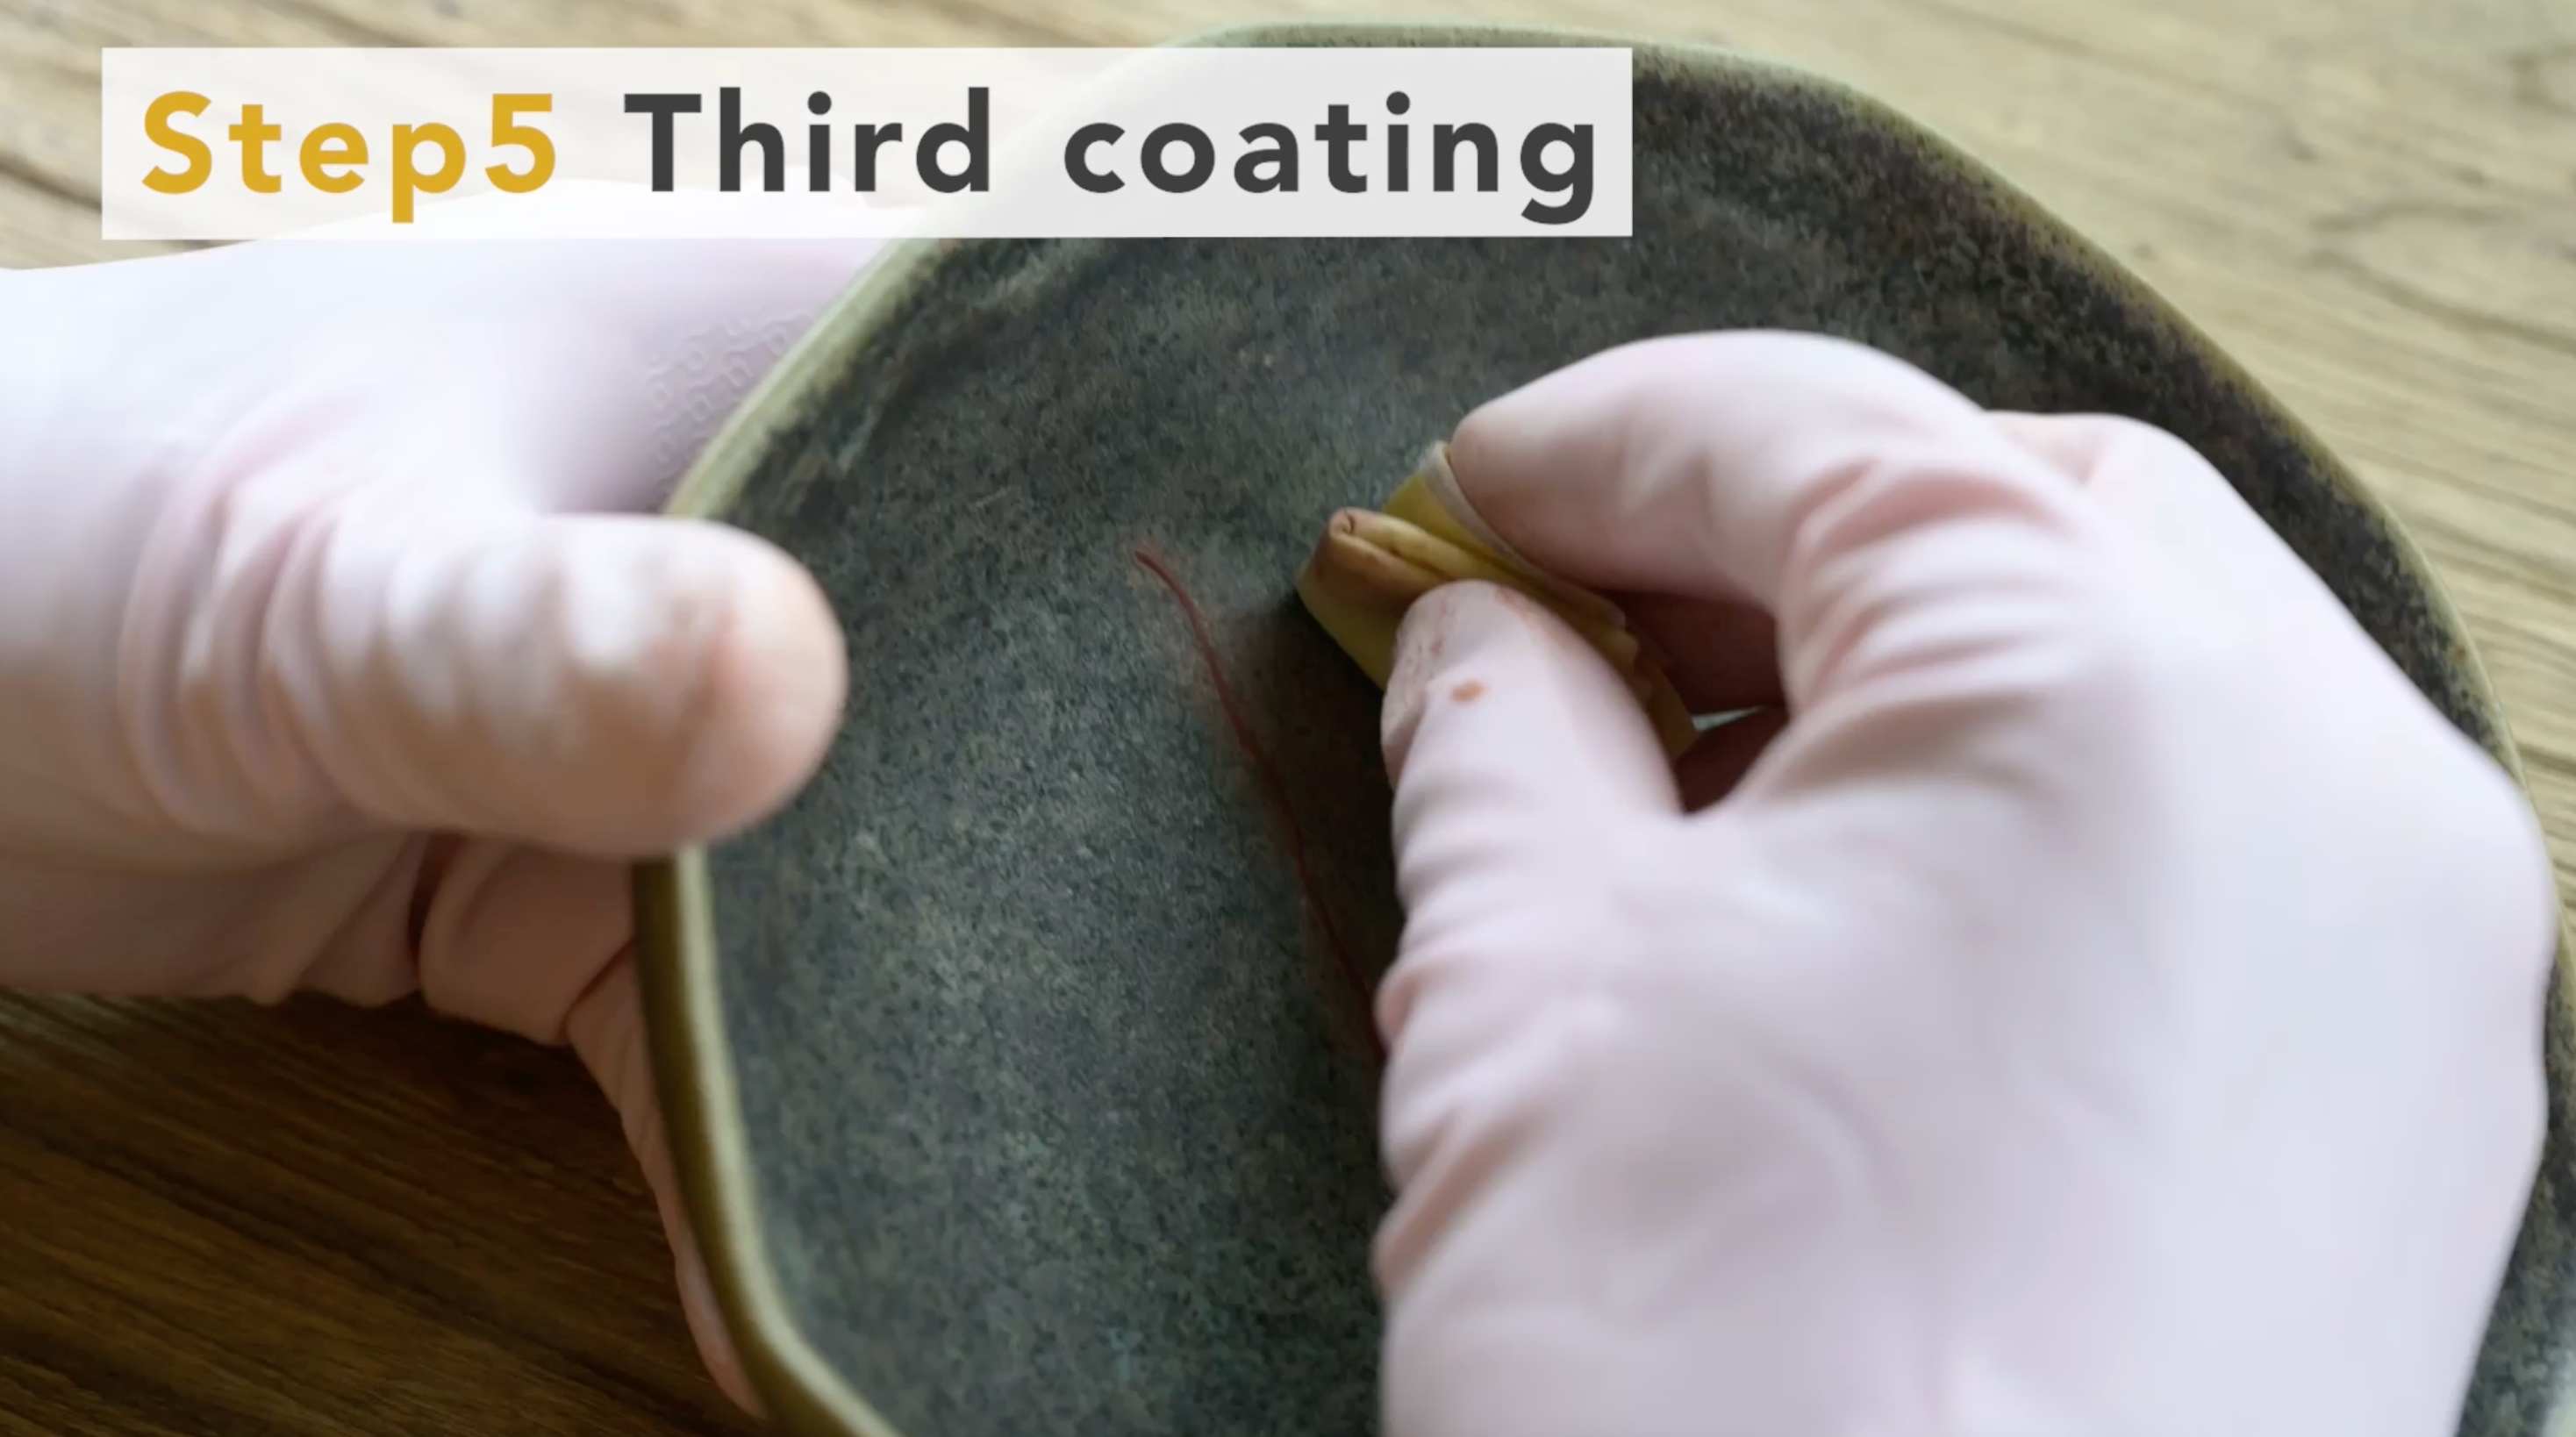
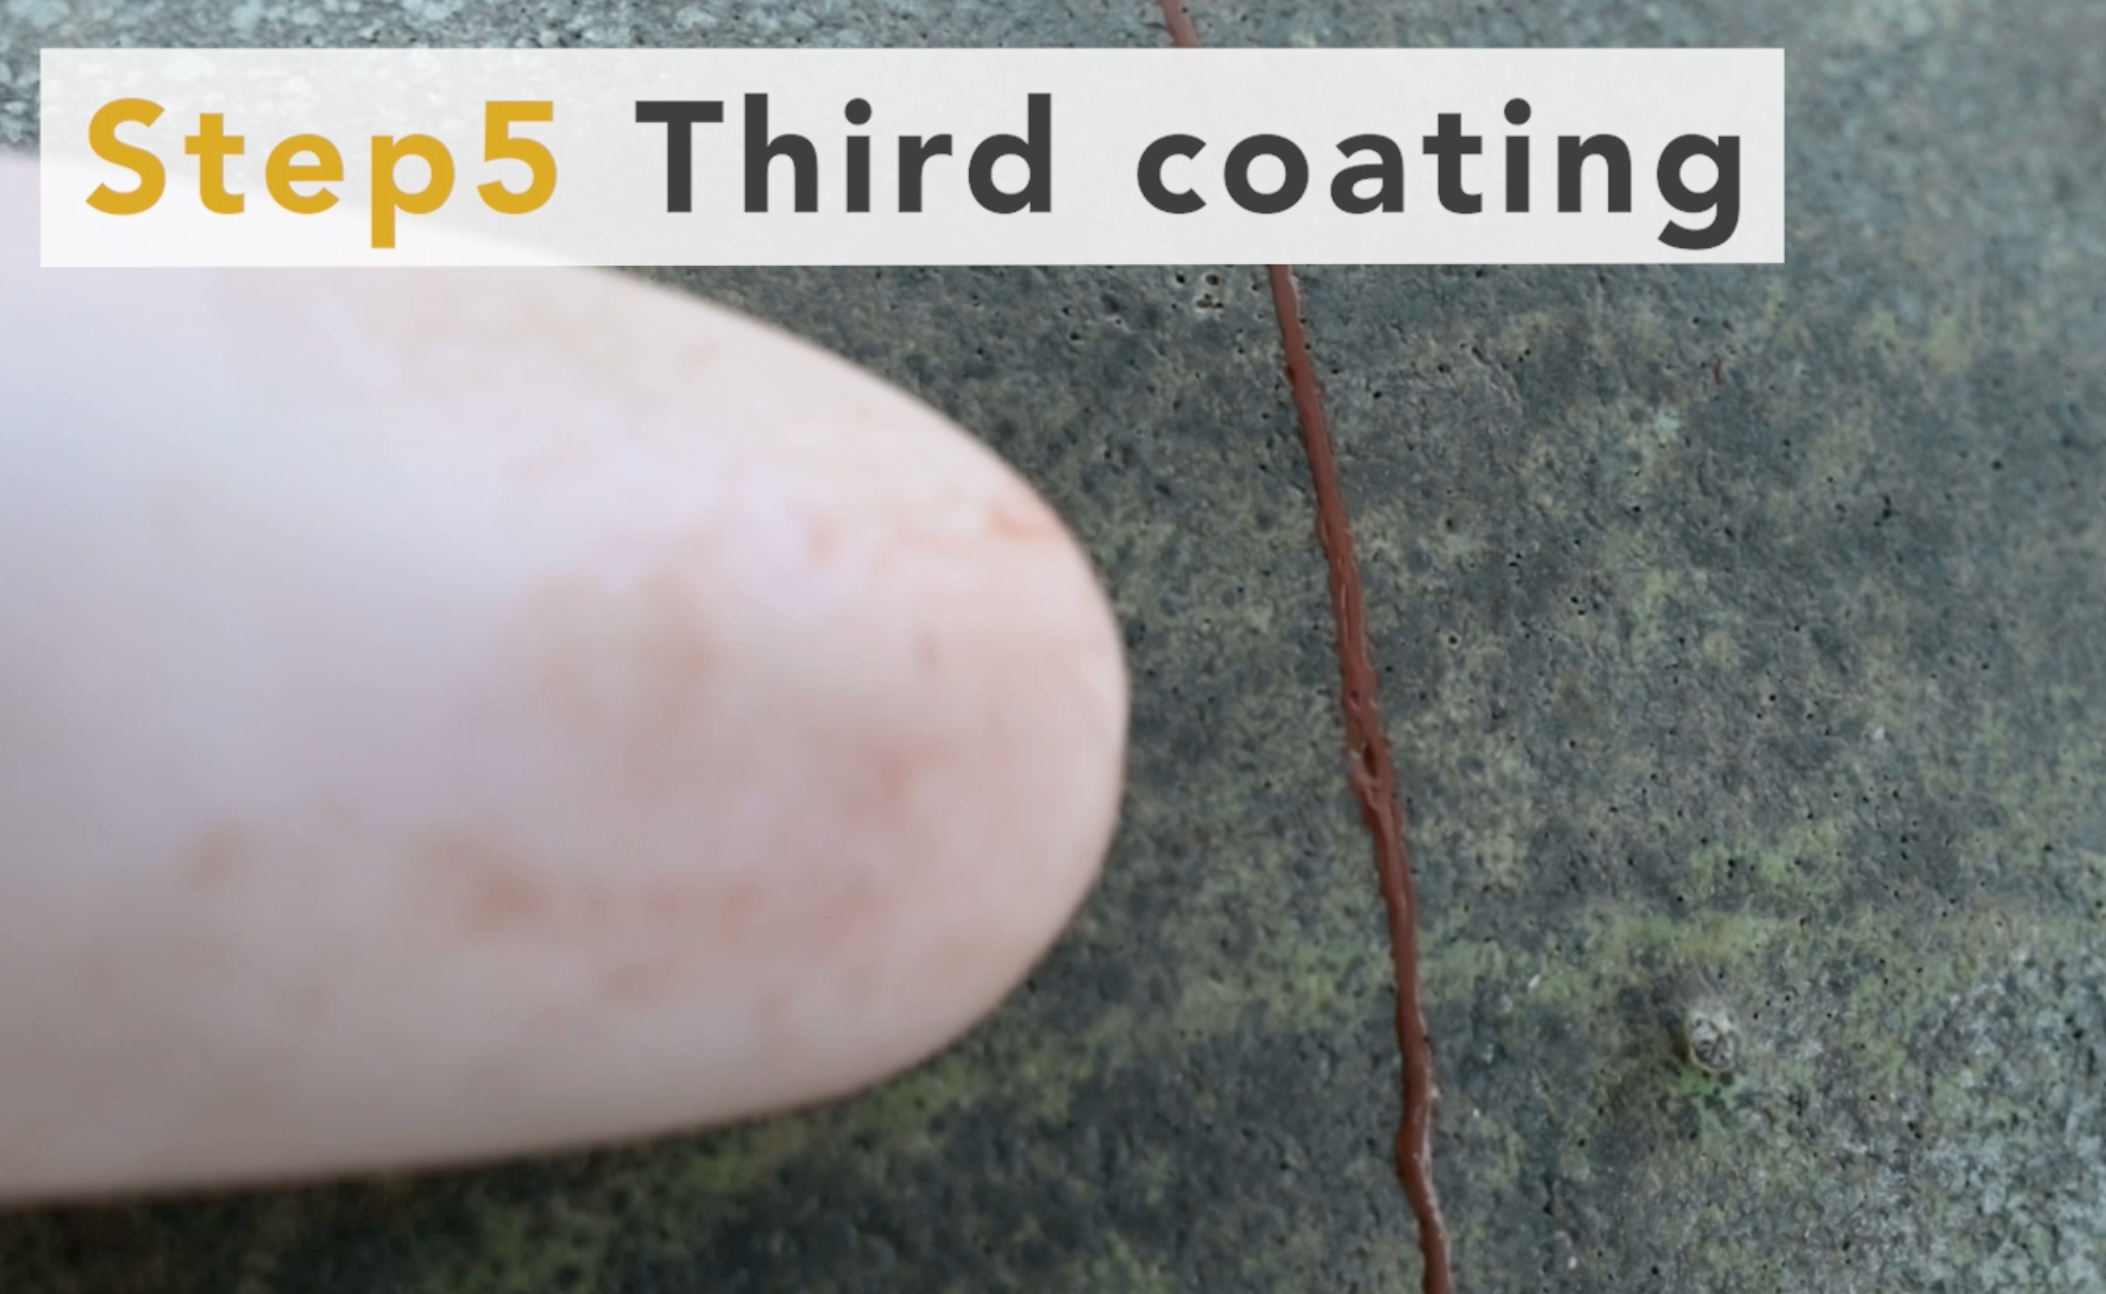
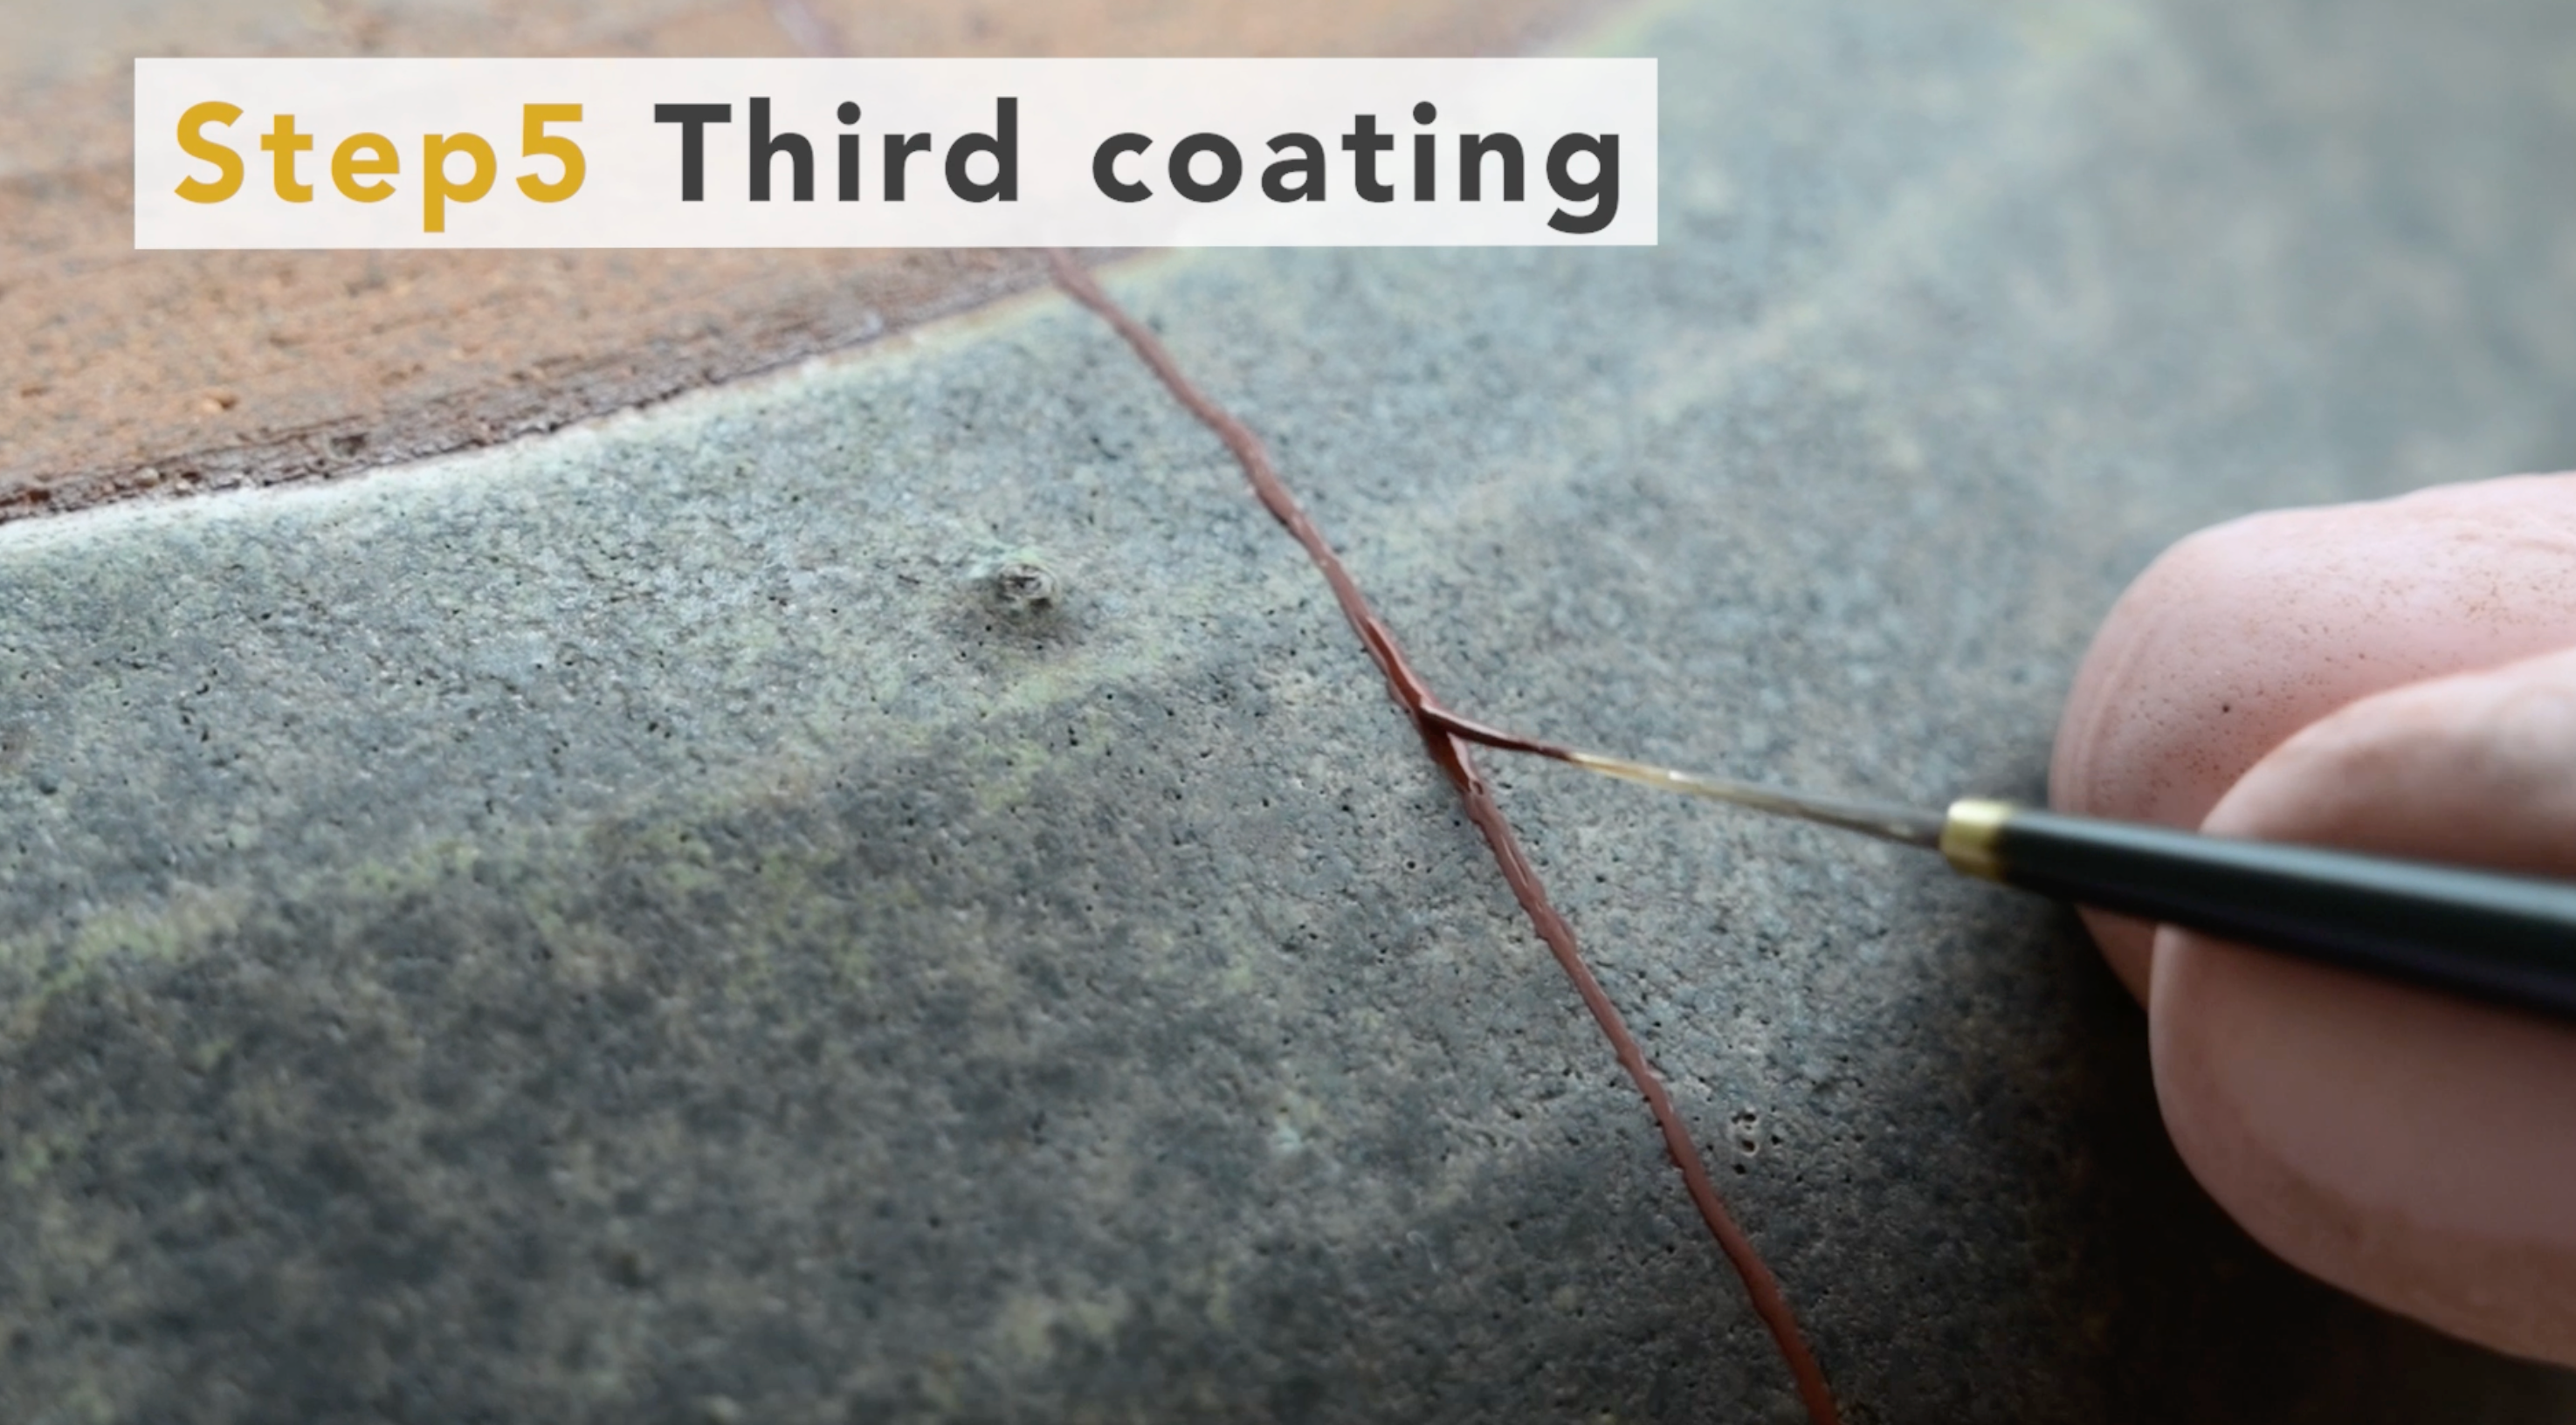
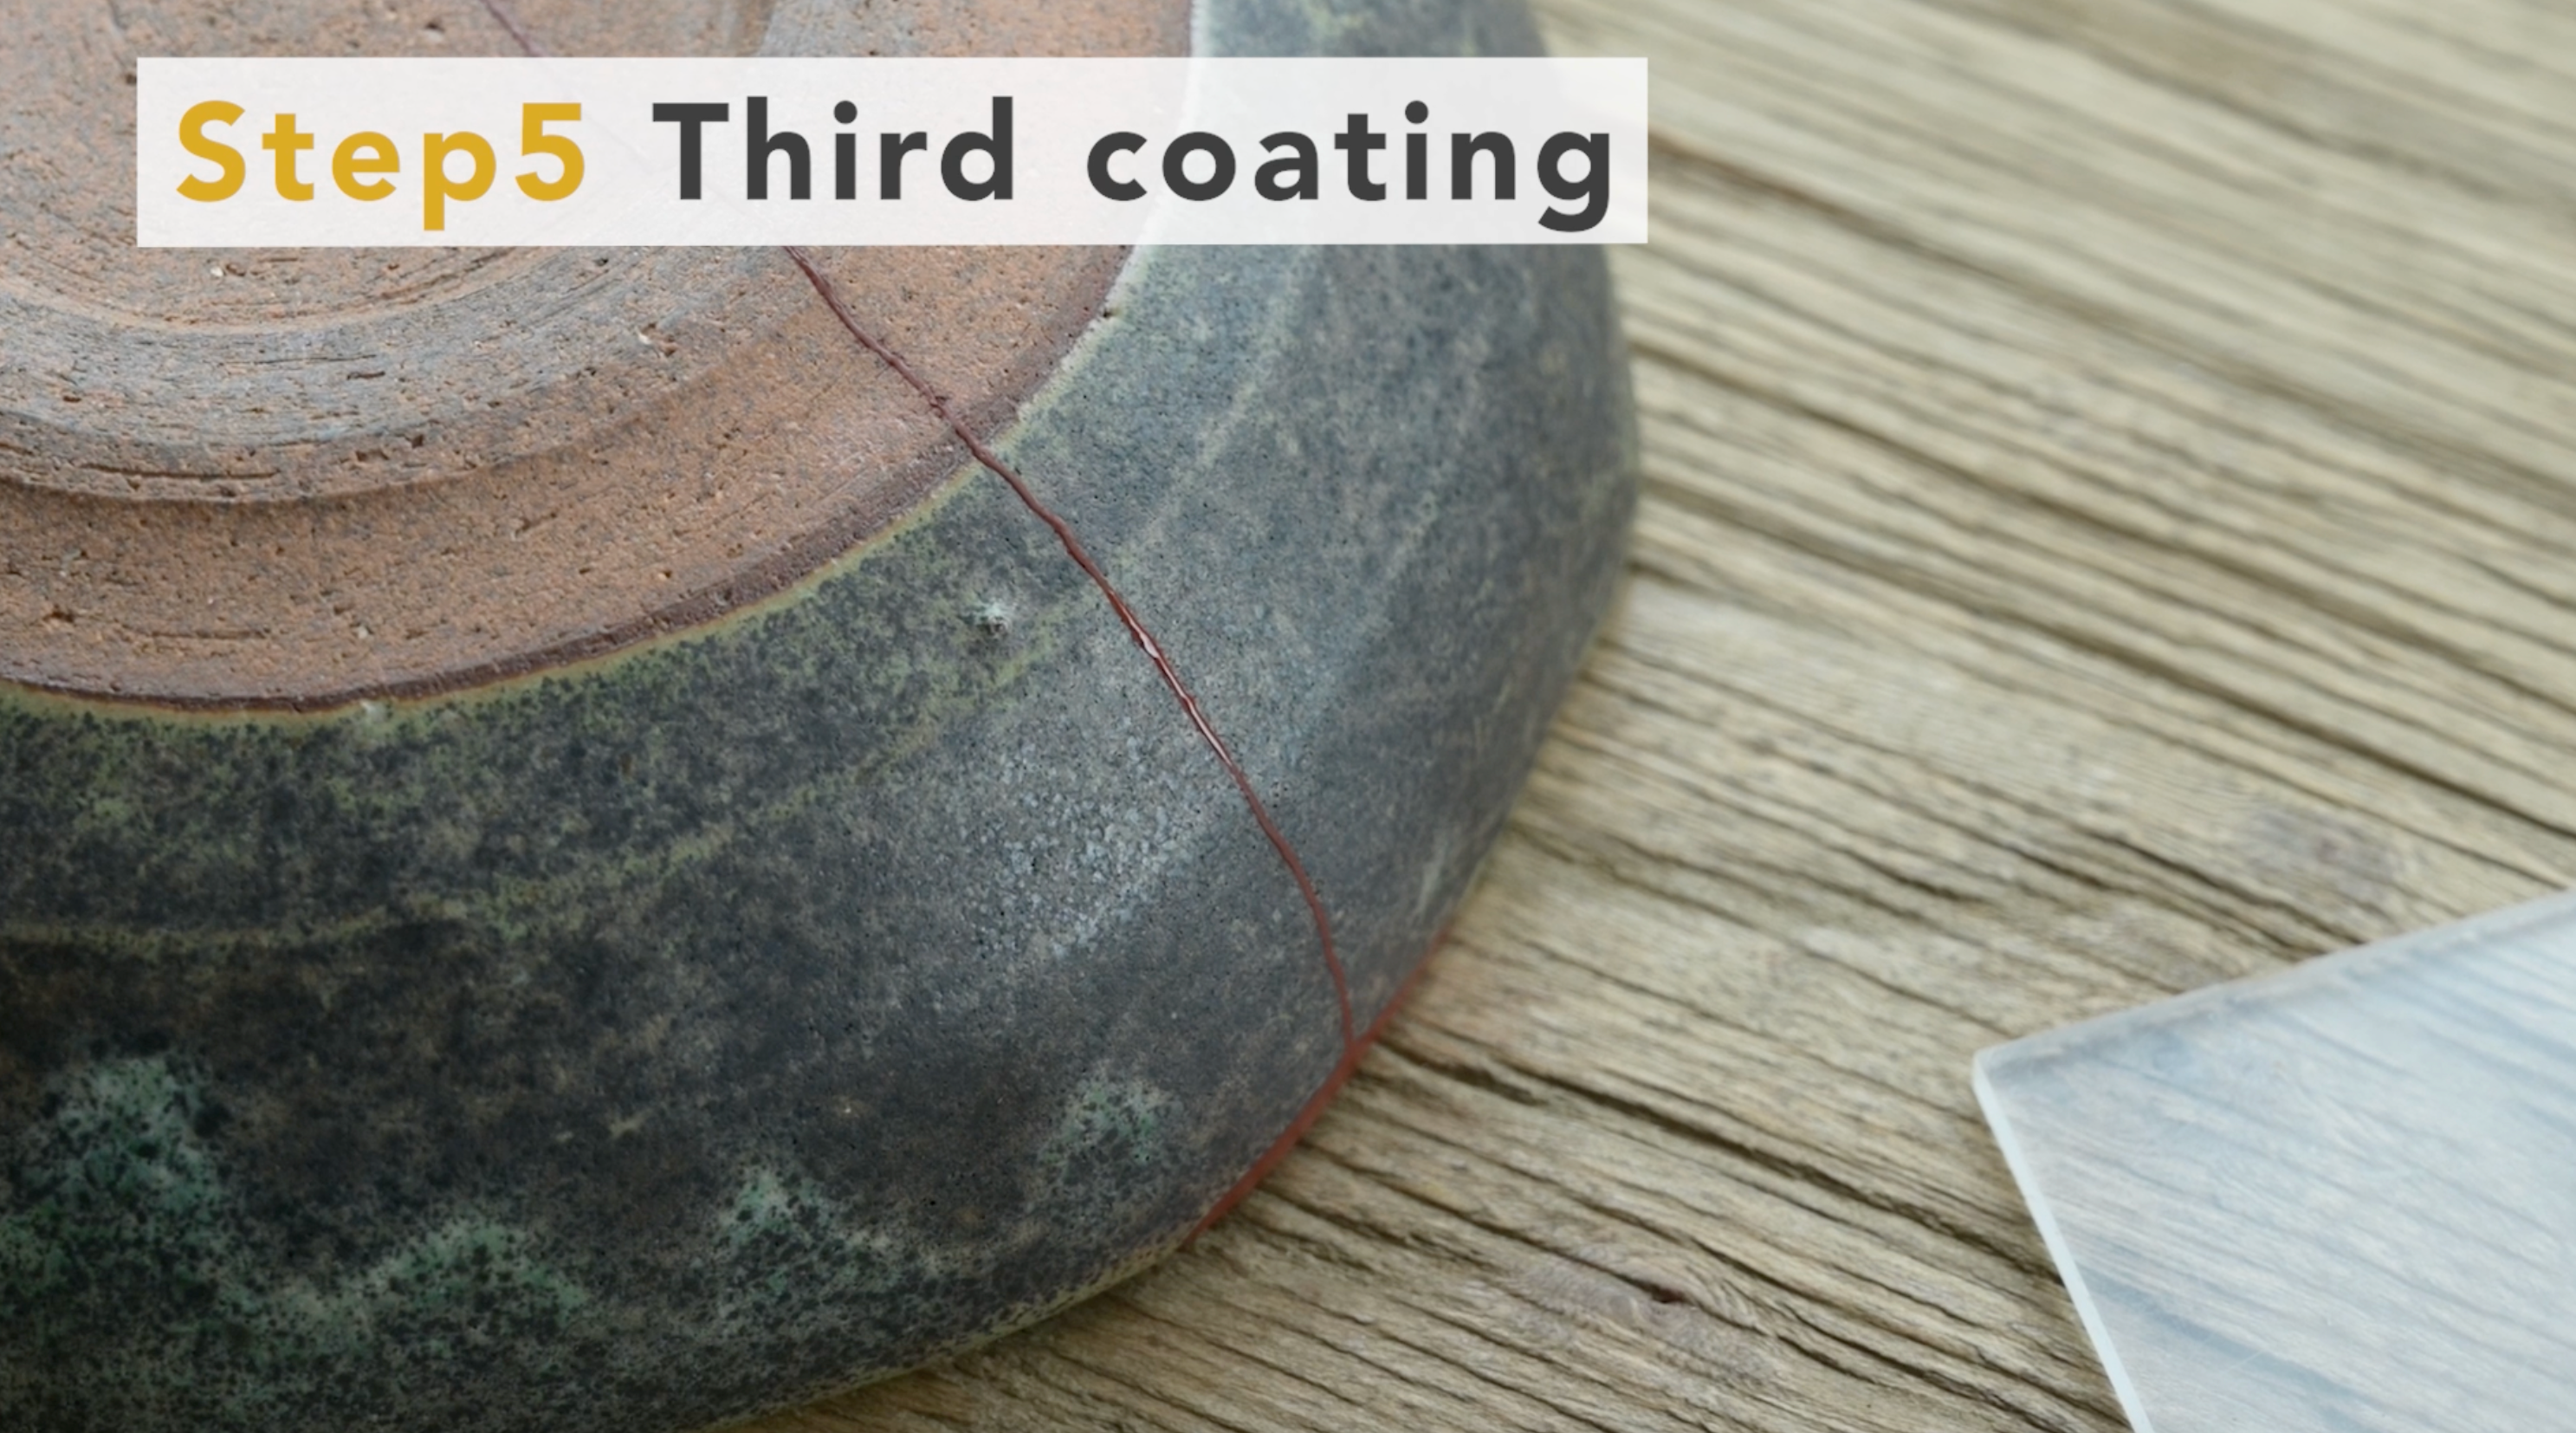
1. Polish the seams with an abrasive sheets
After the bengara urushi dries, polish the seams using soft abrasive sheets.
The polishing sheet is soft and fine-grained, so it will not scratch the glaze even if it is polished directly.
However, the gilding and painting may come off, so protect it with masking tape beforehand.
When the seams are flat enough that you can run your finger over them and not feel any bumps, wipe with ethanol.
2. Coating with bengara urushi
Two coats were applied, but there is still a slight groove.
Apply another coat to fill this in.
- Tips
- In this procedure, the coating process has been applied 3 times, but basically the coating process is repeated until the seams are flat. Conversely, if the work is finished beautifully at the point of the first coat, the 2nd, 3rd coat may not be applied.
Wipe the brush tip thoroughly with ethanol first before use.
It is recommended that the entire area be reapplied, not just the grooved areas.
This is because there may be fine grooves that are not visible to the eye.
For visible grooves, apply a slightly thicker coat to fill them in.
3. Wait few days to harden
When you have finished coating, leave it in the humid room and wait for a few days.
Also, keep the temperature around 25°C and the humidity around 70% because it will not harden if the temperature and humidity is too low.
On the other hand, too high a humidity of 80% or more is not good, as it may cause wrinkles when the urushi hardens.
- note
- One method is to place wet towels in cardboard boxes to maintain the right humidity for storage.
- The temperature should also be kept from getting cold by using air conditioning.
- In particular, urushi may not harden properly if the temperature falls below 20 degrees Celsius, so be careful to control both temperature and humidity after working on this and subsequent steps.
How to wash brushes
Wash brushes after use with vegetable oil such as rapeseed oil.
Dip the brush into the oil that has been put out on the acrylic plate and wipe it off with a tissue.
Repeat this process until there is almost no color on the tissue.
Finally, put the cap on and store the brush with a little oil remaining on it.
Otherwise, the brush tip may harden.
Finally, completely wipe off any oil remaining on the acrylic plate with ethanol.
If even a small amount of oil is left, it may mix with the oil and prevent the urushi from hardening next time.
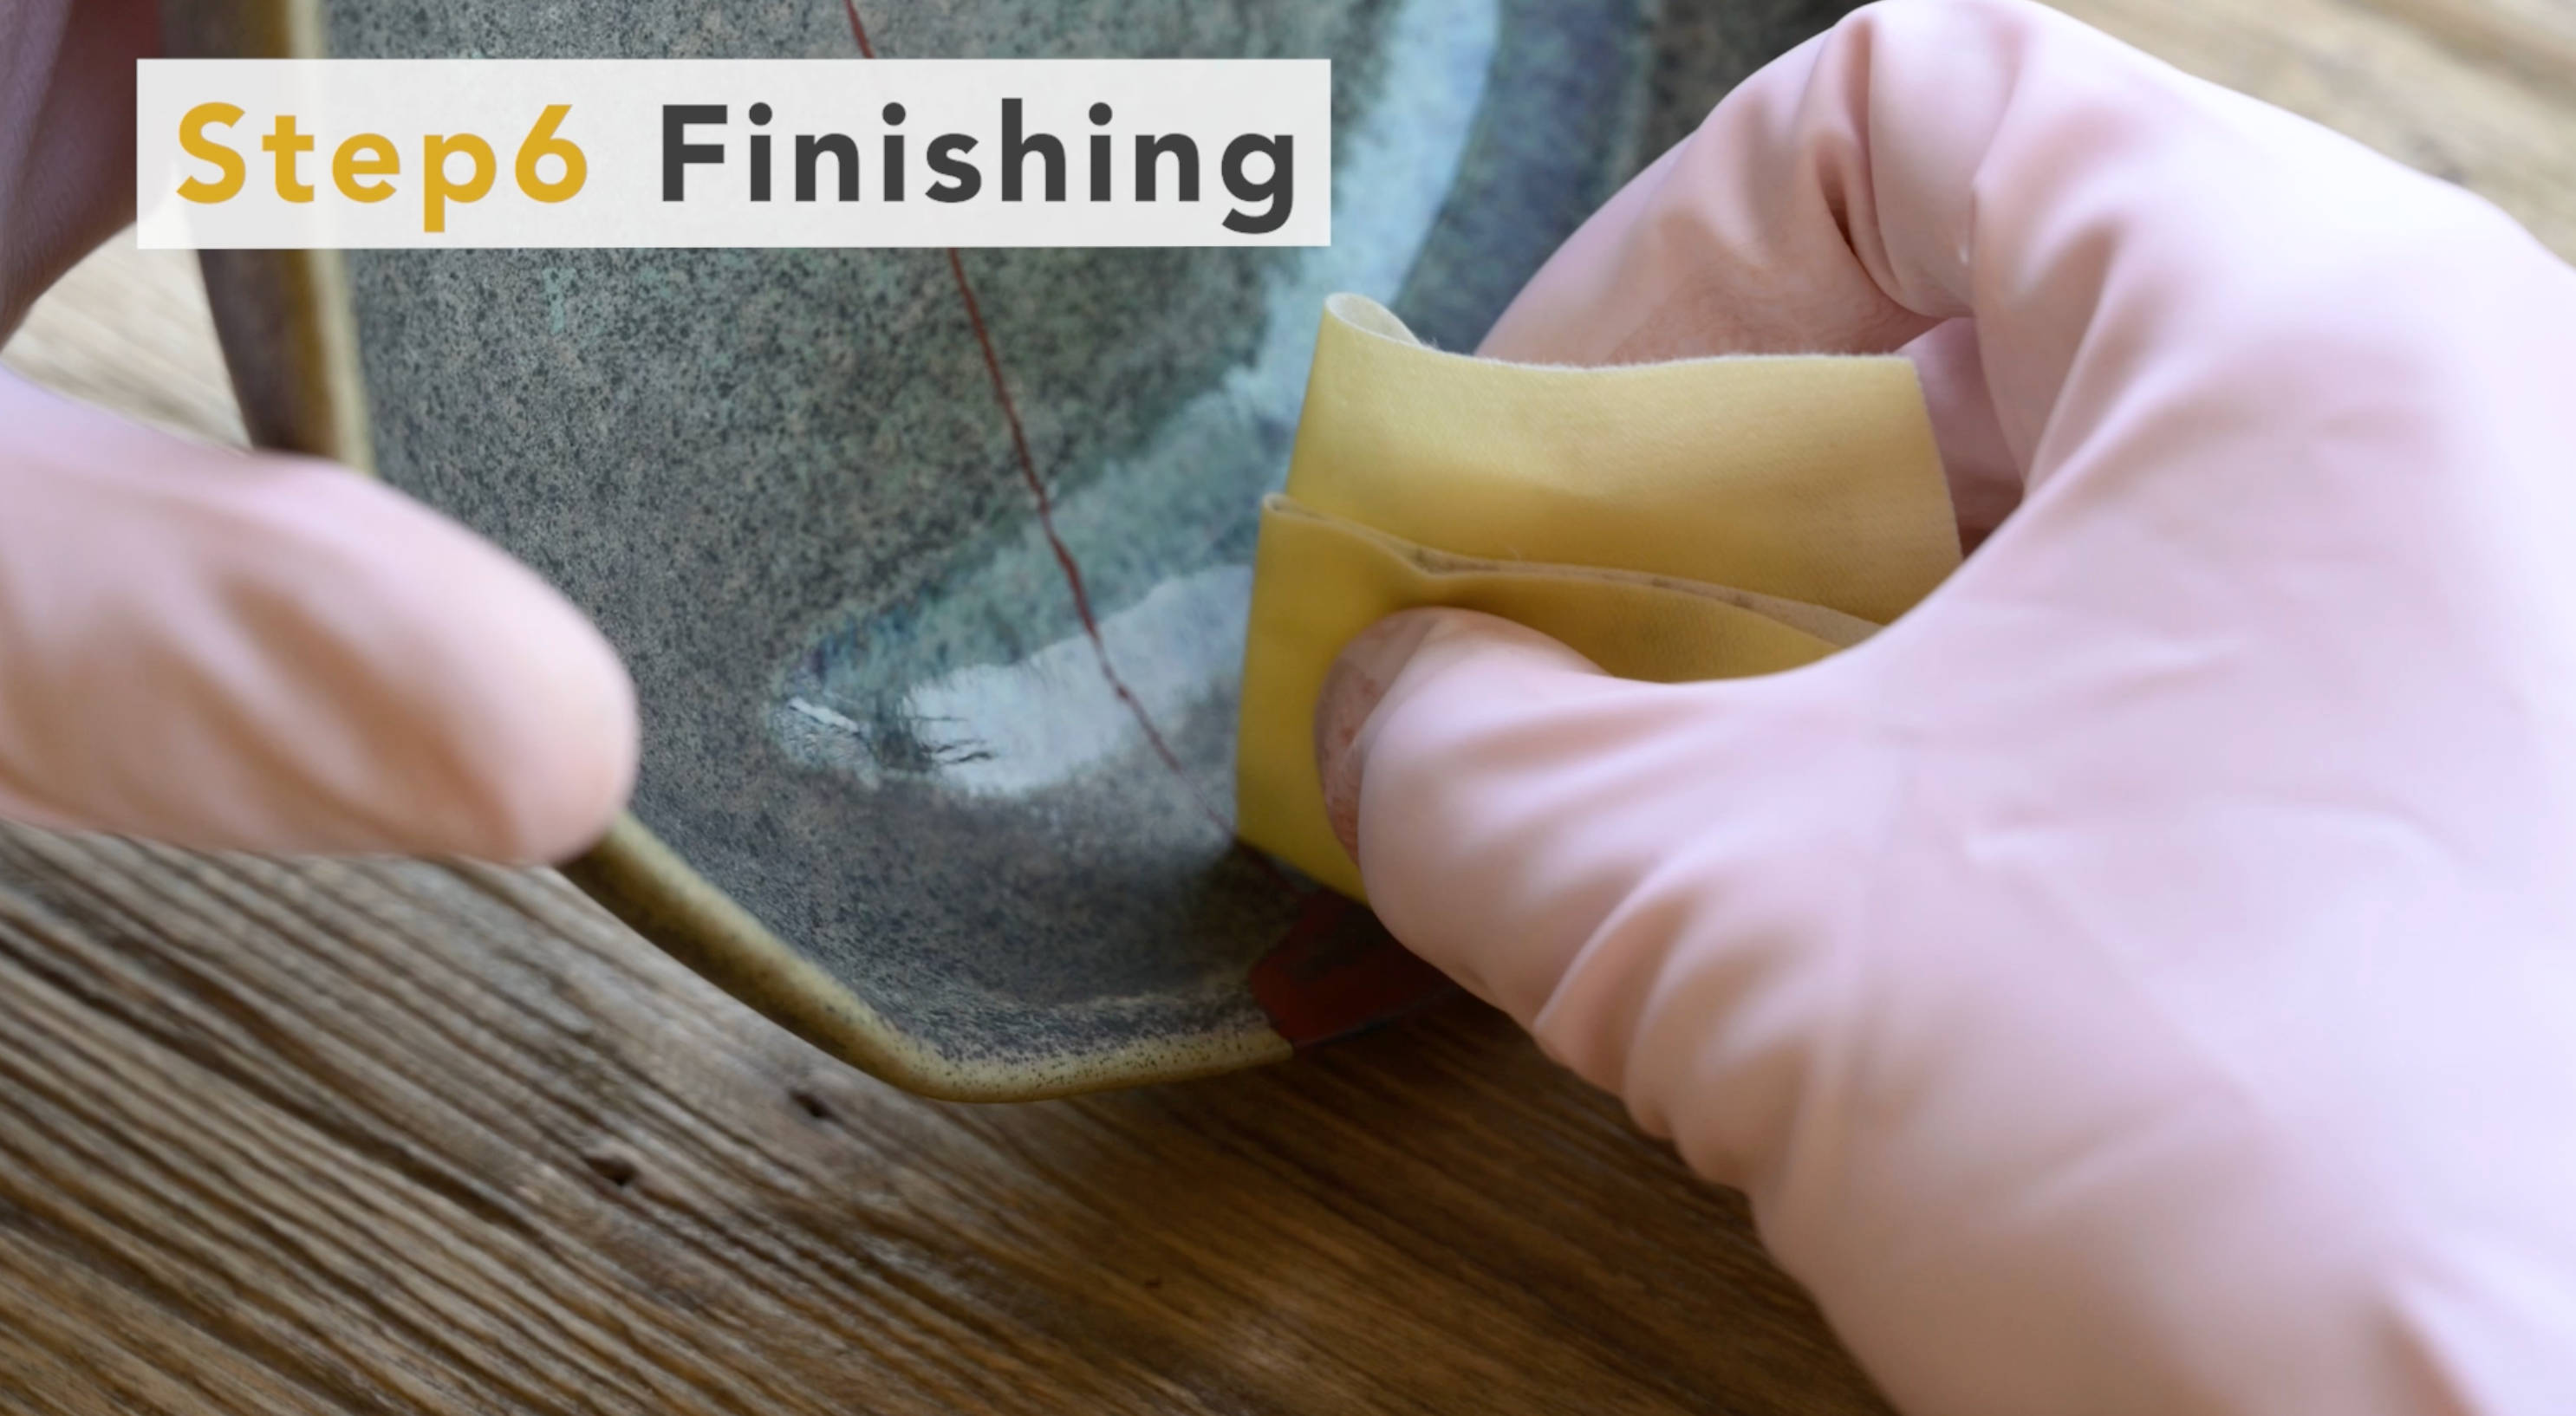
1. Polish the seams with an abrasive sheet
After the 3rd coat of bengara urushi dries, polish the seams using an abrasive sheet.
The polishing sheet is soft and fine-grained, so it will not scratch the glaze even if it is polished directly.
However, the painting may come off, so protect it with masking tape beforehand.
When the seams are flat enough that you can run your finger over them and not feel any bumps, wipe the whole thing down with ethanol.
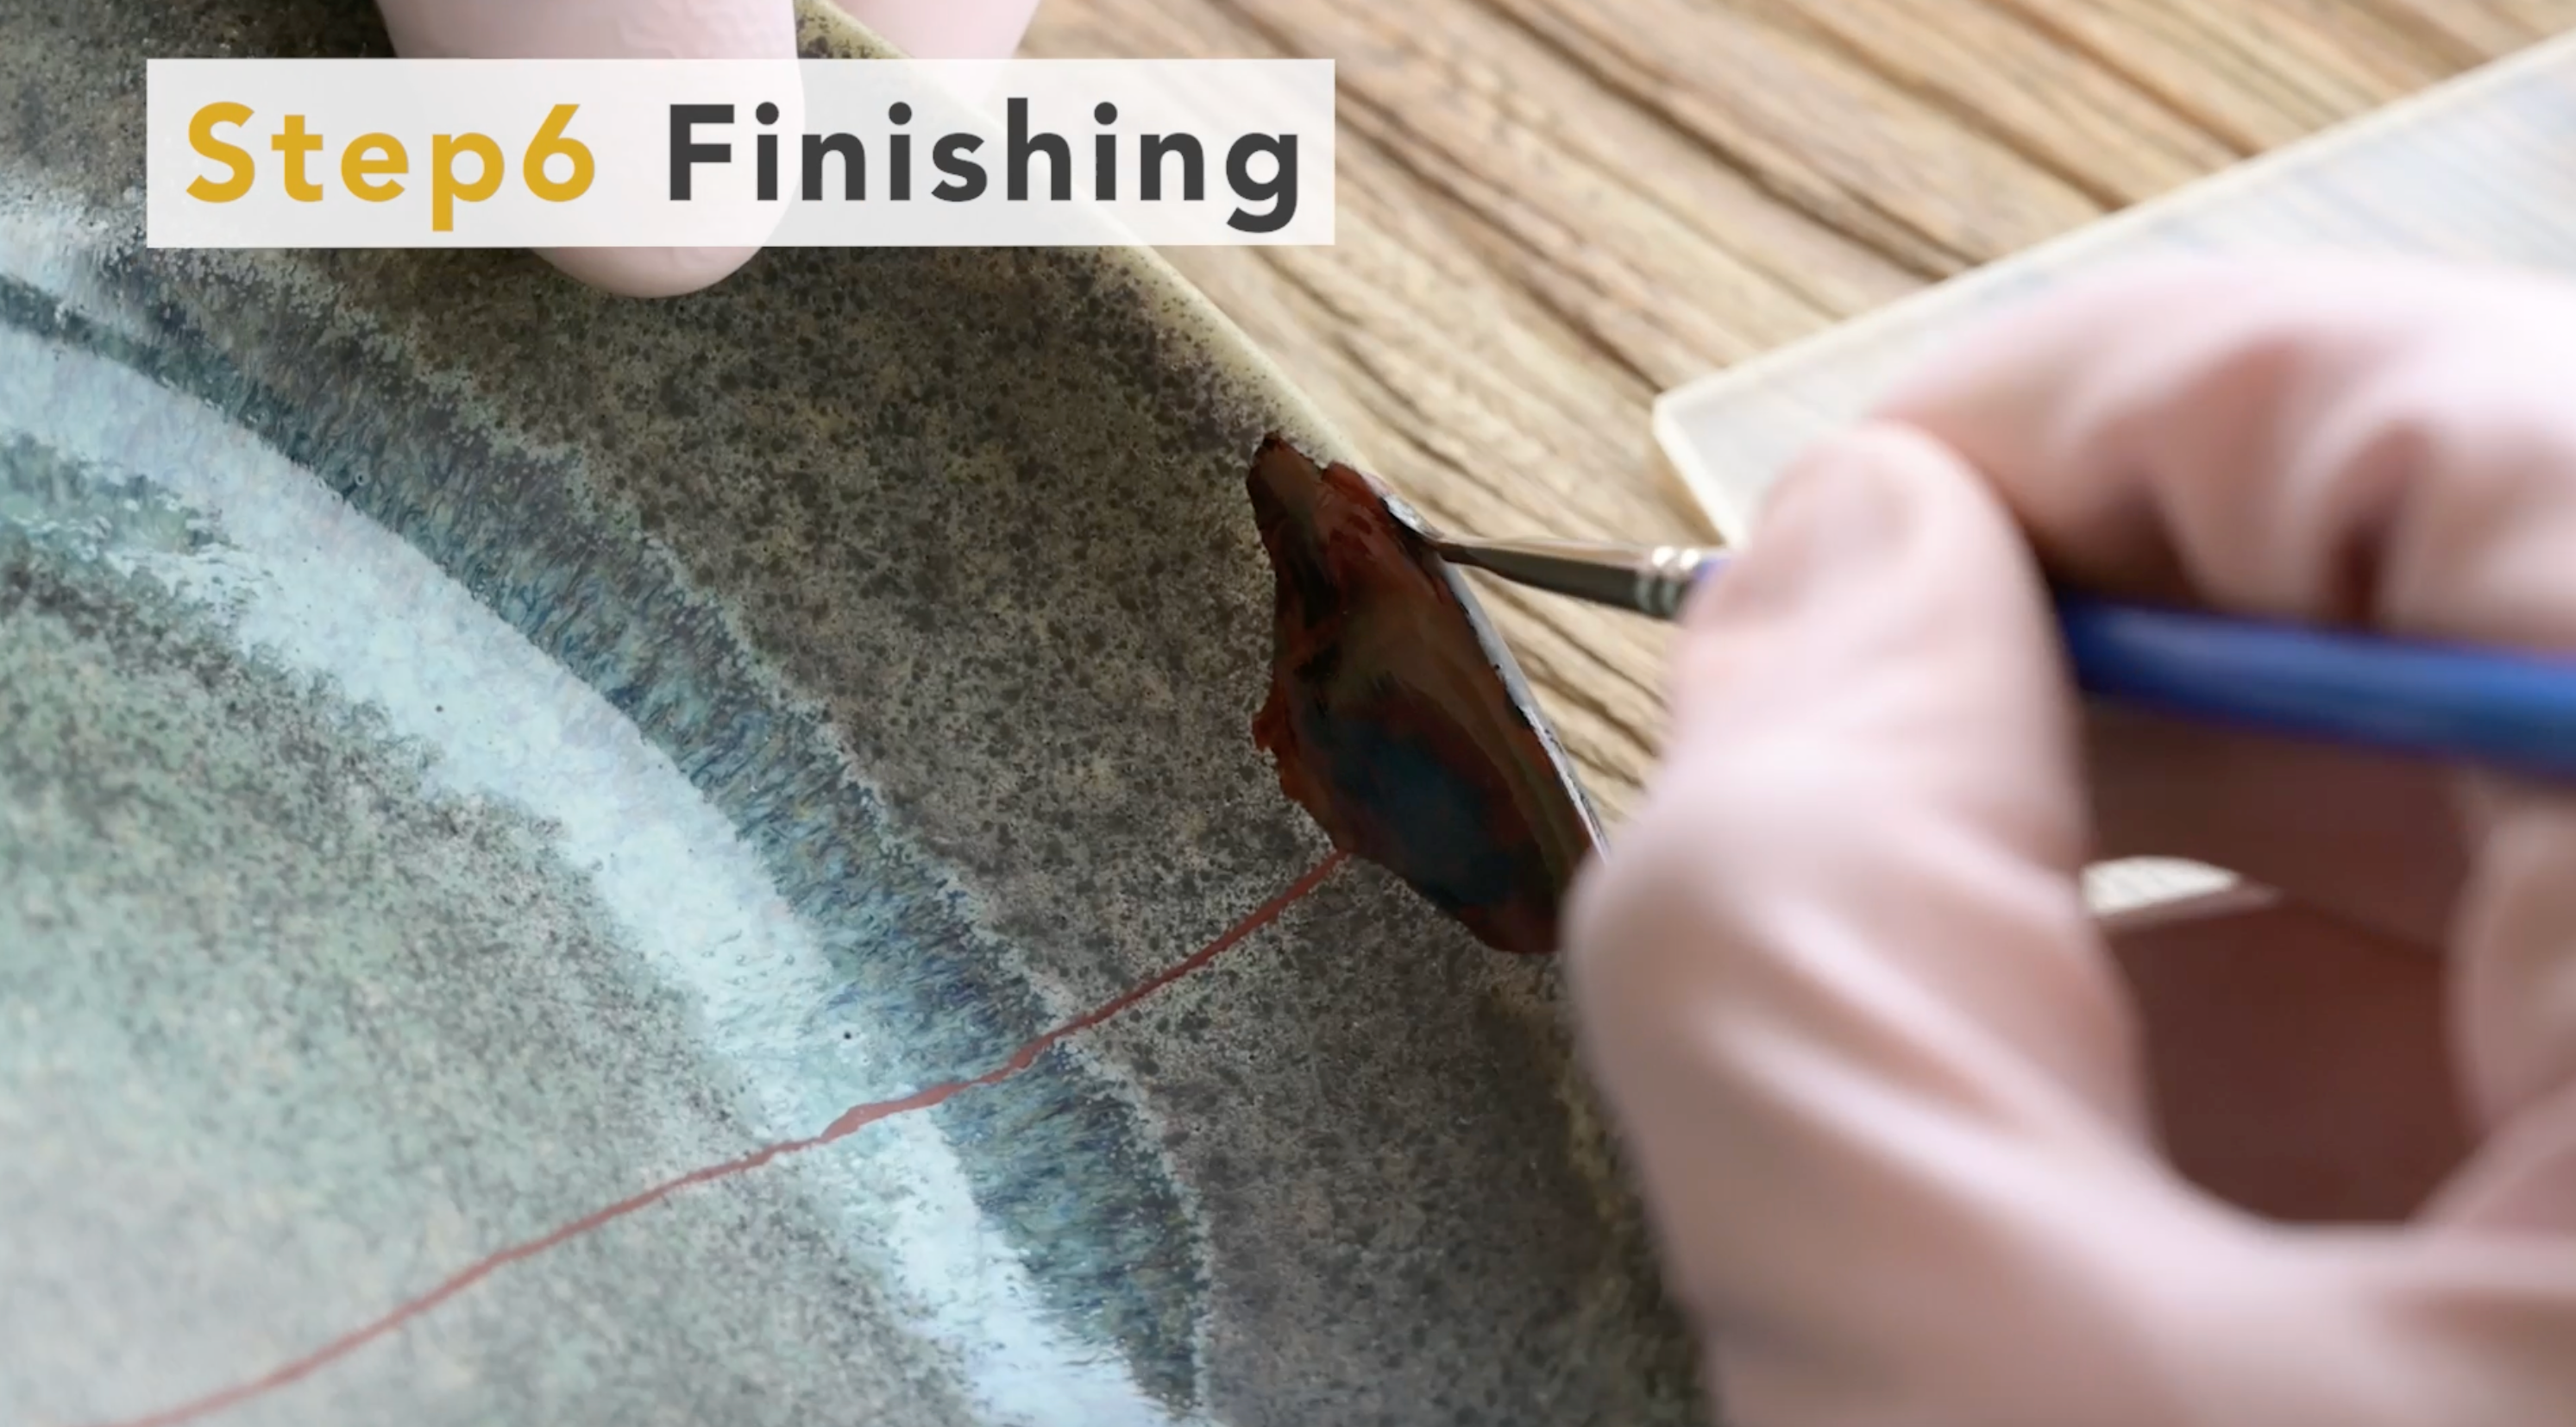
2. Apply a thin coat of Black urushi
Once the seams are in place, it is time to prepare for applying silver powder.
First, a "thin" layer of black urushi is applied to the seams.
Be careful not to apply it too thickly, otherwise the silver powder will sink into the black urushi.
- Tips for applying thin coat
- Put a little black urushi on the brush tip.
- Move the brush slowly.
- Do not add more black urushi until the black urushi becomes faint.
If you add black urushi to the tip frequently, it will be applied too thickly.
3. Apply silver powder on the seams
After applying black urushi, apply silver powder.
In the basic tutorial, we used cotton from the beginning, but this time we will use ashirai brush first.
First, add a lot of powder to the tip of the brush.
Then lightly tap the brush to drop the powder around the seam.
Apply powder to the seam while brushing off the surrounding powder with a brush.
Be careful not to touch urushi with a brush.
The only thing that touches black urushi is the powder moved by the brush.
Once the area has been powdered, it is safe for the brush to touch it.
Even then, the brush should be laid down slightly to gently touch the seam.
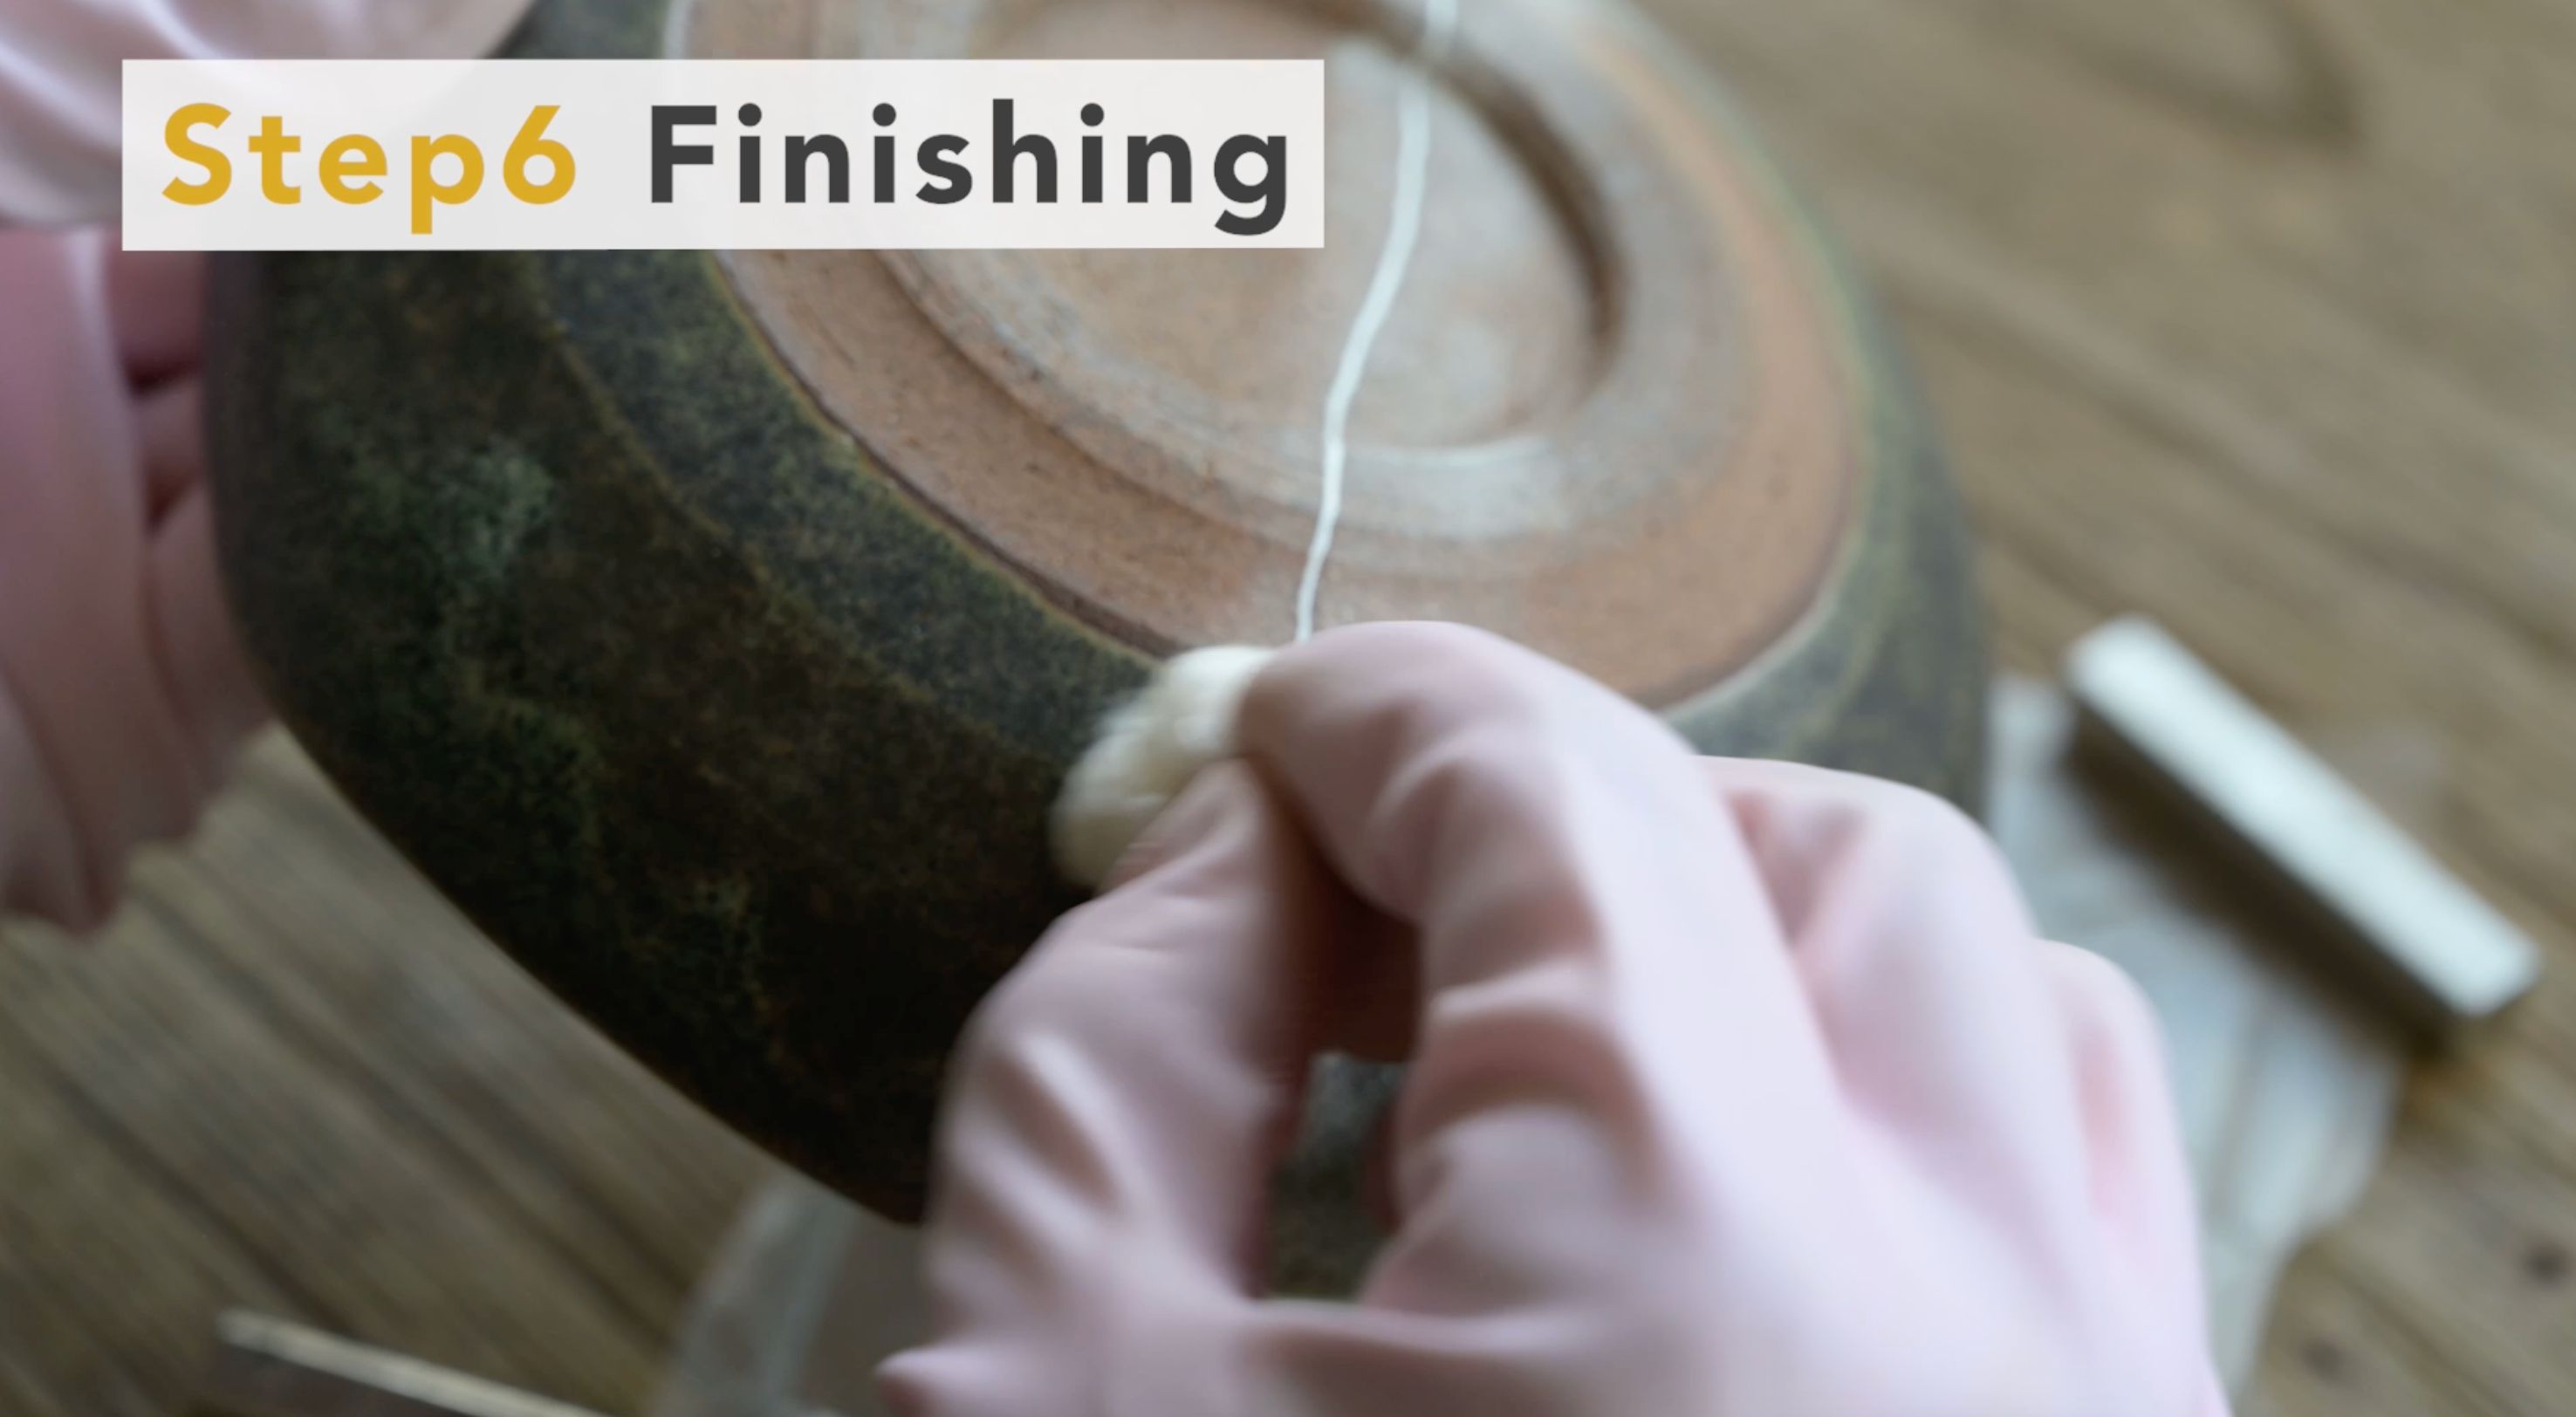
Once the entire area is covered with powder, the next step is to finish with cotton.
Put generous amount of silver powder on a cotton ball and move the cotton ball in small circles over the seams.
This will give it more luster.
- Tips
- Be careful that the cotton itself does not touch urushi.
- Ideally, only the silver powder on the cotton should touch the urushi.
- The key is to apply gently and with as little force as possible.
4. Wait about a week to harden
When you have finished applying, leave it in the humid room and wait for a few days.
Also, keep the temperature around 25°C and the humidity around 70% because it will not harden if the temperature and humidity is too low.
On the other hand, too high a humidity of 80% or more is not good, as it may cause wrinkles when the urushi hardens.
- Tips
- When washing the ashirai brush, wipe them down with ethanol, not oil.
- note
- One method is to place wet towels in cardboard boxes to maintain the right humidity for storage.
- The temperature should also be kept from getting cold by using air conditioning.
- In particular, urushi may not harden properly if the temperature falls below 20 degrees Celsius, so be careful to control both temperature and humidity after working on this and subsequent steps.

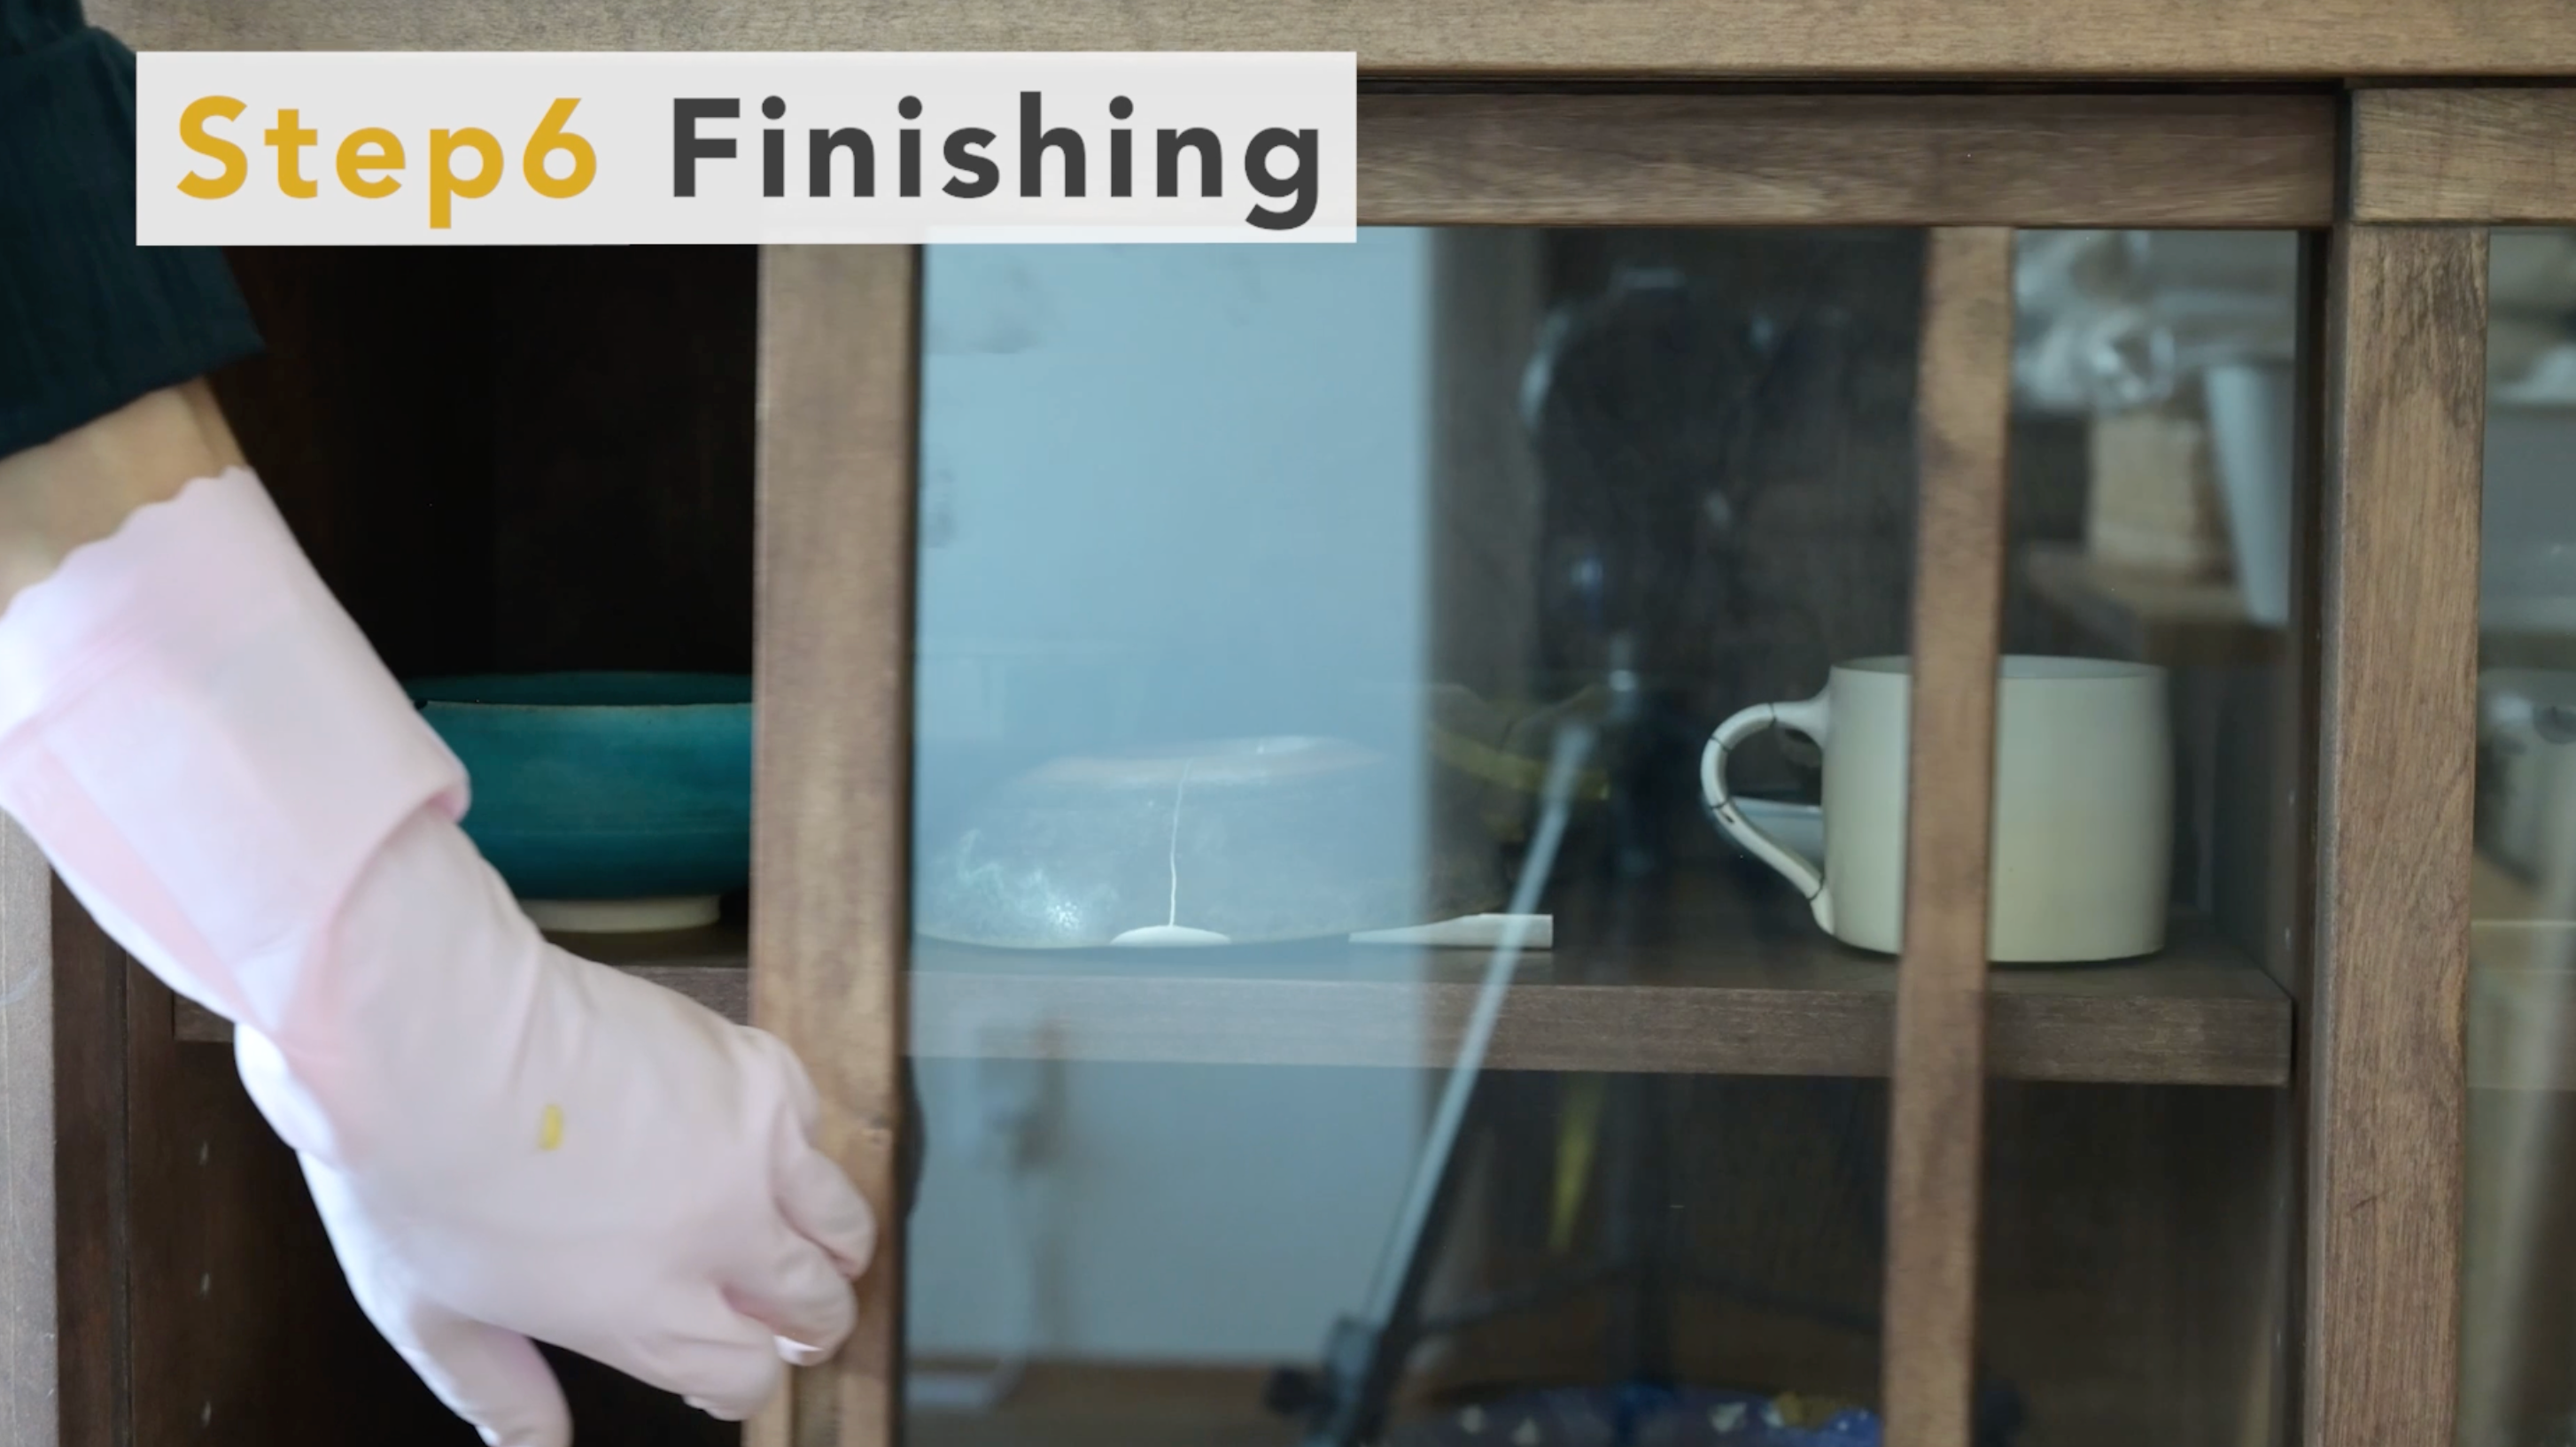
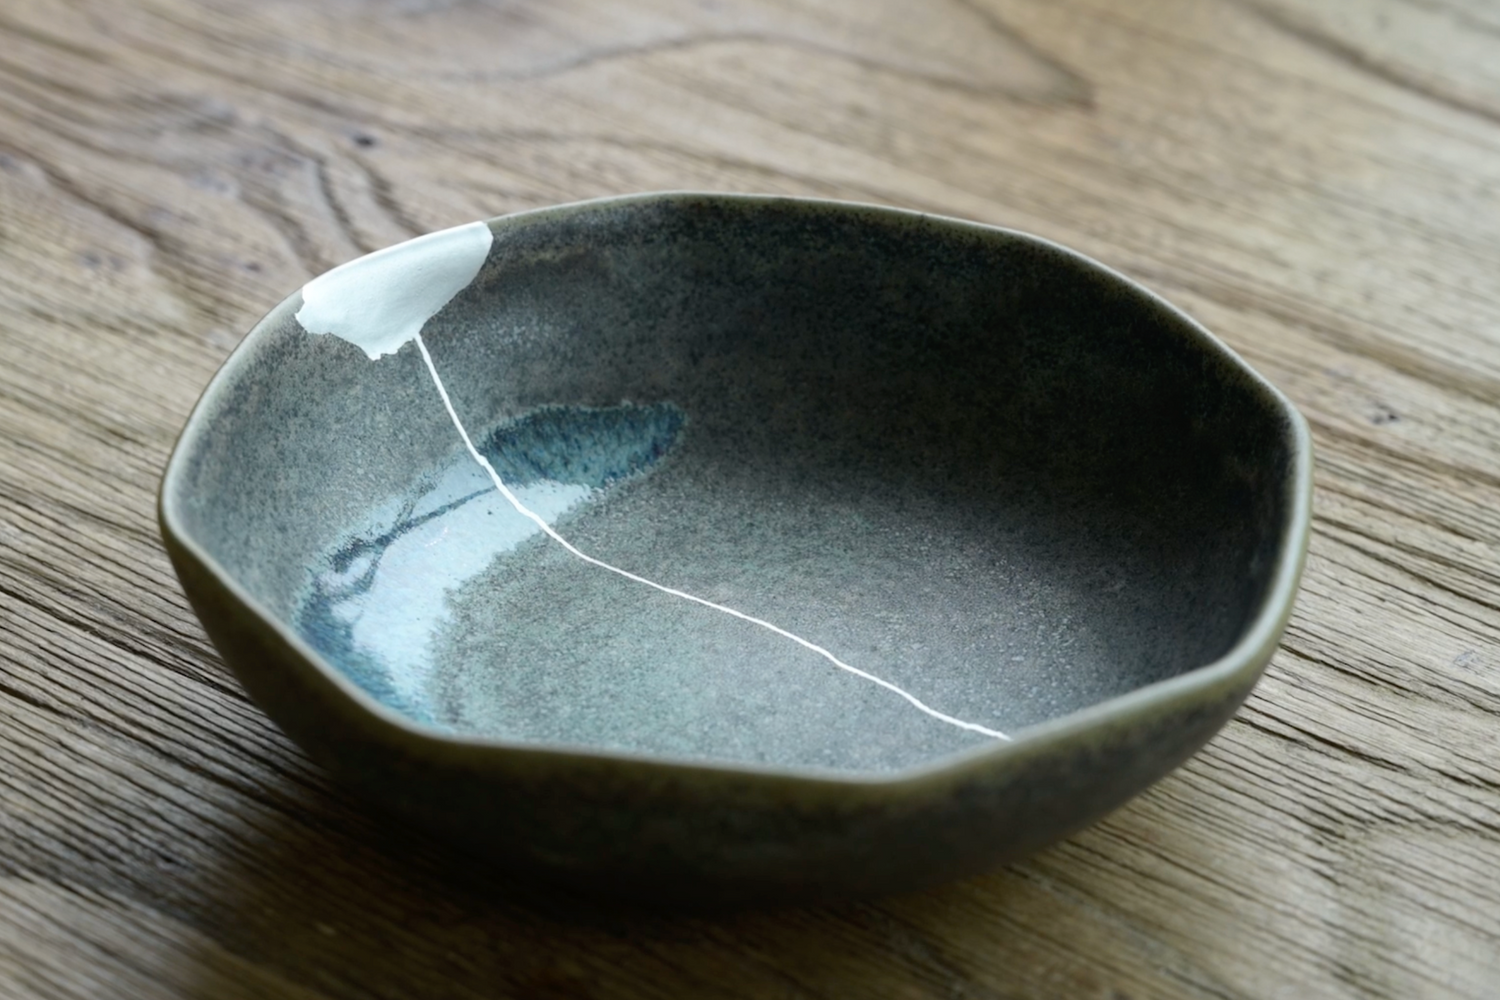
5. Completion
After one to two weeks in the urushi room, the black urushi hardens and the silver powder is fixed to the seams.
Wipe off the surface with a wet wipe to complete the process.
At this time, wipe with water, not ethanol.
Wiping with ethanol may remove even silver powder.
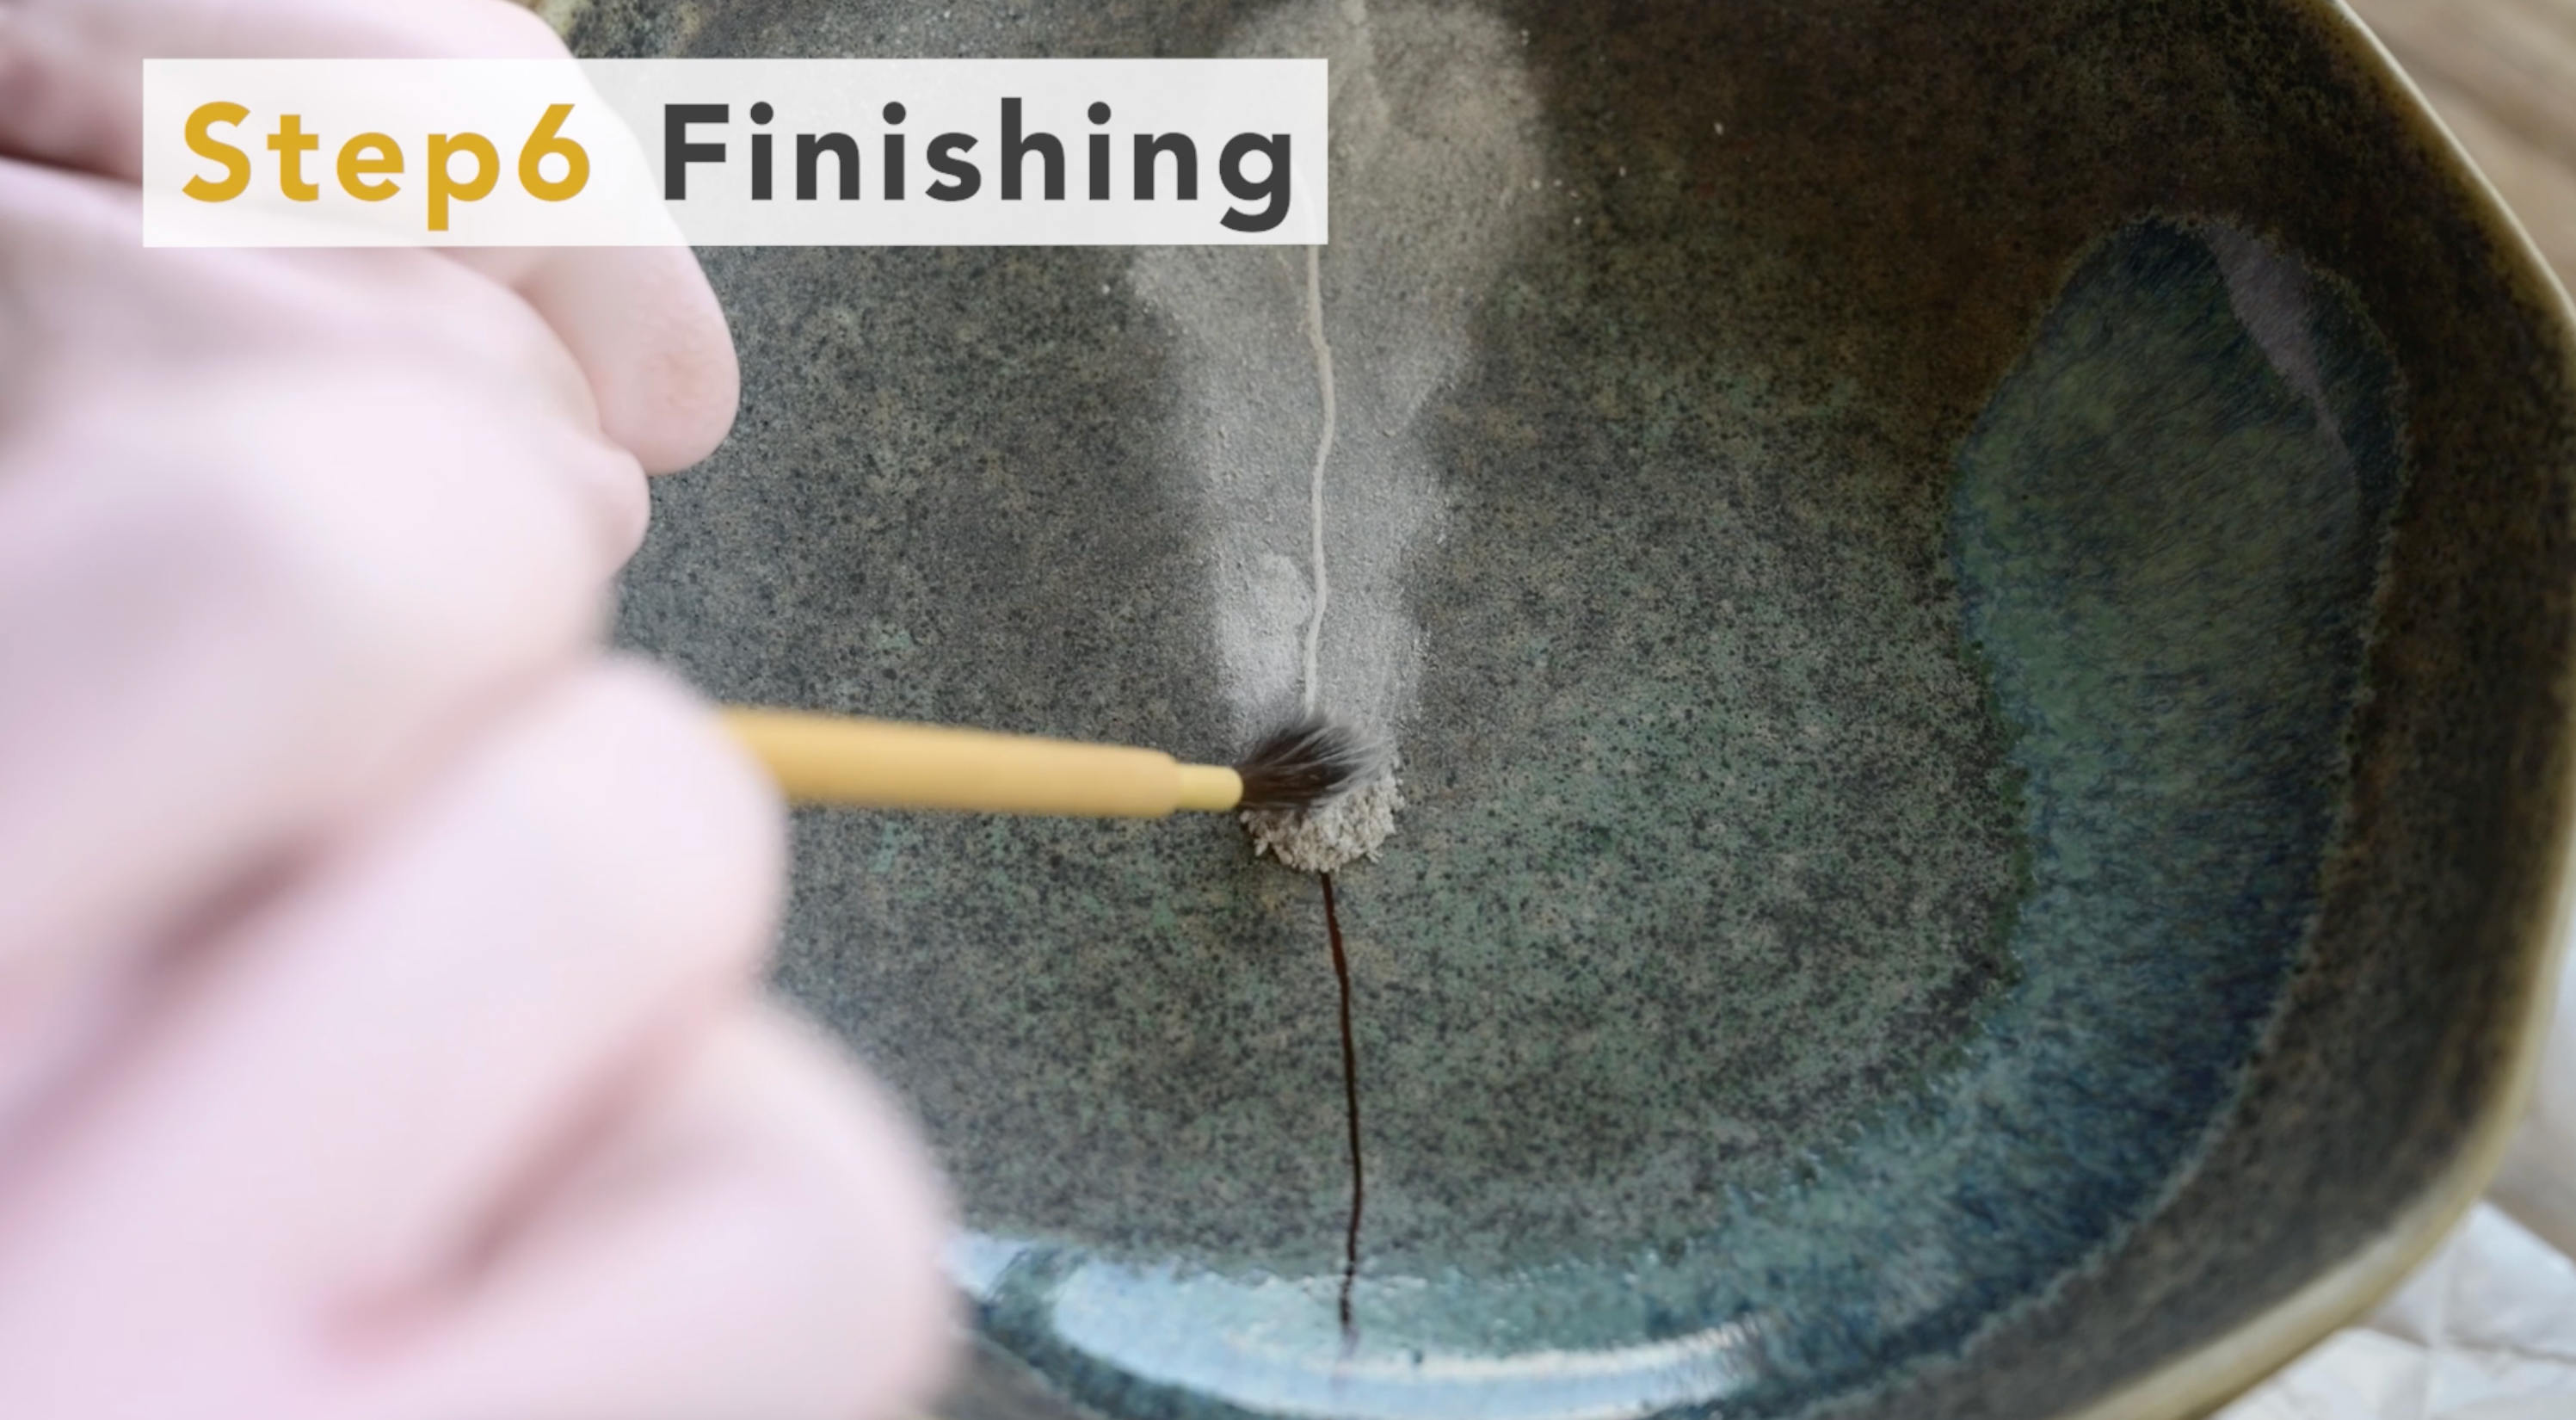
1. Polish the seams with an abrasive sheet
After the 3rd coat of bengara urushi dries, polish the seams using an abrasive sheet.
The polishing sheet is soft and fine-grained, so it will not scratch the glaze even if it is polished directly.
However, the painting may come off, so protect it with masking tape beforehand.
When the seams are flat enough that you can run your finger over them and not feel any bumps, wipe the whole thing down with ethanol.
2. Apply a thin coat of Black urushi
Once the seams are in place, it is time to prepare for applying silver powder.
First, a "thin" layer of black urushi is applied to the seams.
Be careful not to apply it too thickly, otherwise the silver powder will sink into the black urushi.
- Tips for applying thin coat
- Put a little black urushi on the brush tip.
- Move the brush slowly.
- Do not add more black urushi until the black urushi becomes faint.
If you add black urushi to the tip frequently, it will be applied too thickly.
3. Apply silver powder on the seams
After applying black urushi, apply silver powder.
In the basic tutorial, we used cotton from the beginning, but this time we will use ashirai brush first.
First, add a lot of powder to the tip of the brush.
Then lightly tap the brush to drop the powder around the seam.
Apply powder to the seam while brushing off the surrounding powder with a brush.
Be careful not to touch urushi with a brush.
The only thing that touches black urushi is the powder moved by the brush.
Once the area has been powdered, it is safe for the brush to touch it.
Even then, the brush should be laid down slightly to gently touch the seam.
Once the entire area is covered with powder, the next step is to finish with cotton.
Put generous amount of silver powder on a cotton ball and move the cotton ball in small circles over the seams.
This will give it more luster.
- Tips
- Be careful that the cotton itself does not touch urushi.
- Ideally, only the silver powder on the cotton should touch the urushi.
- The key is to apply gently and with as little force as possible.
4. Wait about a week to harden
When you have finished applying, leave it in the humid room and wait for a few days.
Also, keep the temperature around 25°C and the humidity around 70% because it will not harden if the temperature and humidity is too low.
On the other hand, too high a humidity of 80% or more is not good, as it may cause wrinkles when the urushi hardens.
- Tips
- When washing the ashirai brush, wipe them down with ethanol, not oil.
- note
- One method is to place wet towels in cardboard boxes to maintain the right humidity for storage.
- The temperature should also be kept from getting cold by using air conditioning.
- In particular, urushi may not harden properly if the temperature falls below 20 degrees Celsius, so be careful to control both temperature and humidity after working on this and subsequent steps.
5. Completion
After one to two weeks in the urushi room, the black urushi hardens and the silver powder is fixed to the seams.
Wipe off the surface with a wet wipe to complete the process.
At this time, wipe with water, not ethanol.
Wiping with ethanol may remove even silver powder.
Standard Kit
Lesson 05: Gintsugi(Silver Repair)
Leave a comment
All comments are moderated before being published.
This site is protected by reCAPTCHA and the Google Privacy Policy and Terms of Service apply.